
A Curious Guy's Guide to Content Creation
For almost the past 2 years I have been actively doing content creation in some platform (LinkedIn, X & blogsite) ,and thinking of doing it on some other platforms (YouTube, Insta). Through my efforts I have gathered over 20k people who enjoy what I put out.
I was quite confused where to put this, it’s not exactly an AI/ML blog, but these are not my random thoughts or projects either. I have researched and put together this document as a current as well as a future guide for my self and any other curious mind who is trying to get into content. Staying true to my way of writing, this is going to be another long & dense blog. But I can assure you, after it you will have a new found respect for content creation, and hopefully a new desire to do it yourself.
Here is the table of content, I strongly recommened going through them in order. But if you find any topic more interesting than the other, feel free to skip to that one!
- On Reason
- On Platform
- On Content
- On Writing
- On Audio
- On Video
- On Framming
- On Color Grading
- On Fonts
- On SFX
- On VFX
- On Secrets
On Reason
From experience I can assure you content creation is not easy, it is easy to see the outliers where someone from their bedroom with a bad cell phone camera has a million followers. But look past them, it is a journey which tests your own self-worth (because in the end content is extremely transparent about you and if people like your thoughts and ideas).
And this generally is not easy without having a strong reason. I personally believe you can have any of the three following reasons. (Originally inspired by Ali Abdul {paste link} from his video on how to do content creation {paste link})
- Logging (Personal Hobby)
- Hiring (Personal Career)
- Business (Personal Branding)
The above list is in the order of ease, Let’s go through each of them one by one.
I urge people to do content creation, because it does truly change your life. Maybe it is not for you, but I hope to change that by the end of this.
On Platform
{add links to videos by Dan Koe, Hormonzi and the caleb guy whose content video you watched a long time ago}
https://www.youtube.com/watch?v=Ch4Sl0POBhU&t=31s
https://www.youtube.com/watch?v=MVz9mm0Z-7g&t=3s
The unfortunate reality is that each platform has it’s own kind of “major” audience (what I mean by that is, each platform has a mix of people in it. But it still ultimately caters to a specific kind). Now due to the variety of it, I am in way no expert in all of them (And I do lack the credibility beside two platforms too.), and different things work on different platforms and it keeps changing.
But the core idea remains the same. Identify the sub-part of the major audience which your content provides value to.
The whole of this entire blog and in fact for all of content creation can be summed up in two words in my opinion; AUDIENCE & VALUE. You would also obviously be interested into how to monetize it, so I’ll dabble a bit on that and add it here.
X (formerly Twitter)
Audience
X in my opinion is one of the easiest to start with and still one of the hardest to penetrate. The simple reason being that people who spend time here are usually tech people and people in a hurry. They want information as soon as possible. So you have a very short window to provide value to them. Density and Complexity is rewarded here.
Value
From my observation, long threads, long articles, quick witty tweets and links to unknown sources work well. As they provide a lot of information very quickly. People here from my observation are tech focused (AI).
Monetization
- From the platform (Certain criterias, not tough after 6 months of consistency)
- From affiliates & promotions
Audience
This is one of those platform which has a chunk of two kinds of people, business people looking to learn/hire/connect and upskillers.
Value
Talking about business, talking about courses, sharing multiple links in a single post works great. Because people come here with the expectaction to learn in entirety about current trends, additionally sharing novel ideas and knowledge works wonder too. (But that generally works well everywhere)
Monetization
- From affiliates & promotions
- I will say it is much better and easier to get a good job through LinkedIn if you have a good profile.
YouTube
Audience
Talking about Audience in YouTube is not exactly straightforward, because their are all kinds of things people use youtube for. Entertainment, Education, Background noise, COOKING. But in all in all it boils down to, people come here for LONG FORM of entertainment.
Value
Value in YouTube really depends on your audience, but the structure of most videos in my opinion is the same. At the end of the video the audience feels like either they had fun or they learnt something. And as long as you can do that, it will work out well!
Monetization
- From the platform (Probably the best)
- From affiliates & promotions
Audience
The funny thing about Instagram is, everyone is equal to the platform. (which is kind of the case for most platforms now) anyone can get viral. It really does not matter if you have a million followers or not.
So it is important to understand the secret to “virality”, which is essentially high quality cinematic content. Unless you are genius with a very unique taste and content. The cheatcode is to make beautiful content. In youtube mediocre quality with great content works, not with instagram.
Value
Value in instagram is a dopamine rush, make them laugh, make them cry, make them happy, make them feel smart. Understand what emotion you are targetting and fulfil that.
Monetization
- I do not think the platform pays (will need to check)
- From affiliates & promotions (Probably the best)
Bro I am not that old….
YouTube Shorts
Audience
I personally do not have much experience with youtube shorts, but I know this that youtube does not care about cinematic content. I believe it is still mostly a value driven platform. Where real value outweighs everything else.
Value
In my eyes value in youtube has been and always will be knowledge.
Monetization
- The shorts themselves can be monetized
- From affiliates & promotions like other platforms
TikTok
Audience
I have seen my friends use TikTok and what I understand is that TikTok is for fast attention grabbing fun content. If that is you, this is perfect.
Value
Value in TikTok is entertainment.
Monetization
- Affiliates & Promotions
Medium
Audience
Medium is a mix of bags, if you are considering starting out by writing. This is a good platform to start with. The people mostly come here for short to medium sized blogs on specific topic.
For me it peronally revolves around tech, but their is a plethora of things people talk about. Business, Marketting, Writing etc.
Value
I have seen that Medium is more knowledge driven than personal story driven, sharing specific resources, learning, explanations seems to be what the platform prioratizes.
Monetization
- Through paid articles
Substack
Audience
Substack is the next logical step after Medium, it is great if you have been considering starting a newsletter (I recently started one of my own!), Substack audience really comes for YOU! So the audience is litreally to whom you want to talk to.
Value
Really depends on the kind of value you are providing!
Monetization
- Through paid articles
- Possibly affiliates and promotions in the newsletter itself
Blogsite
Audience
If you wish to pursue blogging simply as a hobby, starting one of your is a great way to start. A simple way to set one up is using Jekyll, the audience can be limited to yourself, your friends & family or any random stranger on the internet.
Value
It brings one peace and clarity in life.
Monetization
- Running Ads
Audience
Reddit is a wild place, the people here come for REALITY. Seriously, do not try to push an agenda or “AI Slop”. The comments will demolish you, and you cannot sell a personal brand.
The best use of reddit I have seen is to get early adopters, customers, search through ideas etc. It is an amazing platform for specific usecases!
Value
Share real stories, moments, thoughts, lessons.
Monetization
- Get early customers
- I believe there is a karma system that pays, but I am not sure how it works.
Podcasts (Spotify, Apple Music)
Audience
The two things about podcasts are
- It is inherently a long-form of content
- It is almost always something done in the background along with other activities
And this is very important to understand because it helps you shape what kind of content you are creating.
Value
Value is provided here by providing knowledge or entertainment. (Truth be told I cannot think of any other information that can be created into content.)
Monetization
- Some platforms may be monetizable
- Sponsors are the best bet
Books
Audience
People read what you write, write well.
Value
It’s your book, decide what value you are providing.
Monetization
- I hope I do not need to explain this.
Misc
Fiverr, upwork, woop store
There are a million different ways to make money on the internet, always remember what it is you are providing.
- Product (Media or Physical)
- Service
- Consultation
On Content
{links to vid by chris do too!}
The amazing thing is, you can create all kinds of content depending on what you like
On Writing
The harsh reality is no matter what kind of content creation you pick or the platform you pick, writing is the first thing you will be doing. So you better get good at it
On Audio
Assumiing you chose a platform where you do more than just writing, speaking is going to be the next important thing. Becuase no matter how good your visuals are, if one cant here or understand you, they wont stick around.
On Video
Ok I lied, this exactly isn’t a part on video but more on lighting. Blame bad lighting first before you ever blame your camera.
Now to understand different kinds of frames, we first need to understand how cameras work
ISO
FPS
Apperture
On framming
Framing might be just one of those things that silengthly elevates and sets the mood of the sotry, the way I like to imagine it is. If someone can see your frames, you did bad framming. Good framming is invisible and blends into the story.
{add link to the frames video by that pay kay guy}
https://www.youtube.com/playlist?list=PLTQtLjIqecdydlanOGh6iwoWOb9VxpDts
https://www.youtube.com/watch?v=7W89eklcj3c&t=2s
On Editing
Import settings
Types of cuts
Useful shortcuts
Export settings
On Color Grading
I believe this might be one of my favourite things to talk about, this journey started for me with photography in college and I was awed after I watched a few videos by gawxart. Surprisingly for the longest time all I did was BnW photography, colors really bought… colors to my art.
I will mainly be diving deep into Davinci Resolve in this one (I know adobe recently introduced there own color grading tool in lumiere, but I have not used it much so I cannot do it justice.), if you wish other tools, that is fine too as most of this knowledge is transferable and will be helpful everywhere.
- https://www.youtube.com/watch?v=gPZ4-CF_osk&t=3s
- https://www.youtube.com/watch?v=45z60vnPOBw&t=827s
- https://www.youtube.com/watch?v=7imay44H3_Q
- https://www.youtube.com/watch?v=53gcbJPP5eA (A ludicrous advance tutorial)
option + s (or alt + s) to add a serial node
Separation of concers is good in most things in life, each part does exactly one thing and it does it well. For the following nodes, you are free to change them as you see fit, mix and merge as well. I am just going with what seems most pragmatic and simple to me.
Contrast using curves
Quick overview
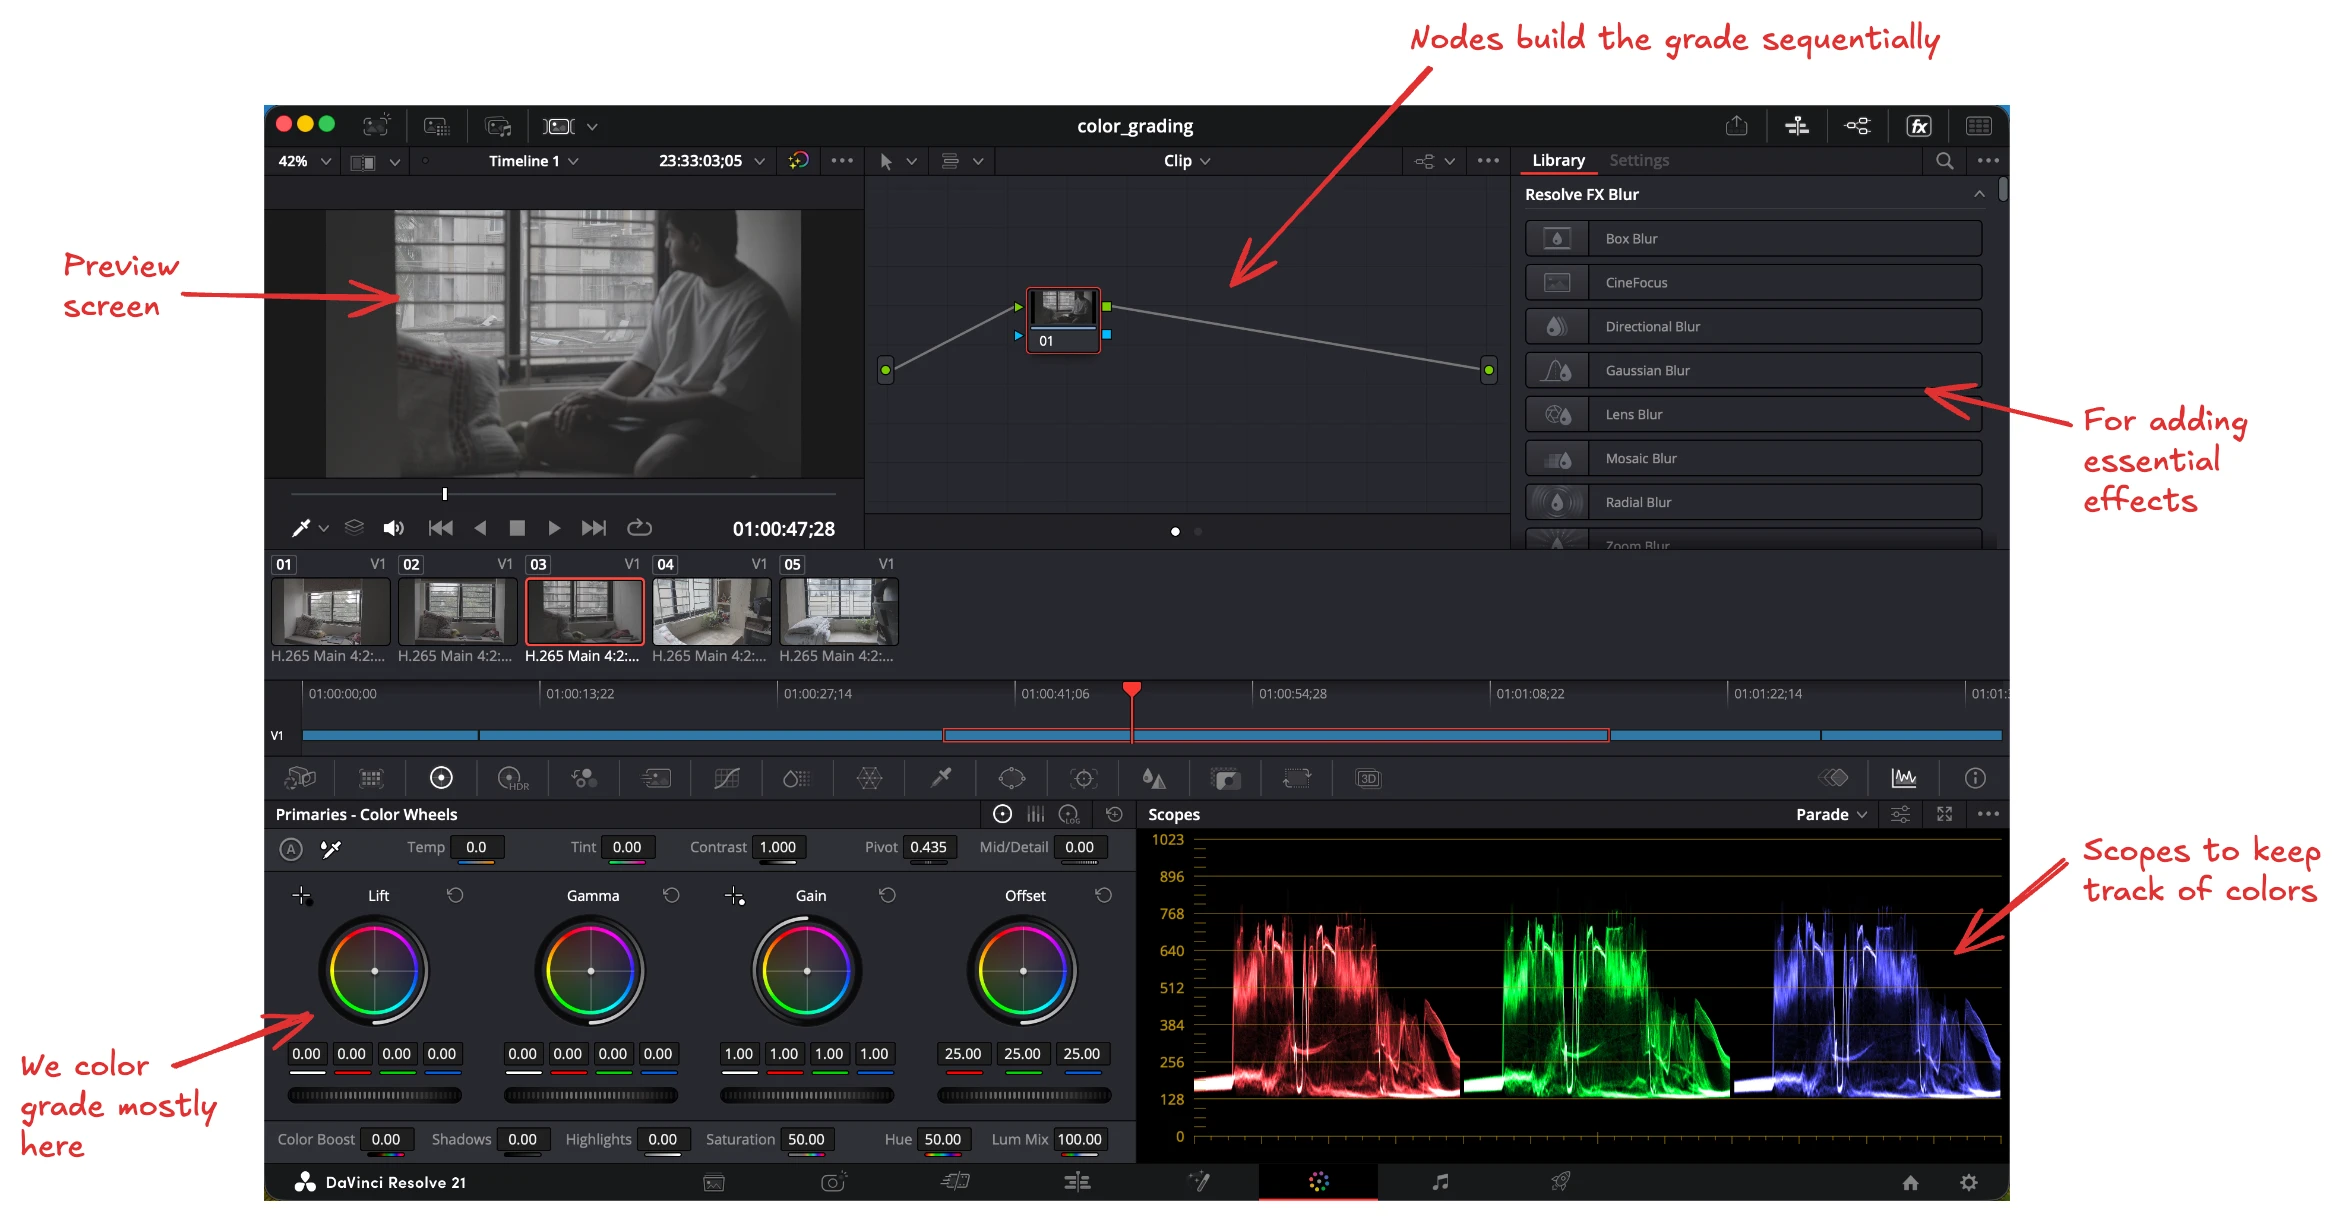
Starting with color grading can be over-whelming at first. But there are a few things we can do to make our lives easier.
Making ourselves familiar with the different tools, along with the methodolody helps. Study the image above to understand what the different parts do, as we move forward I will explain more things.
Color grading is a two step process, first is color correction; where you fix the exposure and contrast of the video. Once you have a good correction which looks like it has depth, we start adding the grade to that.
There are multiple ways of doing this and everyone has their own methodology, I will break down the above videos I have mentioned and essentially write it in three parts
- Beginner
- Intermediate
- Advanced
- Professional
I am still stuck at Intermediate myself and I try to take some inspirations from the more advanced ideas.(I am still not great at it though.)
Beginner
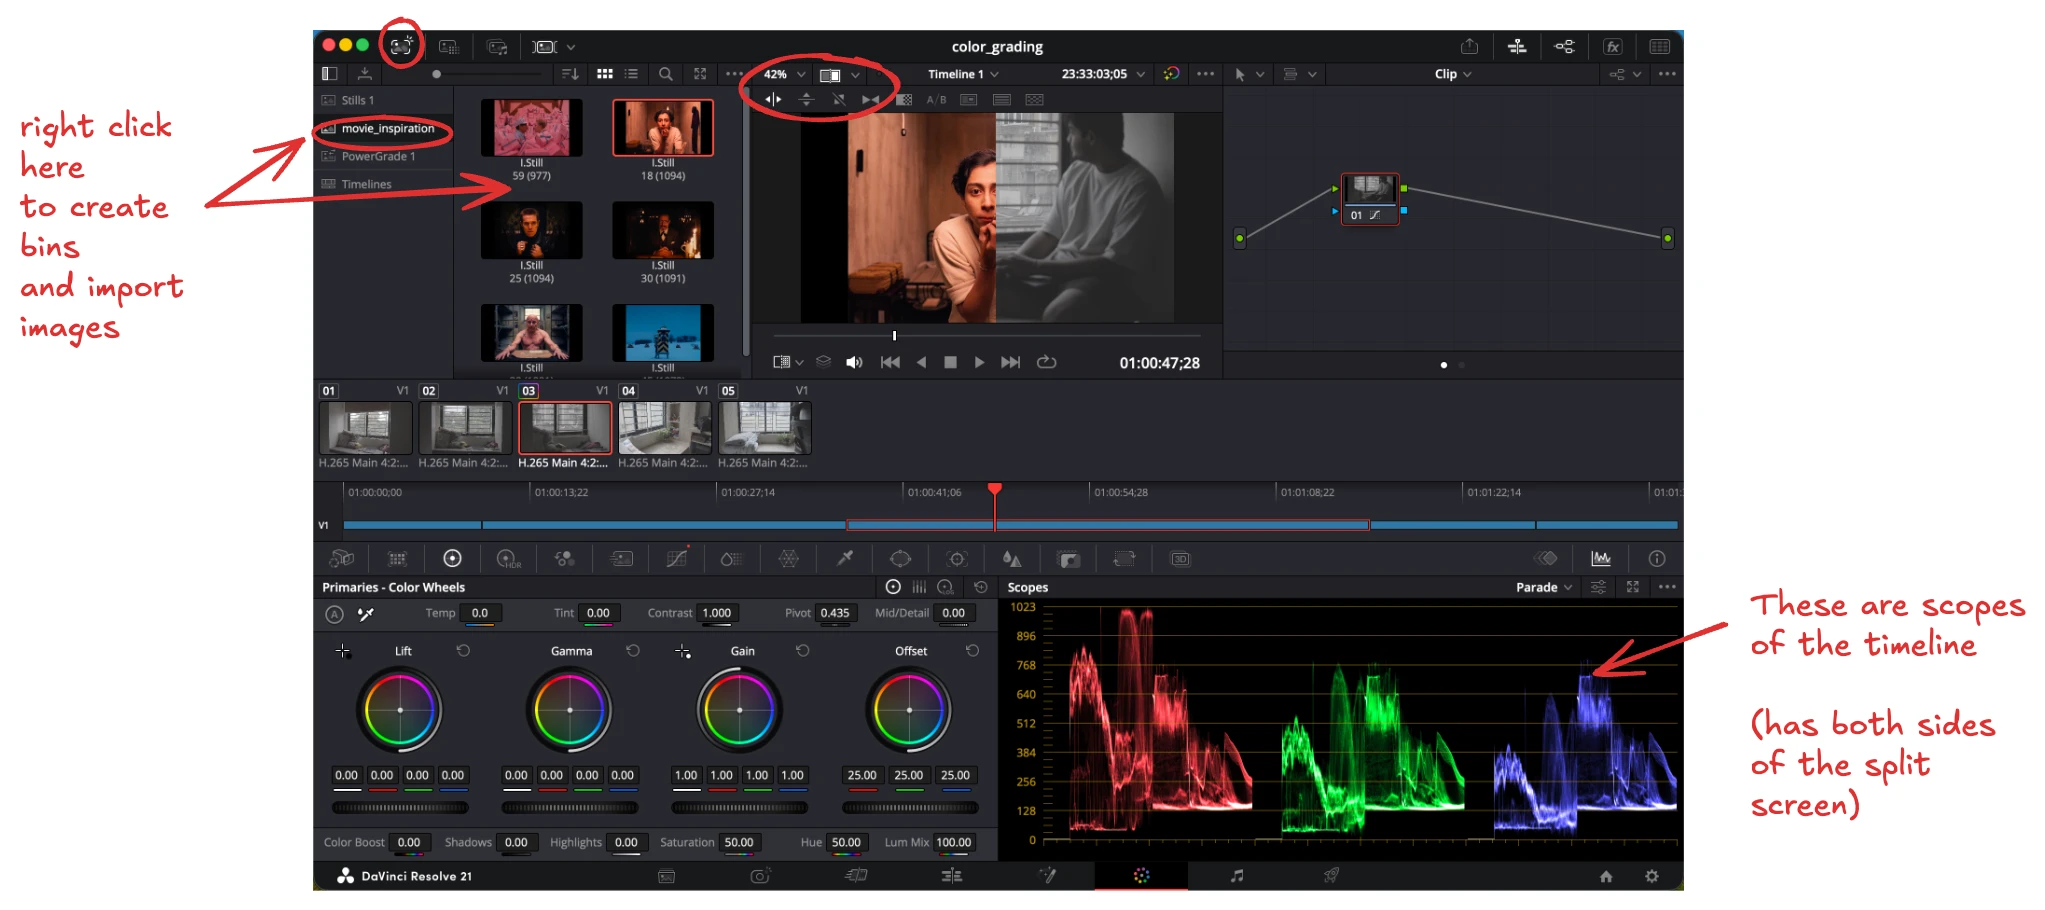
No matter at what stage of a creative process you are at, it is always great to have some inspirations.
Another point to mention is, always pick a hero frame of the video, this is a clean frame that lets you easily apply your grade. (essentially do not pick something with movements, or if it is out of focus and so on)
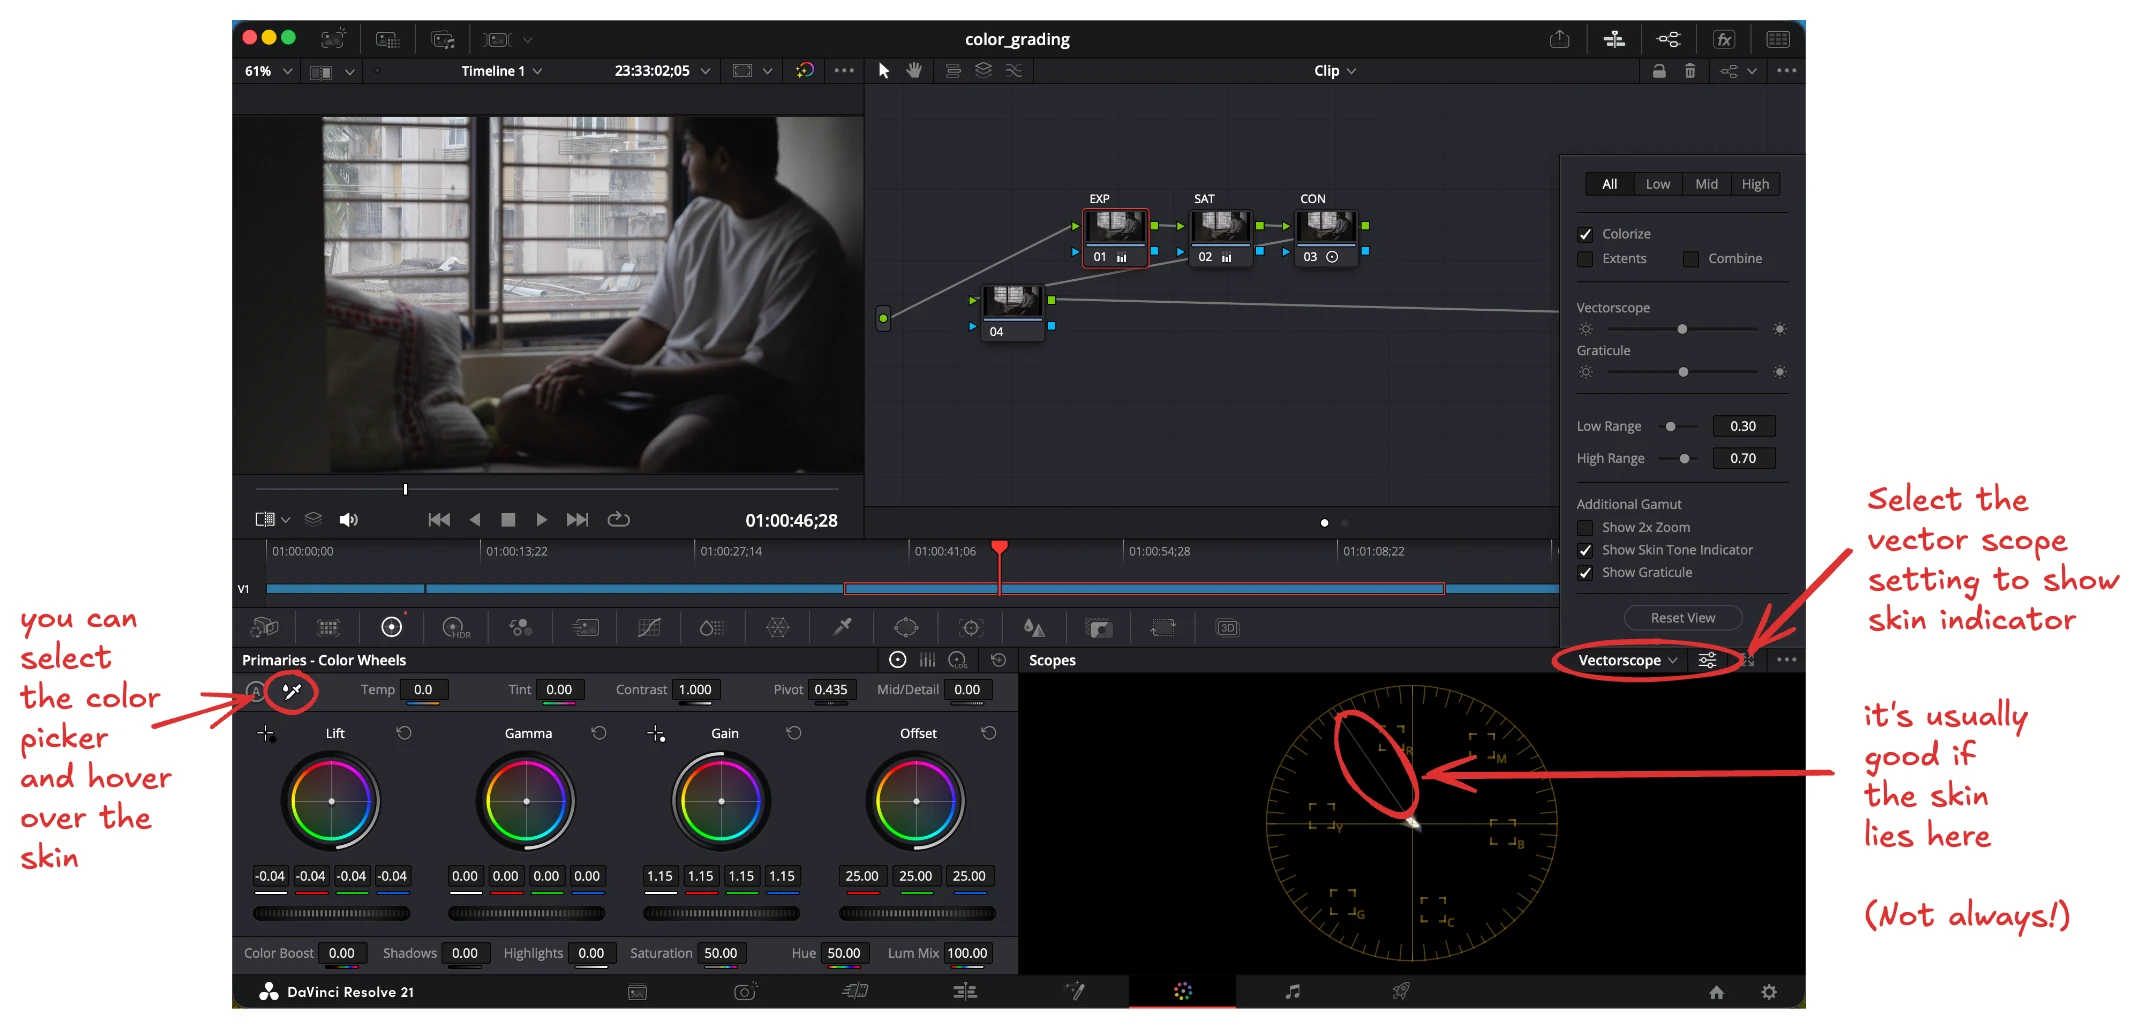
Over here I have added 4 serial nodes (shortcut is alt/option + s), I have adjusted the exposure using the primary wheels. Lift correlates to shadows, Gamma to midtones, Gain to highlights (These are photography terms and not same as blacks and whites, to learn more about them go here [ADD_LINK]).
Offset is used to change everything at once, play around with these wheels to get the hang of it.
One of the most important thing to remember is, we want to do incremenatal changes, never make large changes, .05 can be a lot too at times, We gradually add or subtract the image as we want it.
for exposure I just adjusted the wheels, and as a begineer you can change the saturation and contrast using the primary too (see above the wheel you will see the option).
It is helpful to always label your nodes, you can right click on a node and label it as you see fit.
Most tutorials will tell you against changing contrast and saturation from primaries, but it is a good beginning tool imo.
Before adding a look (or grade) to our image, we have to make sure we protect the skin.
A good rule of thumb is, as long as Black looks black, white looks white and skin looks like skin. You can sell any grade as real.
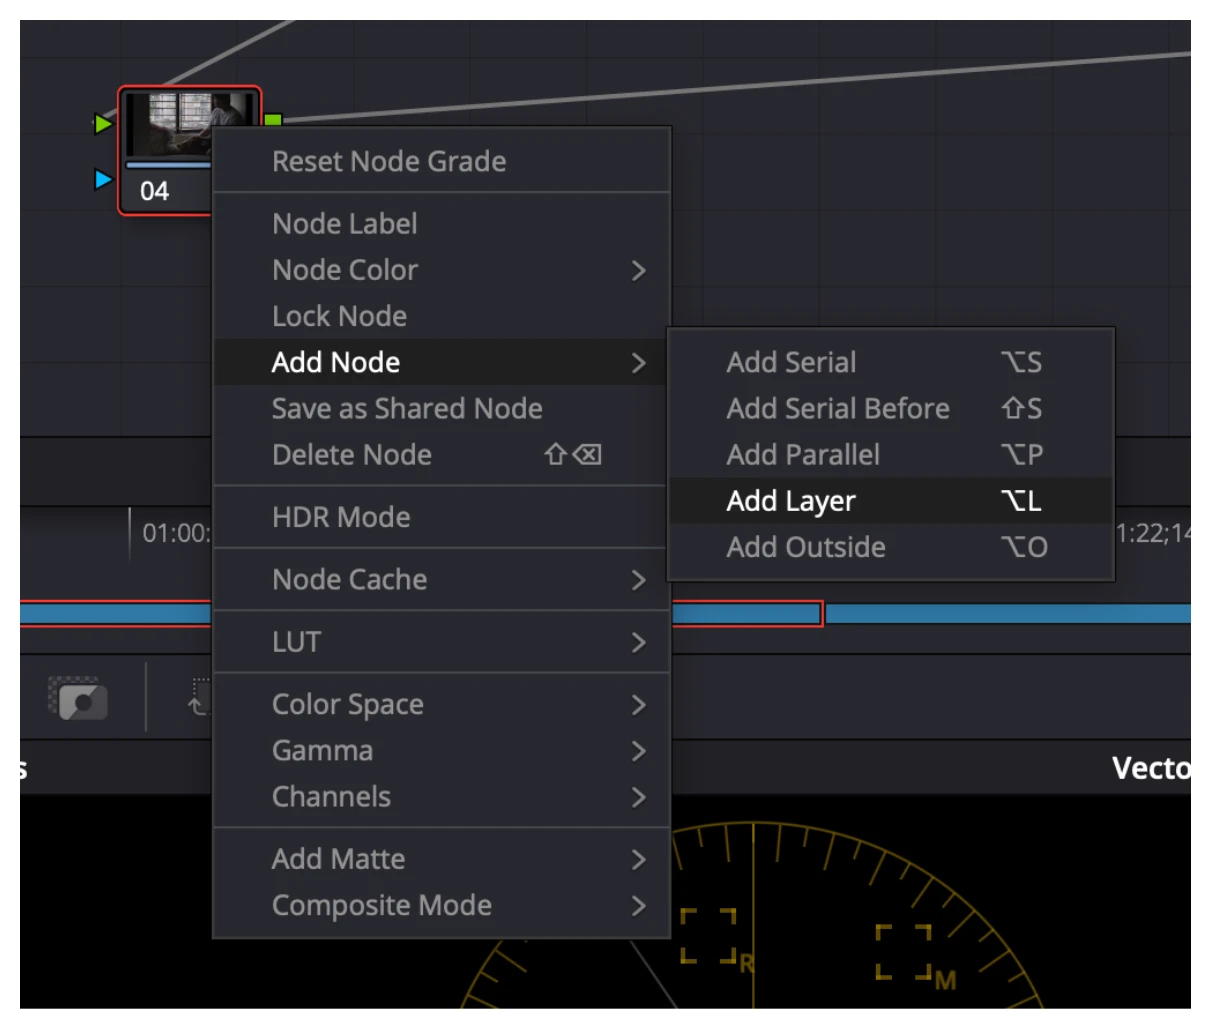
We add a layer node to our 4th node
| Important caveat, whatever is at the bottom, is actually at the top layer. |
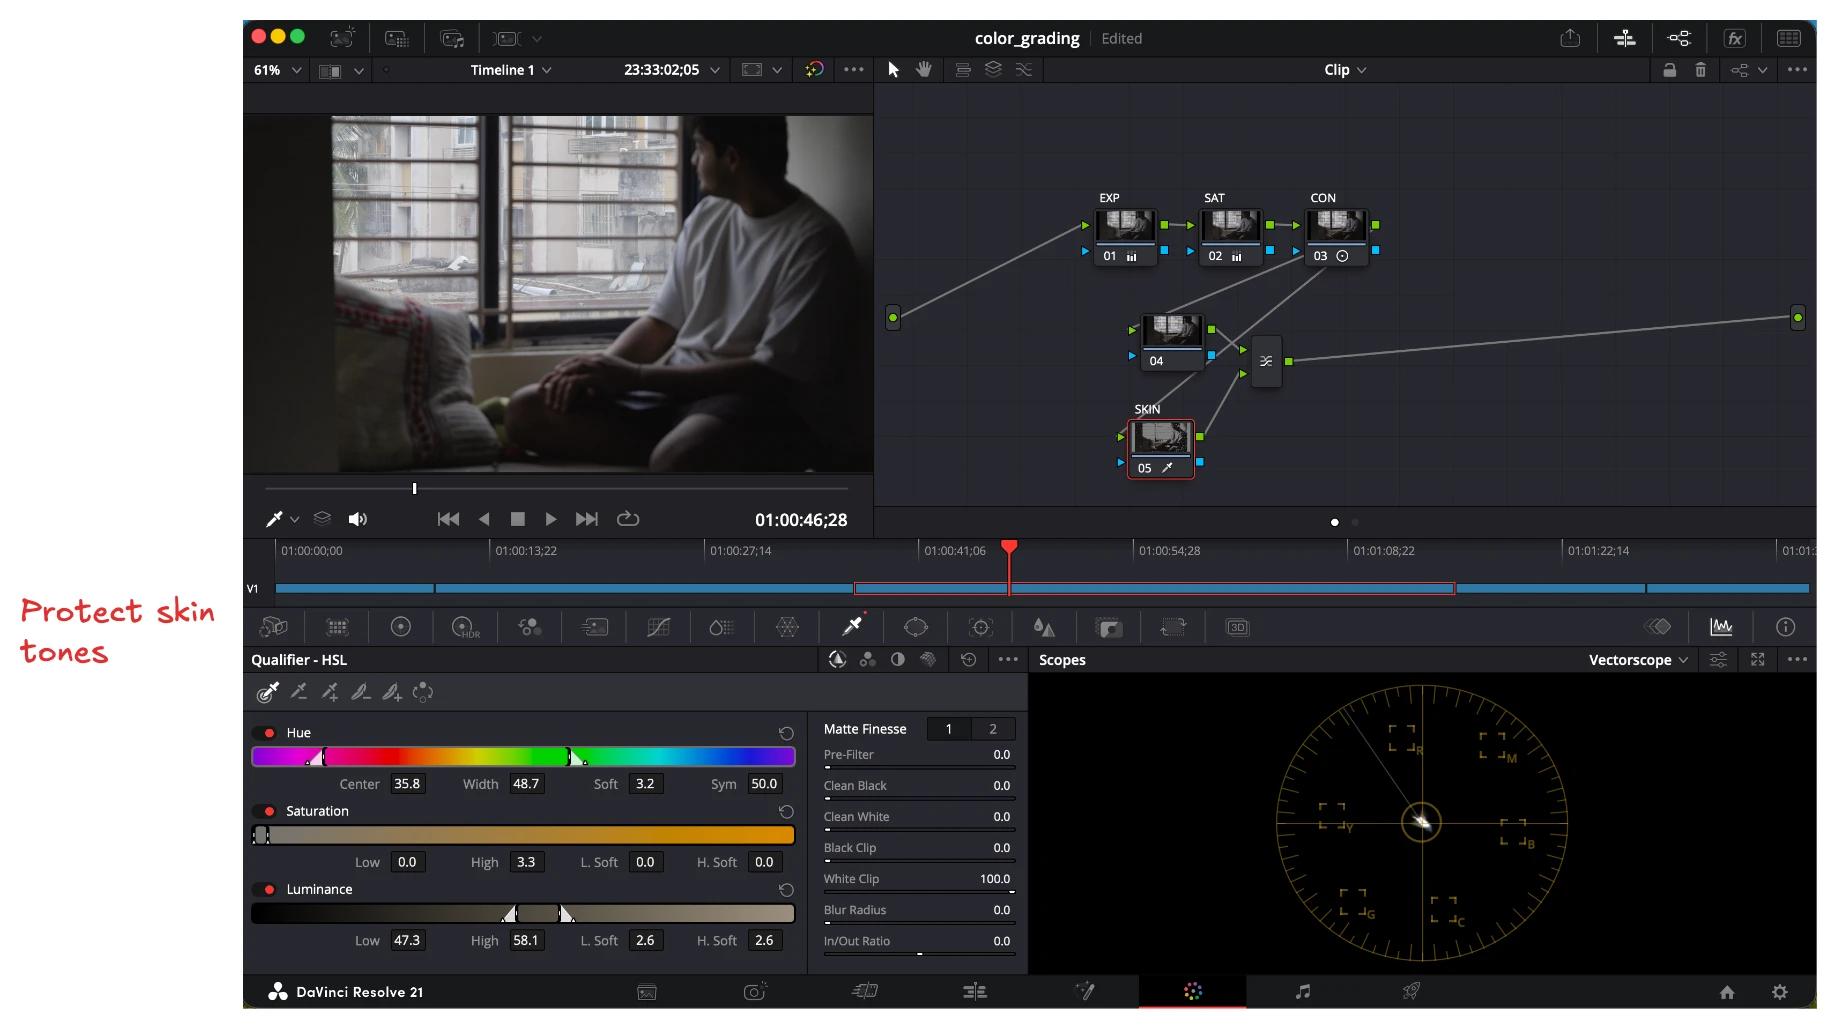
Now selecting the node at top. And chossing the qualifier, by hovering over your skin (I used my face) and clicking on it, you can select the color range you want to protect (Press Shift + H to see the mask that has been selected). This is a delecate fight and it is tough to get exactly what you want at times.
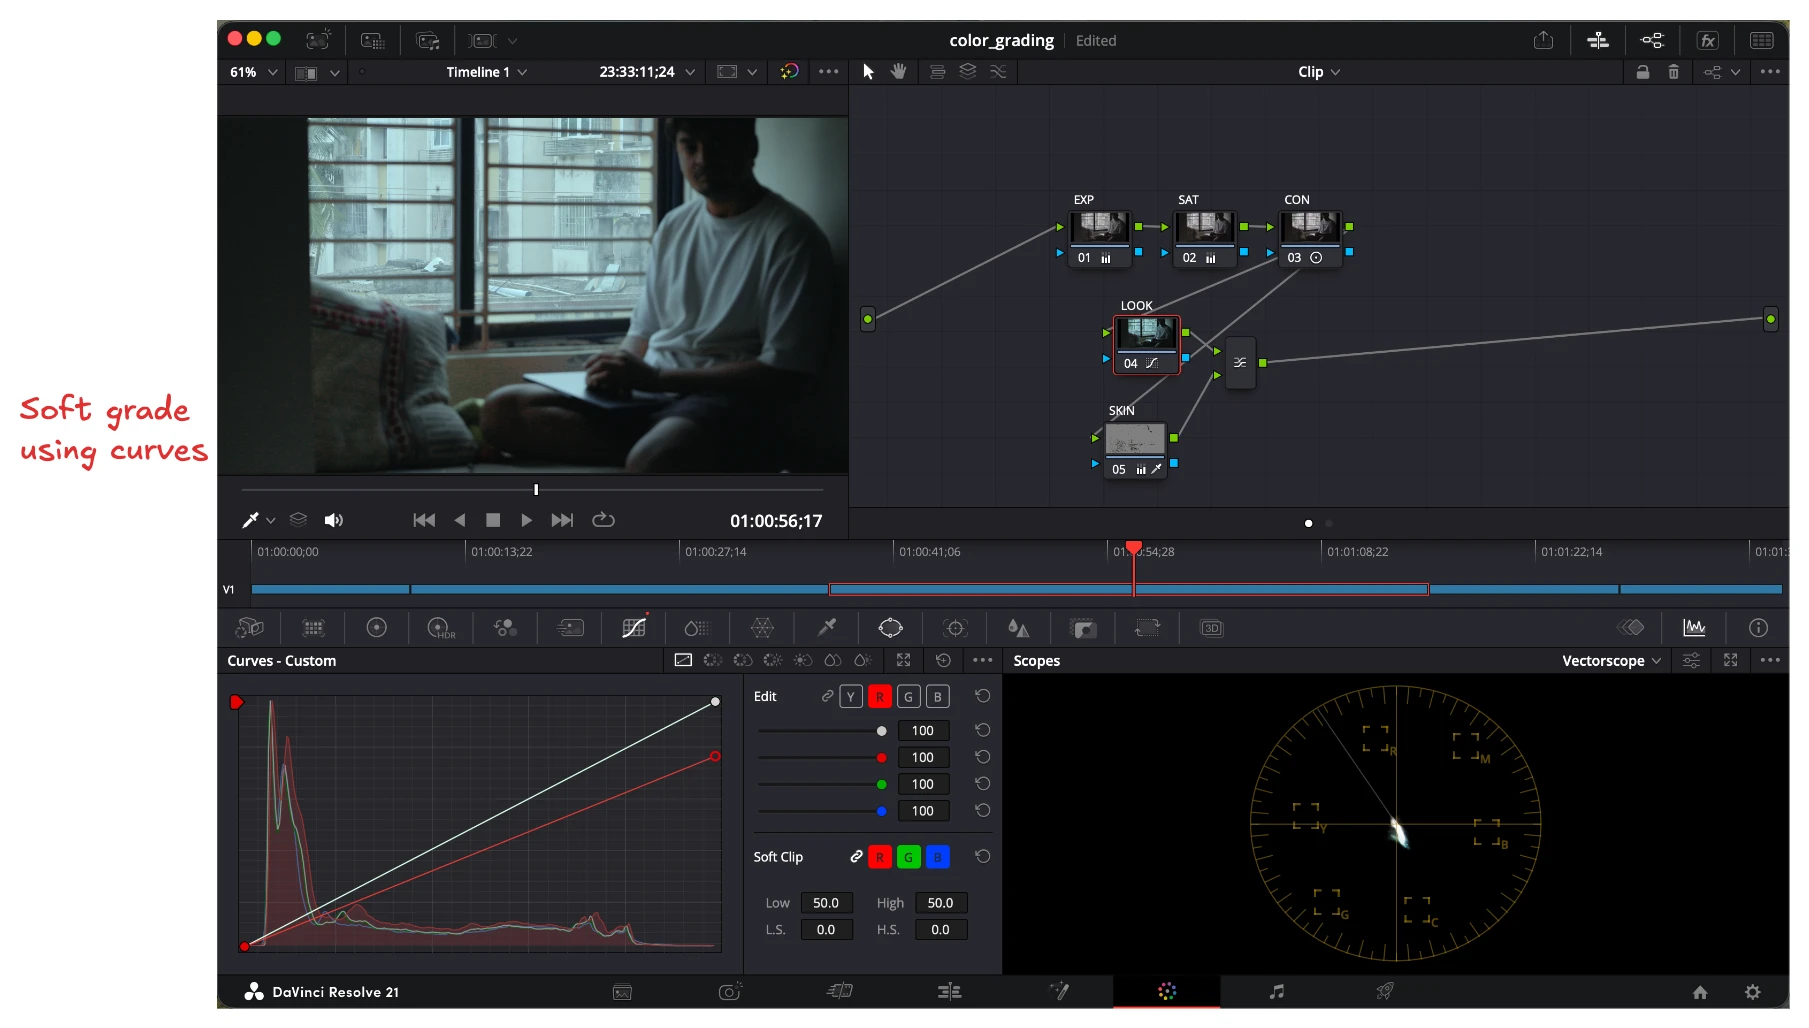
Now we can go to the node on top of our skin and apply grading to that, one of the easiest ways (and the safest) is to go to curves, and change them as you like it!
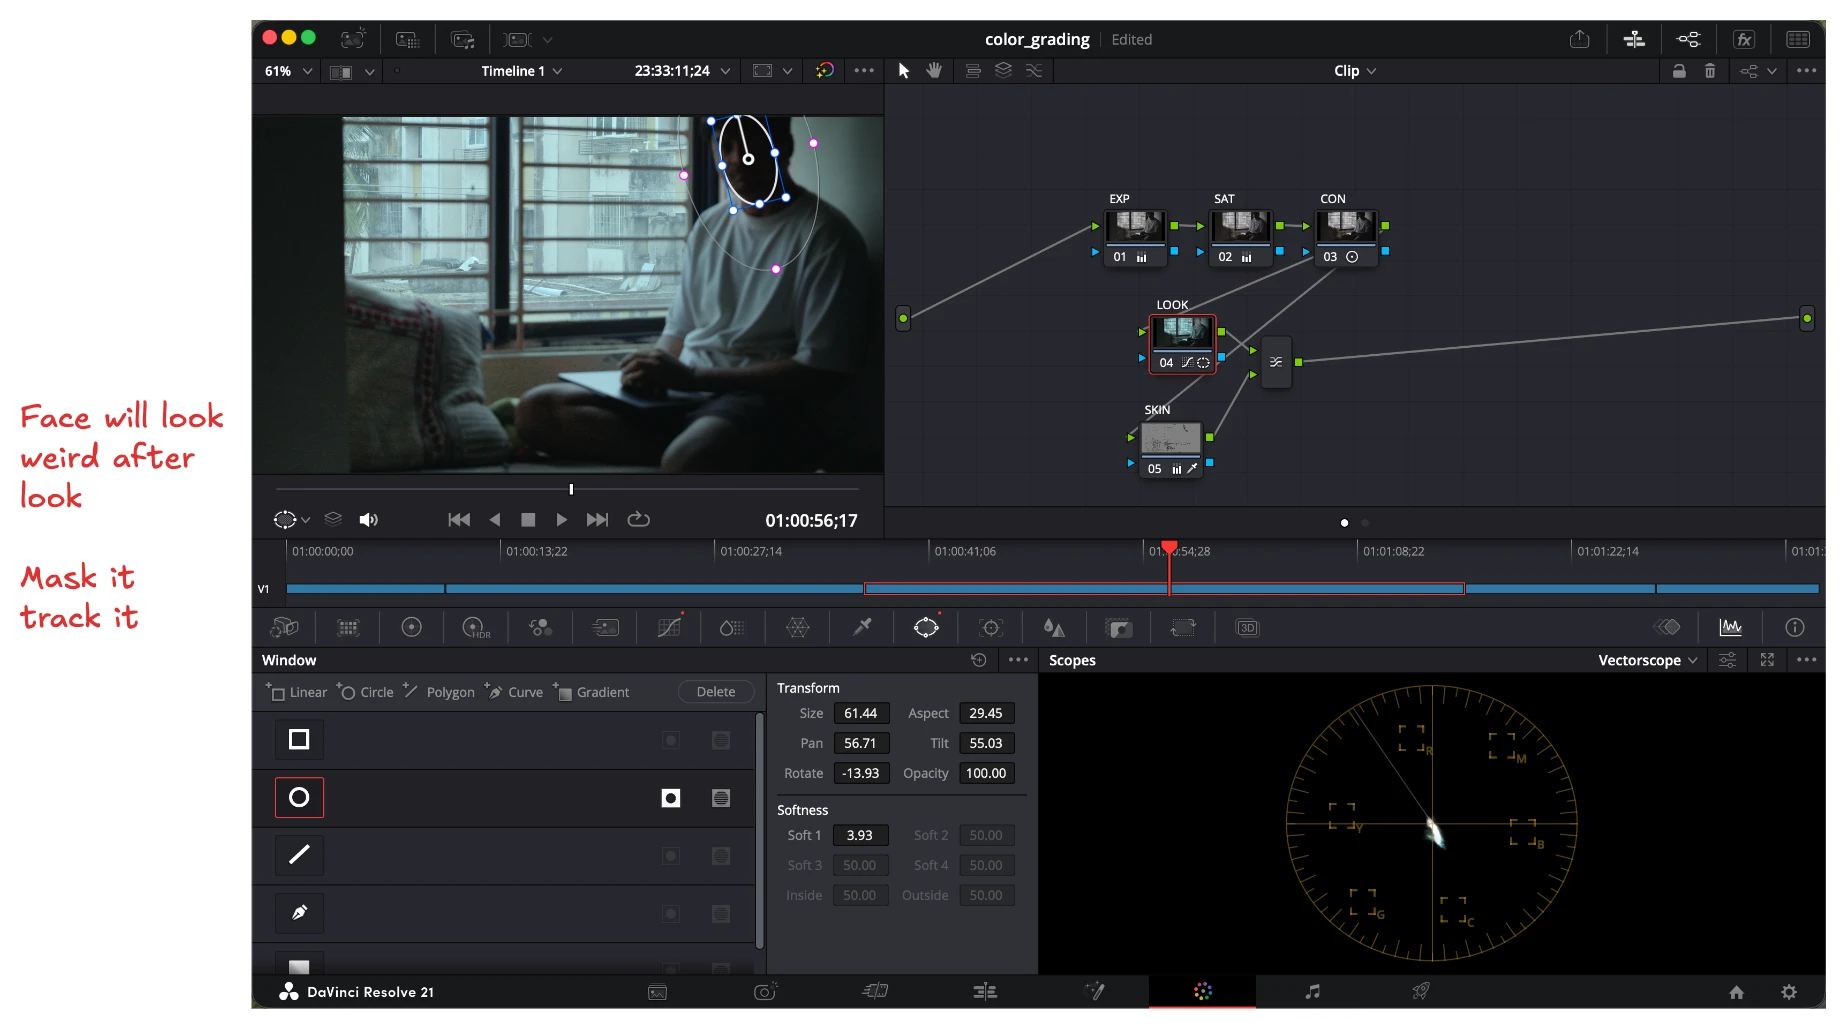
Another cheat code to protecting your skins is just masking them and motion tracking them using the powerful davnici motion tracker. This will make your grade look much cleaner. (Otherwise you start getting weird grainy artifacts). And thats it!
As this was the beginner way we skipped an imense amount of things, including CST!!! your next task, if you choose to accept it. Is to dive deeper into each of these nodes and customize each part.
Intermediate
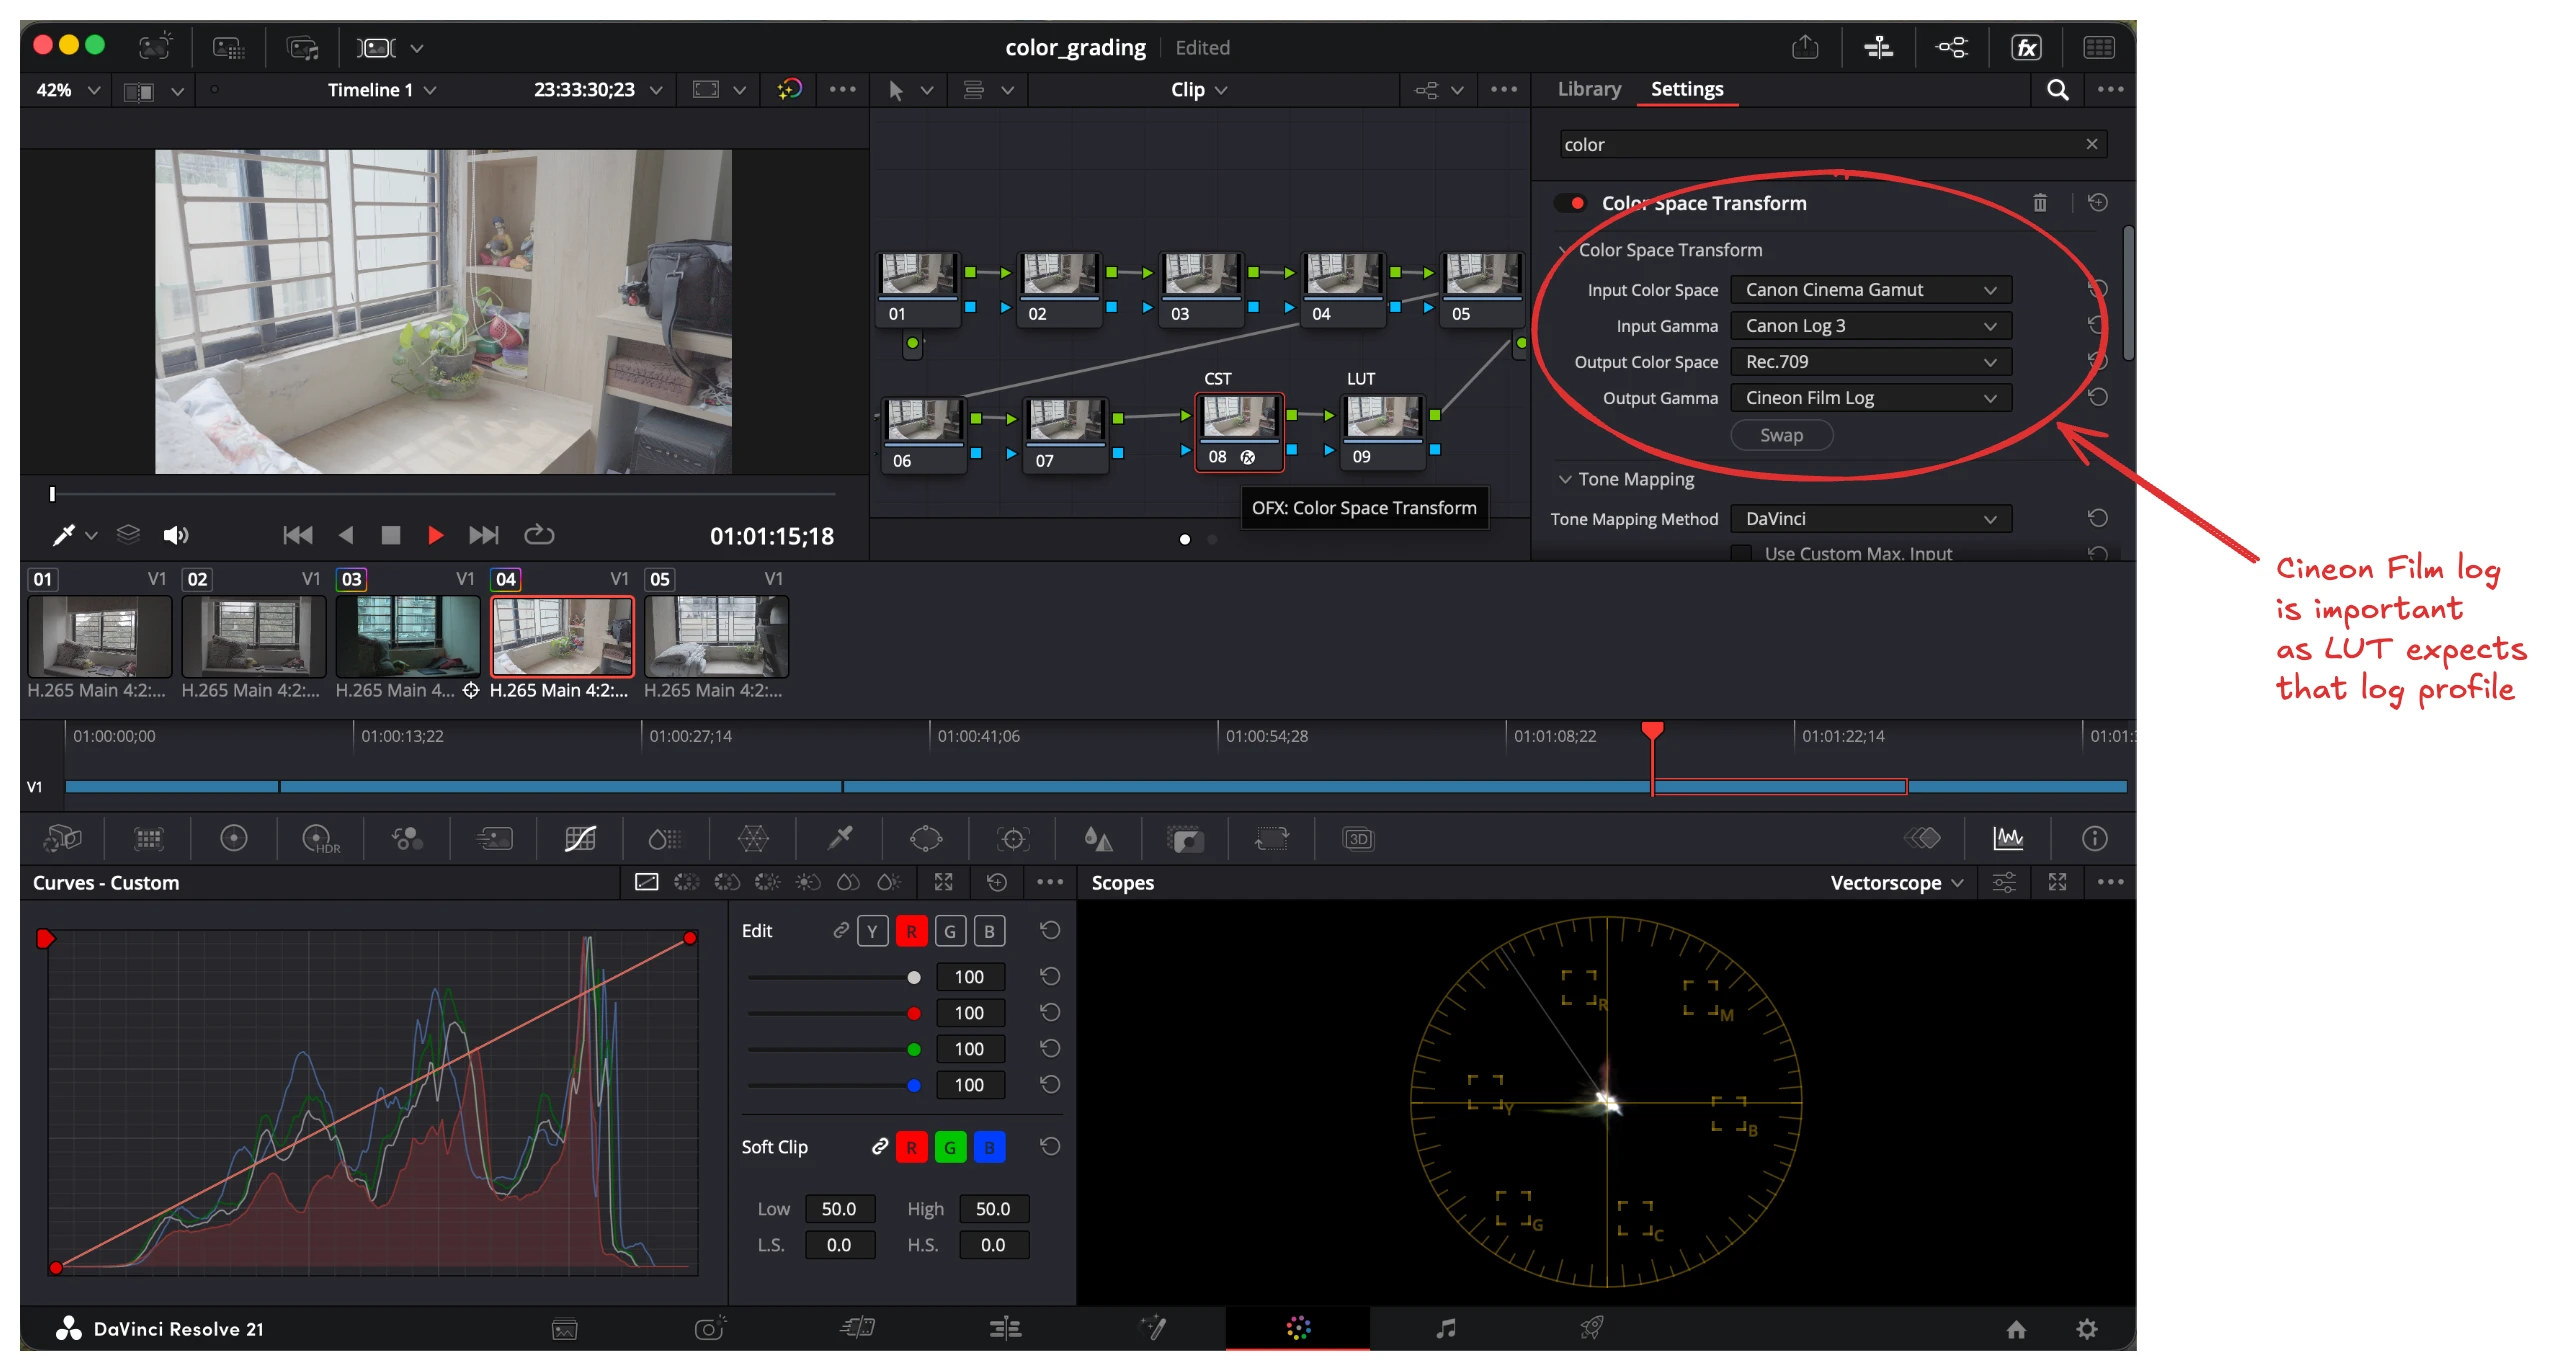
Now it is going to get a bit tougher but it is completely worth it. If you shot your video in log profile as we discussed in the [video] section. You know it completely flattens it.
Now that is because the video is in a different color space from what we are used to in media (which is usually rec709, if you wish to understand about the different types of color profile, [check this out]). So we have to convert it from our log profile to a film profile!
Log profile depends on your camera, as I was using a canon. I applied my settings accordingly.
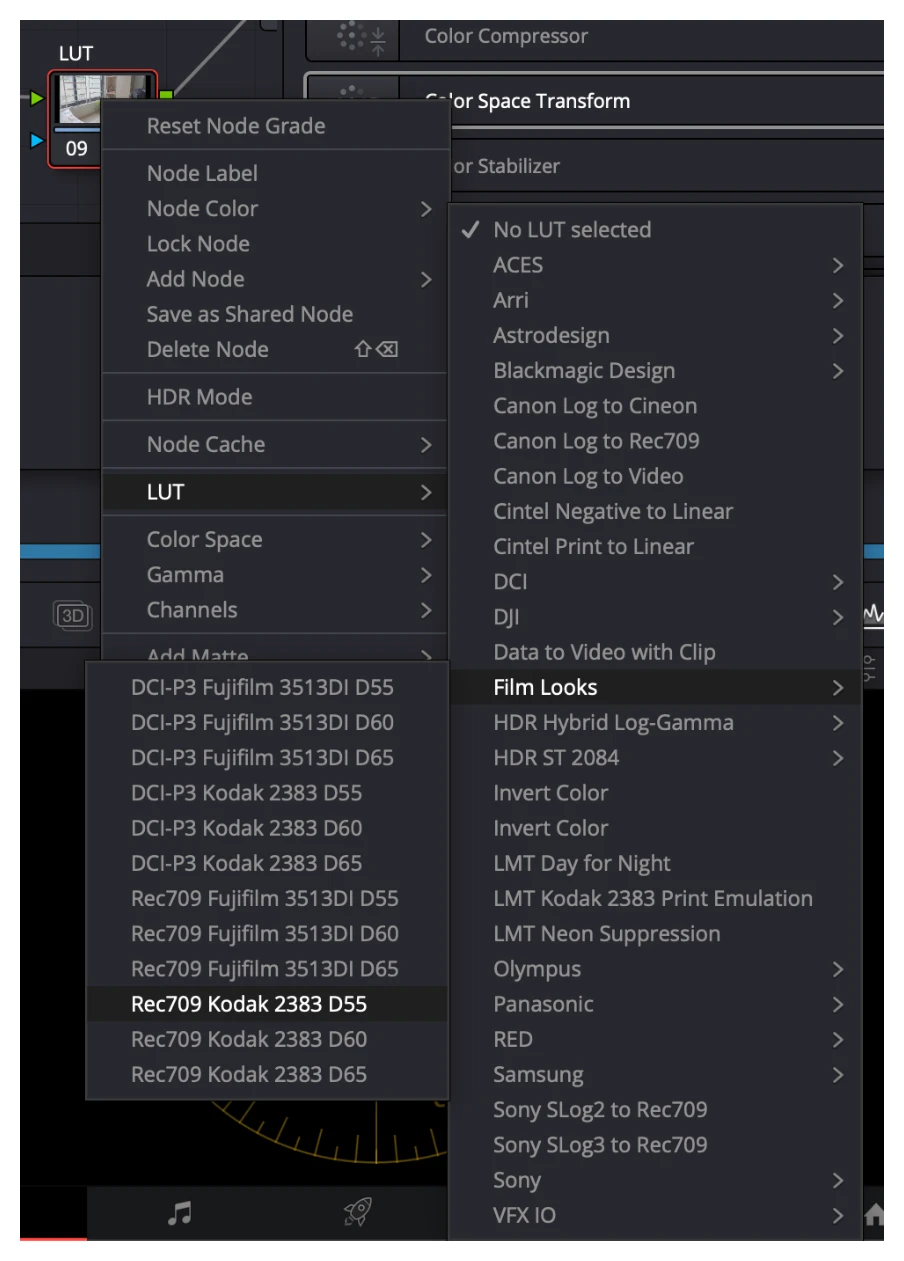
A LUT (Lookup table) is like a pre-set. It let’s you change the colors, the simplest way to imagine it is. It is a mapping from one color to another, so red in rec709 will be turned into scarlet in another LUT.
Pick the LUT you like, I like Kodak so I chose that the difference between D55, D60, D65 is ….{fill this}
Now the problem with LUTs is, they can be too powerful at times. That is why we use something called keying. You can select keying (3rd one from the right. The one that looks like a rectangle with a hole) and decrease the intensity of the LUT. I am leaving it as it is for now because I like the way it looks.
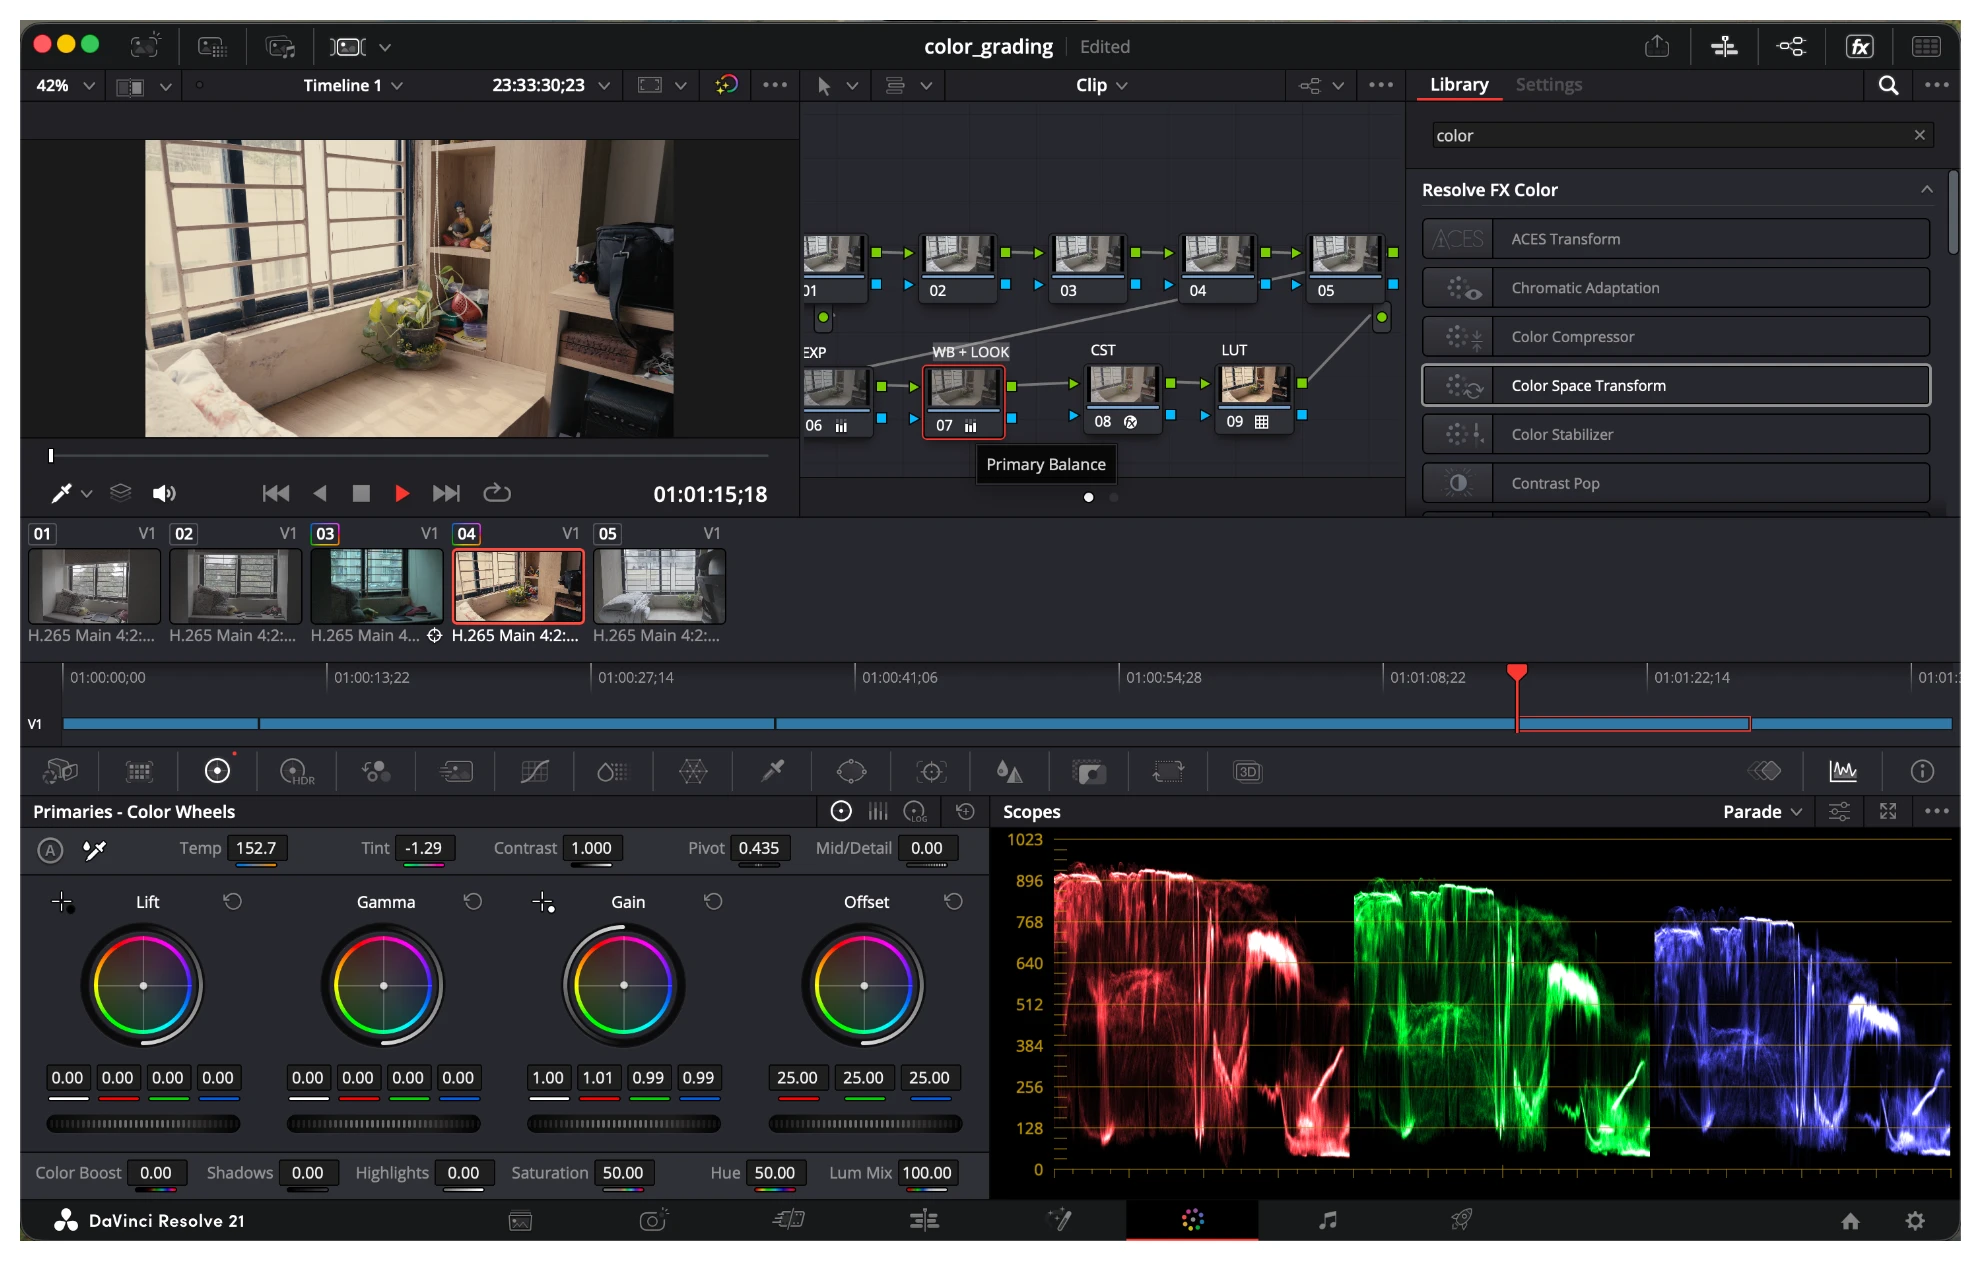
If you notice out video (or image in this case) is already looking so beautiful. Now to push the look we will add a bit of warmth using the temperature, and make the highlights slightly warmer by changing the gain (You can go the direction you like for the look. Changing temp, tint and primary wheels is a common way of achieving the look you want!)
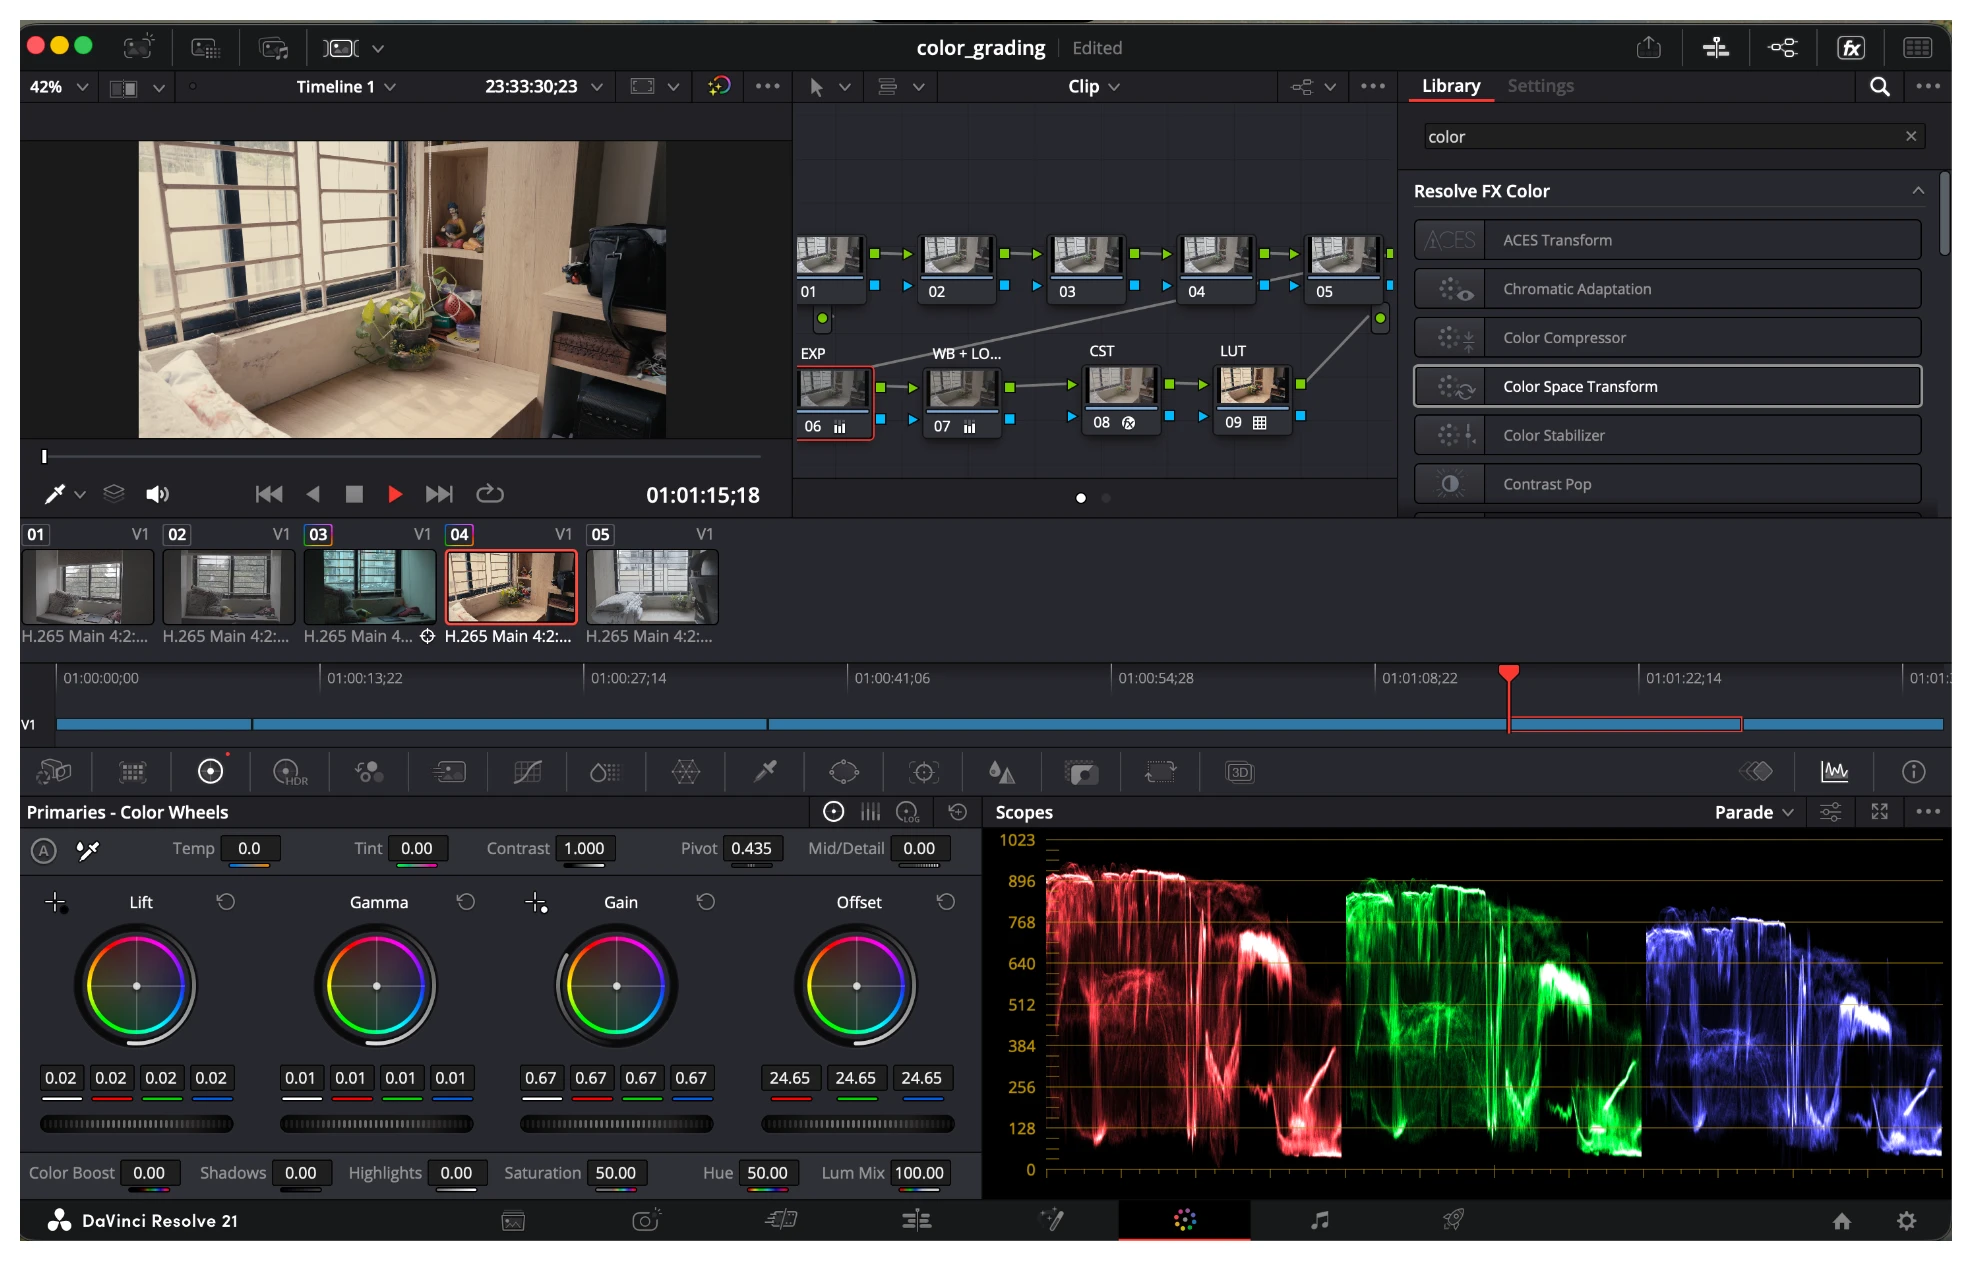
Now we add balance to our image by fixing the exposure, as this is the shot with a window in it, it is way too bright which needs to be fixed. So I have crancked the gain way down, you have to adjust according to your video.
In retrospect, we could have added a separate contrast and saturation node, and used what we learnt in the beginner course. I personally use what we will learn in advanced!
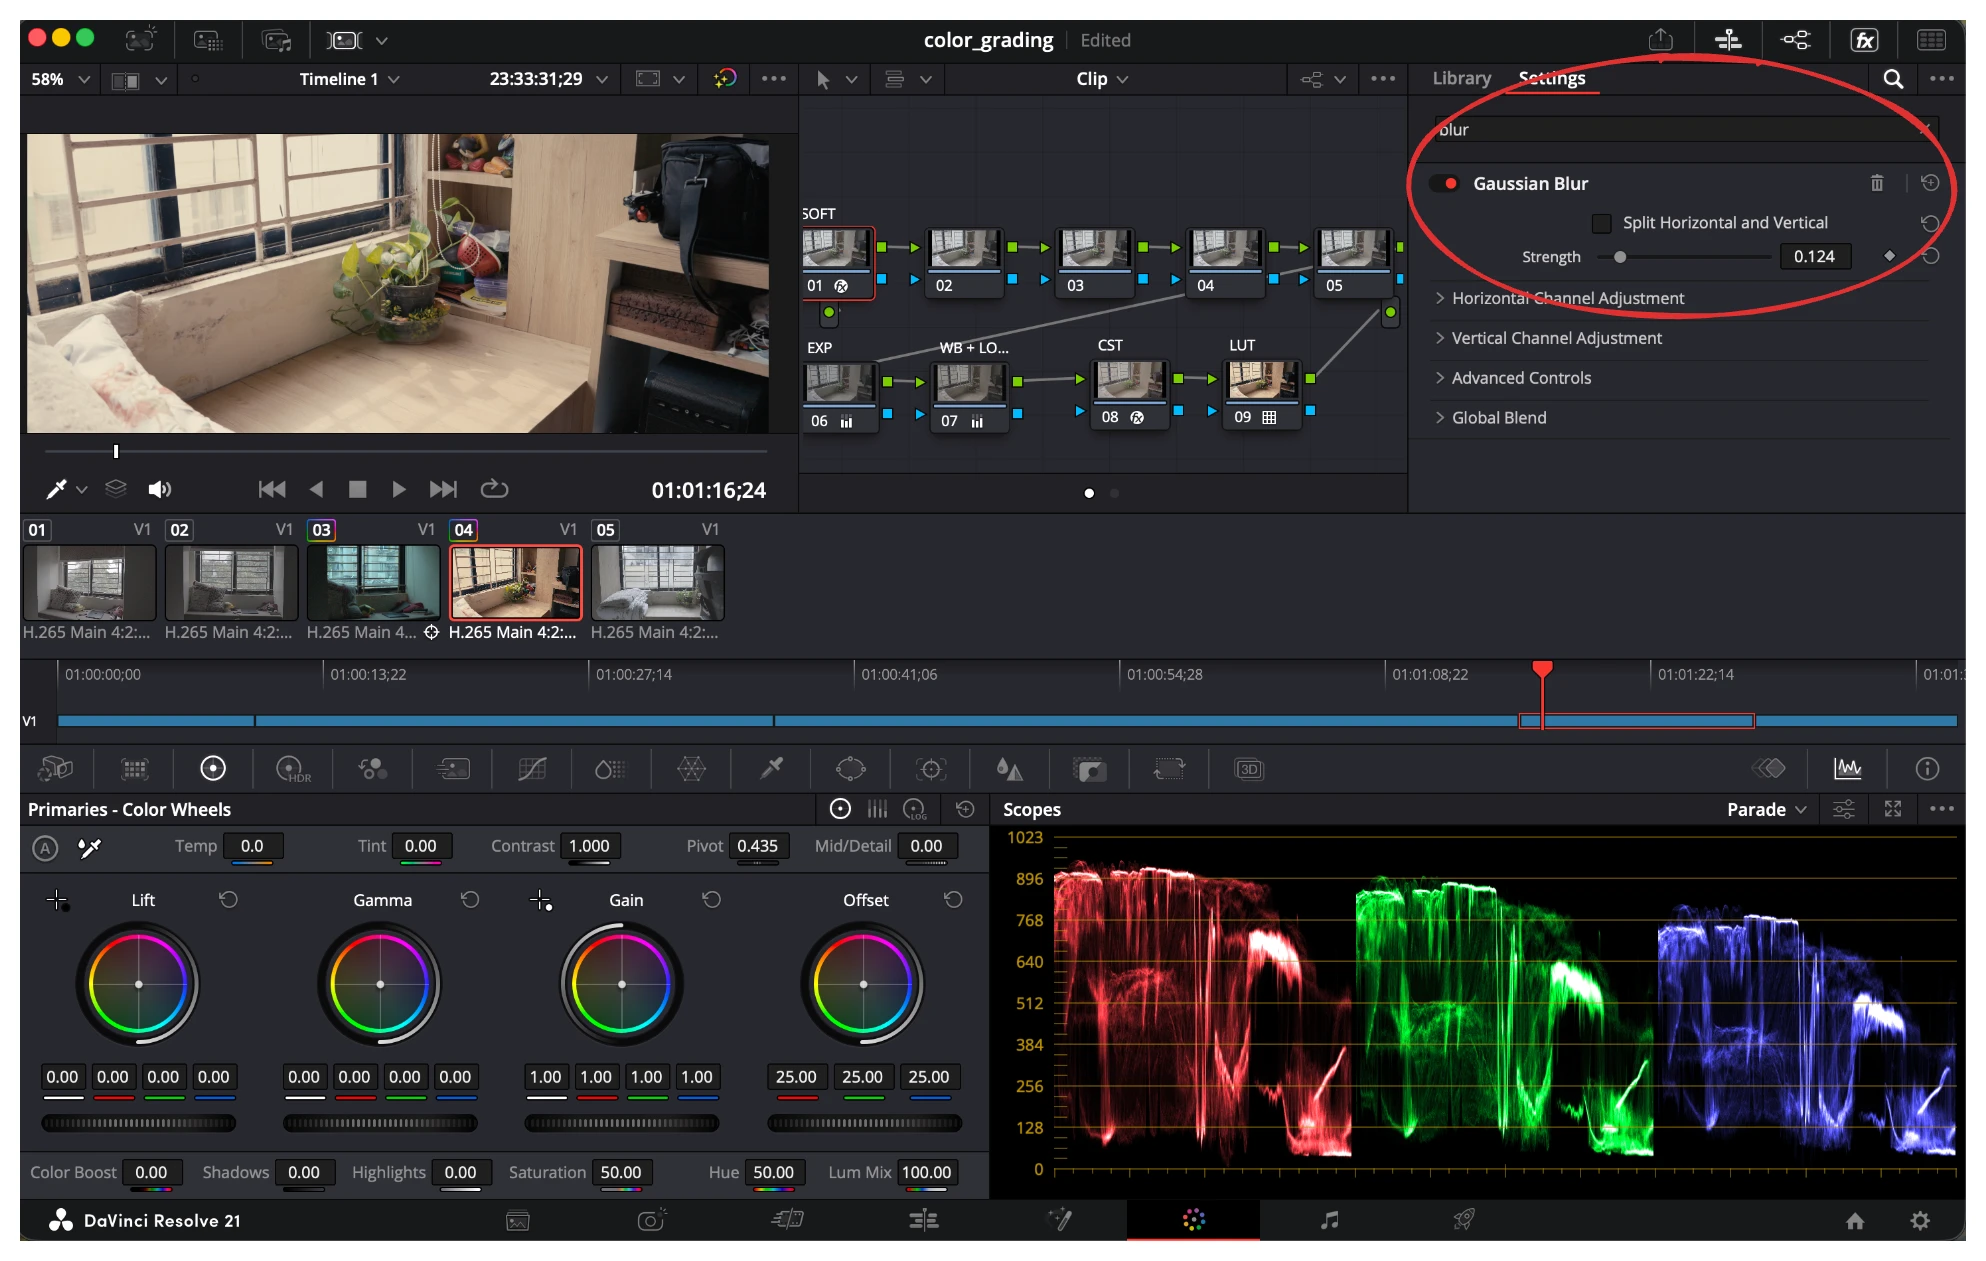
Now to add some film looks/elements, it is a bit of a controversial topic of where to add these nodes. The best practice would be to add them after your LUT node as for these you do not need a high dynamic range unlike for exposure/saturation/contrast. But I am used to this and this is how I learned so I just follow this. (In my head, I believe it should not make much difference. Please comment if you believe I am wrong.)
Over at the first node we add a bit of softness using gaussian blur.
.webp)
Now to add my absolutely favourite node, HALATION. Davinci does have one, but it is paid. So let us see how we can do it for free (and in a better way imo).
Just follow along the images and you will have it ready!
.webp)
.webp)
.webp)
.webp)
If you want to see what changes exactly is introduced by each node click on it and then press CMD/ctrl + D. Essentially what happens is that in the linear space light directly gets added to our original video, with the highlights blured out, adding the halation effect!
.webp)
Now no film look is ever complete without some vinette, the default vinetting of davinci is not that great and you can achieve a much better look using a mask!
.webp)
This is something that I seldom use but it does add a pretty look, these are the white film damage look.
I skipped one node, that is the grain node. As that too is paid in davinci. I will recommend using an overlay and changing the composite mode to “overlay” this is the one I use [FILL_THIS]. Additionally there is another node you can experiment with “Glow”.
Now these methodology will get you the closestest to a cinematic look. In most scenarios I believe you do not need to learn any more things, buttttt let’s go over!
Advanced
At this point if you have been practicing you must have understood the flow.
Fix the exposure, contrast, WB, saturation, protect the skins, add you look, add your effects.
These steps do not usually change, the means of doing each does tho over time. Now let us understand what are the ideal way of doing some of these steps.
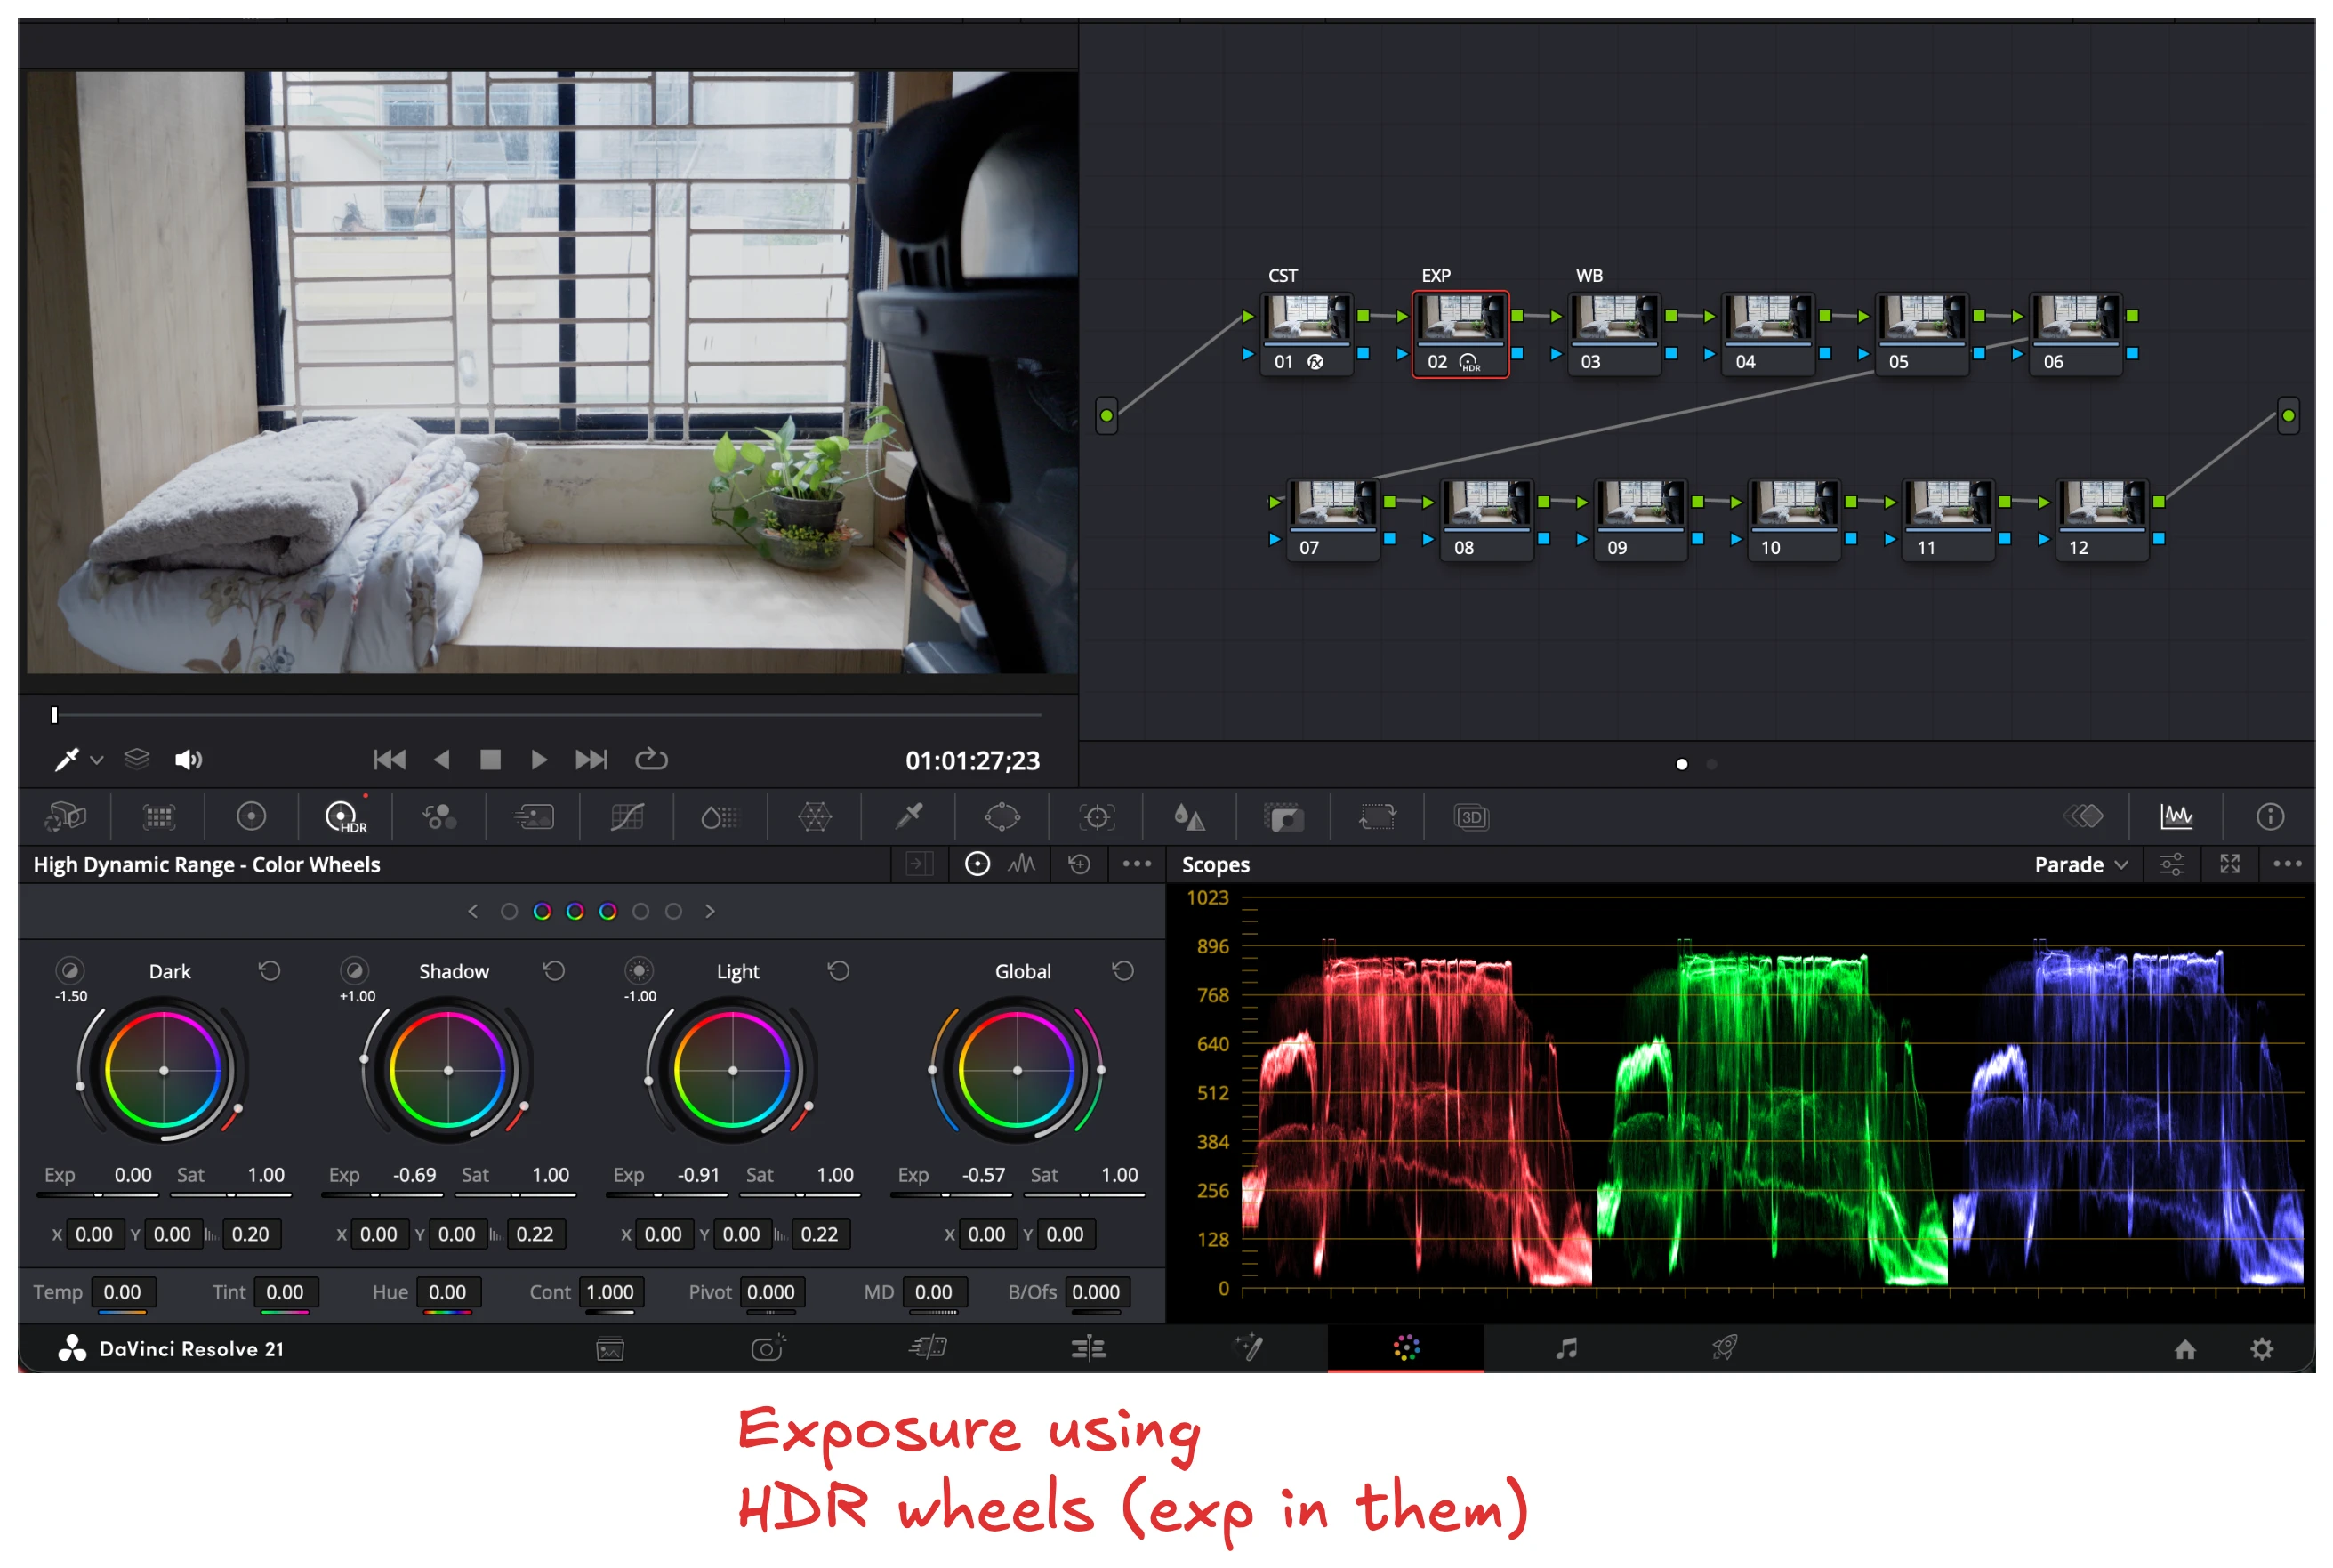
Instead of changing the exposure using the primary wheels, you get much more fine grained control by doing them using the HDR wheels
(I still mostly use primary wheels tho)
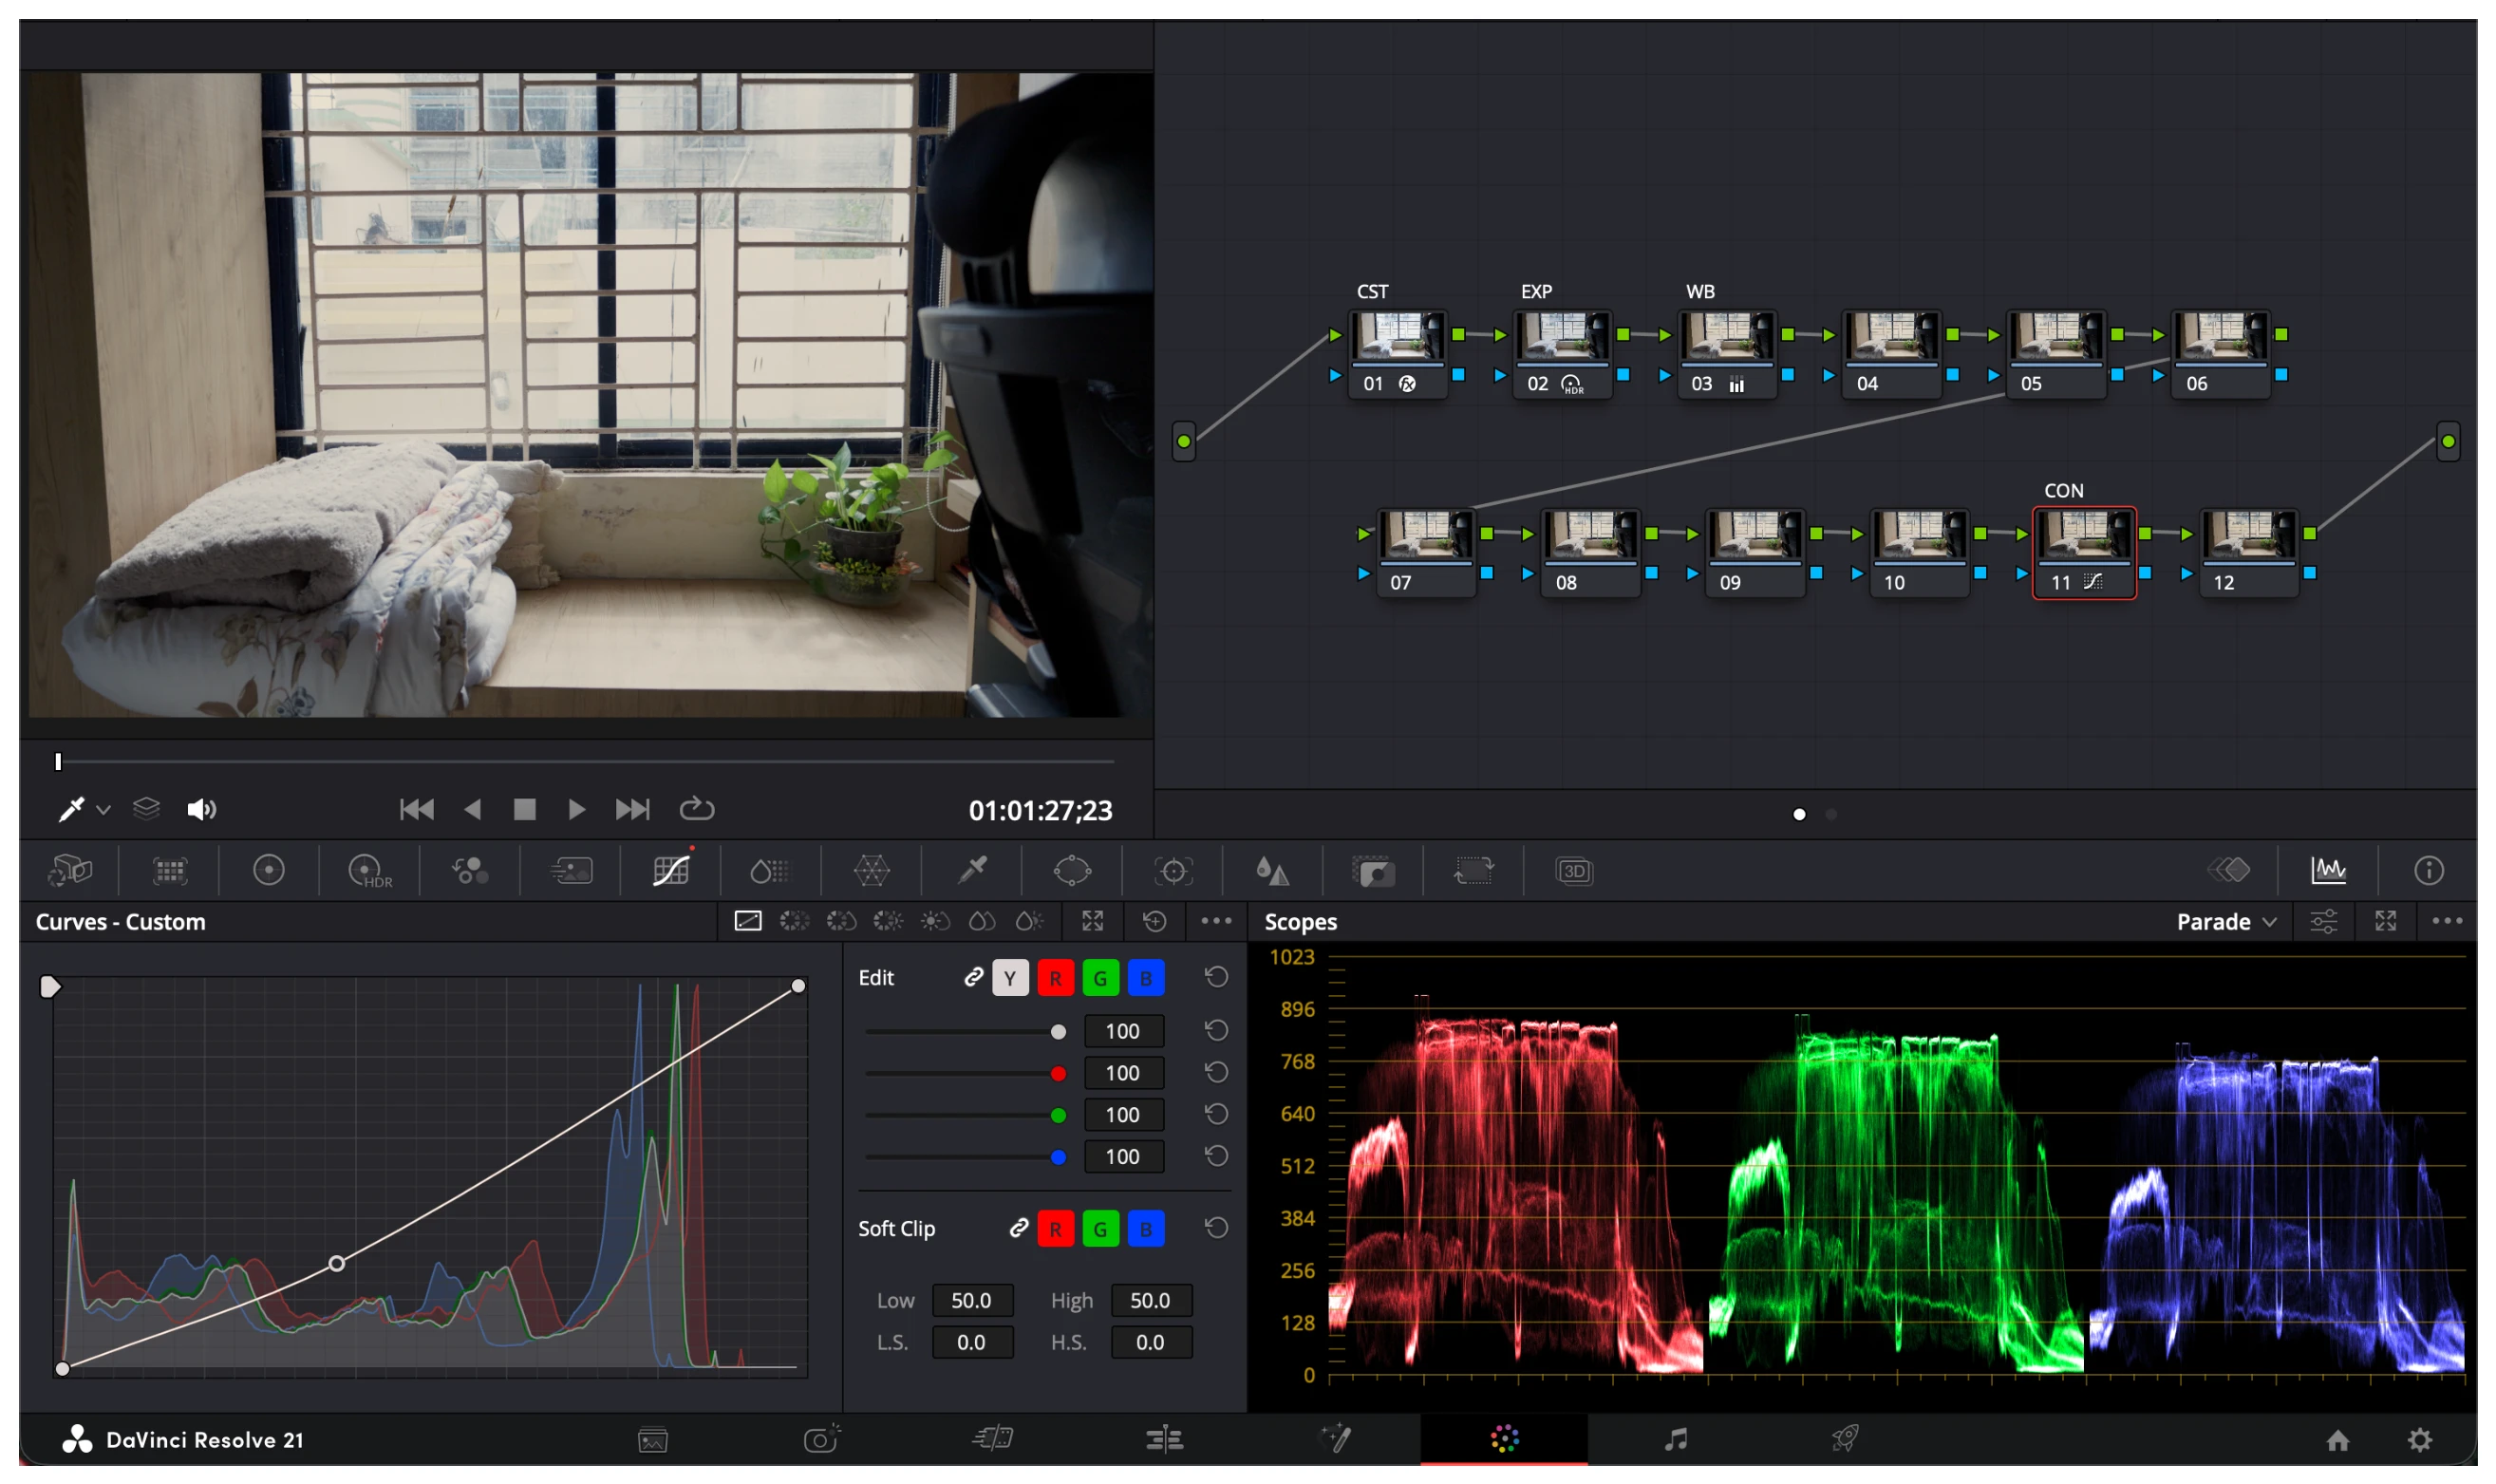
A better method to achieve constrast is by changing the curves.
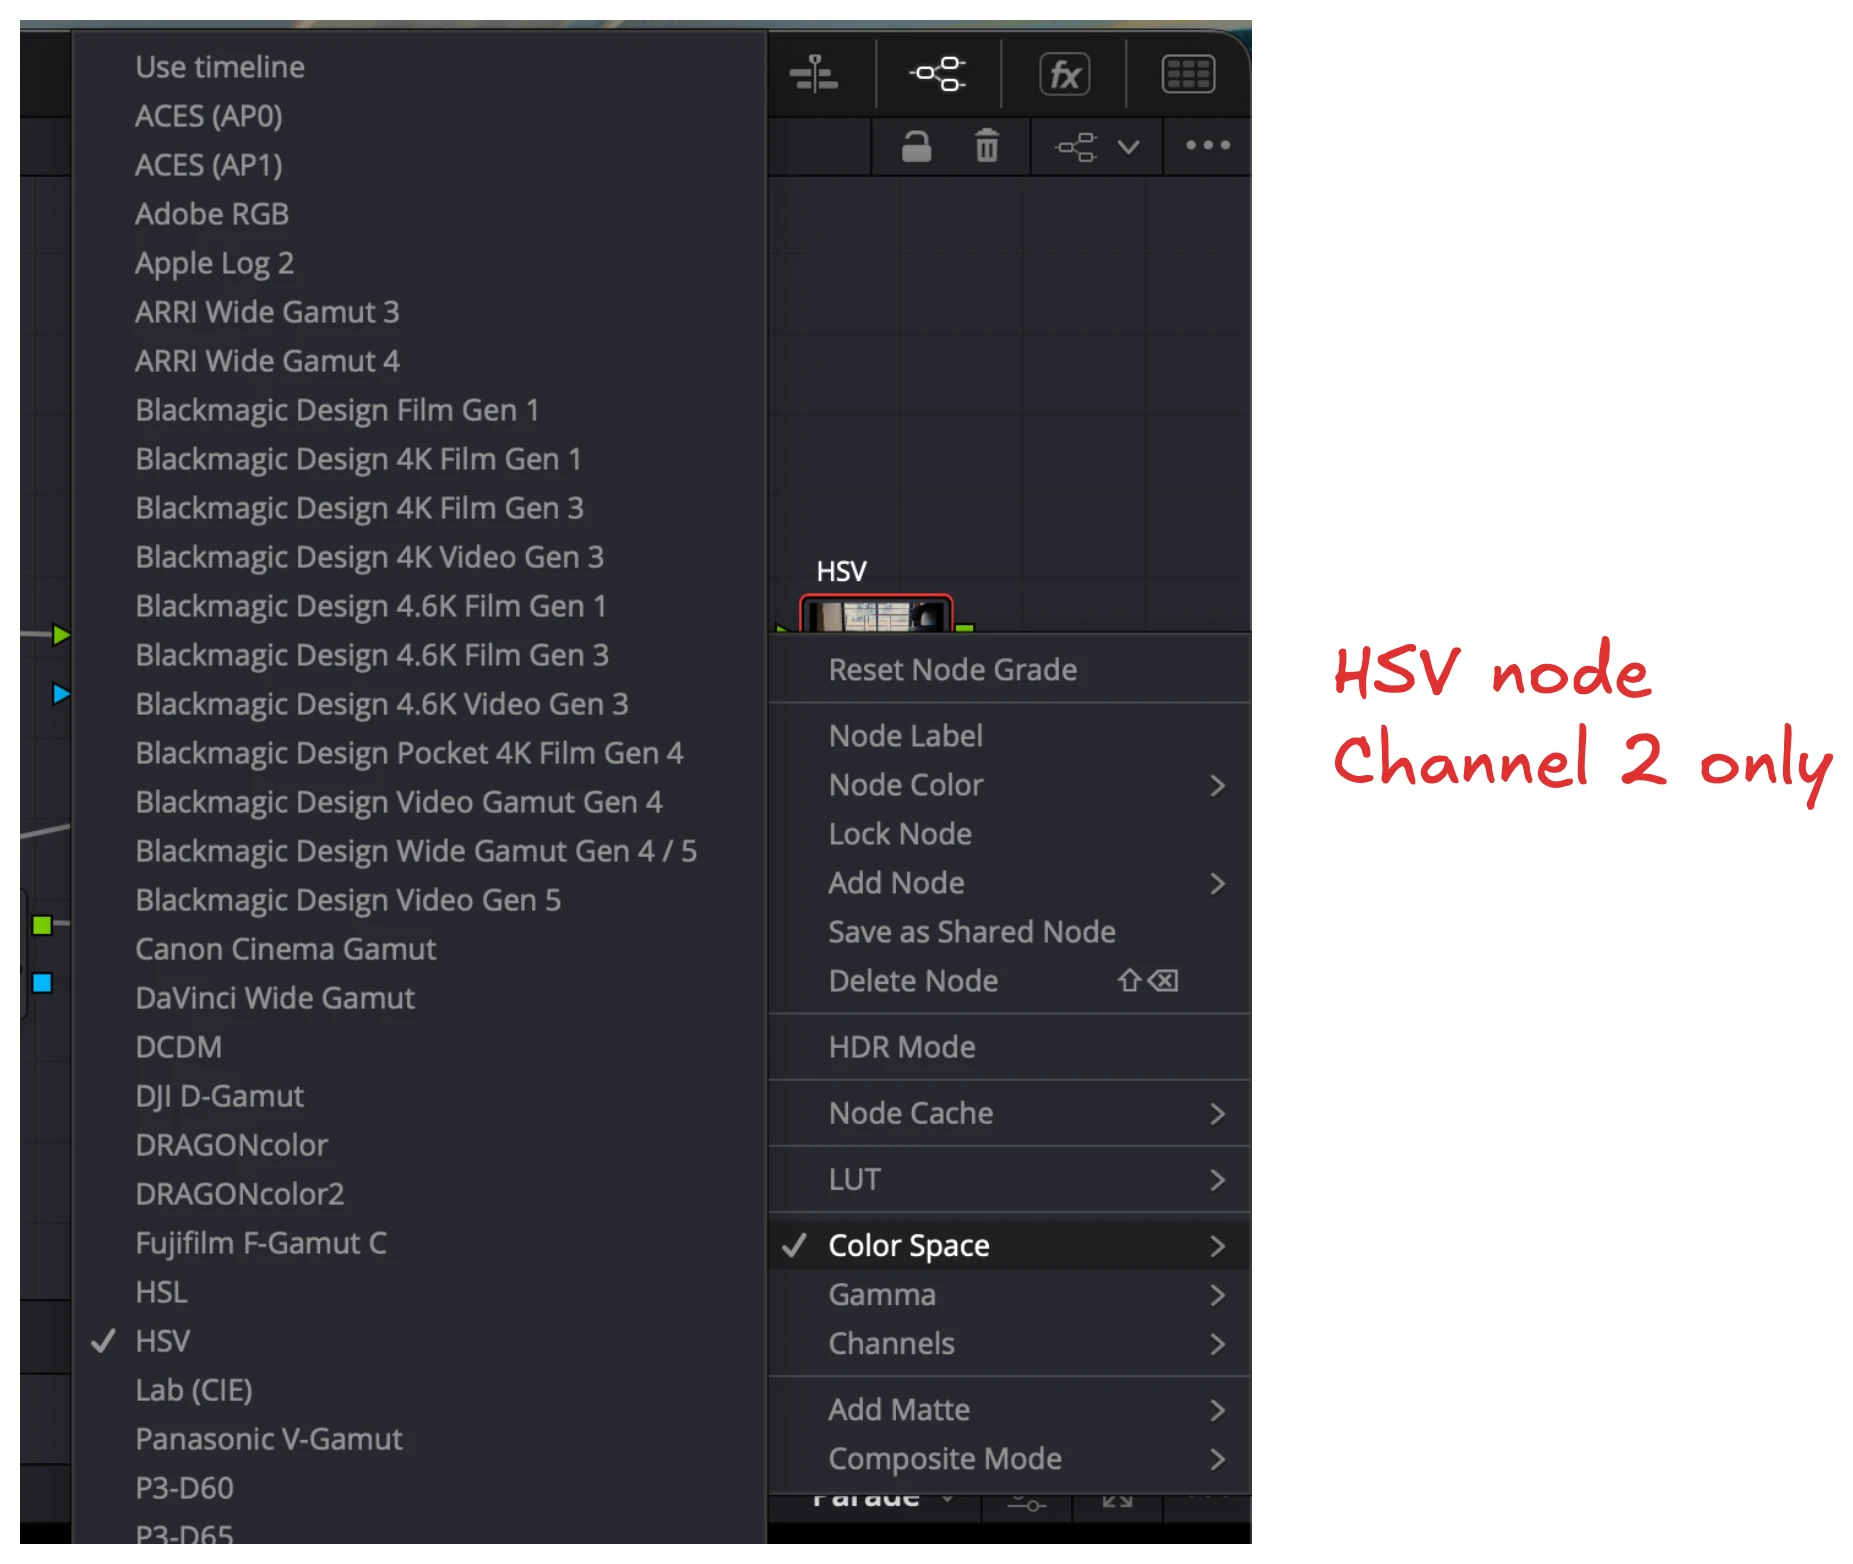
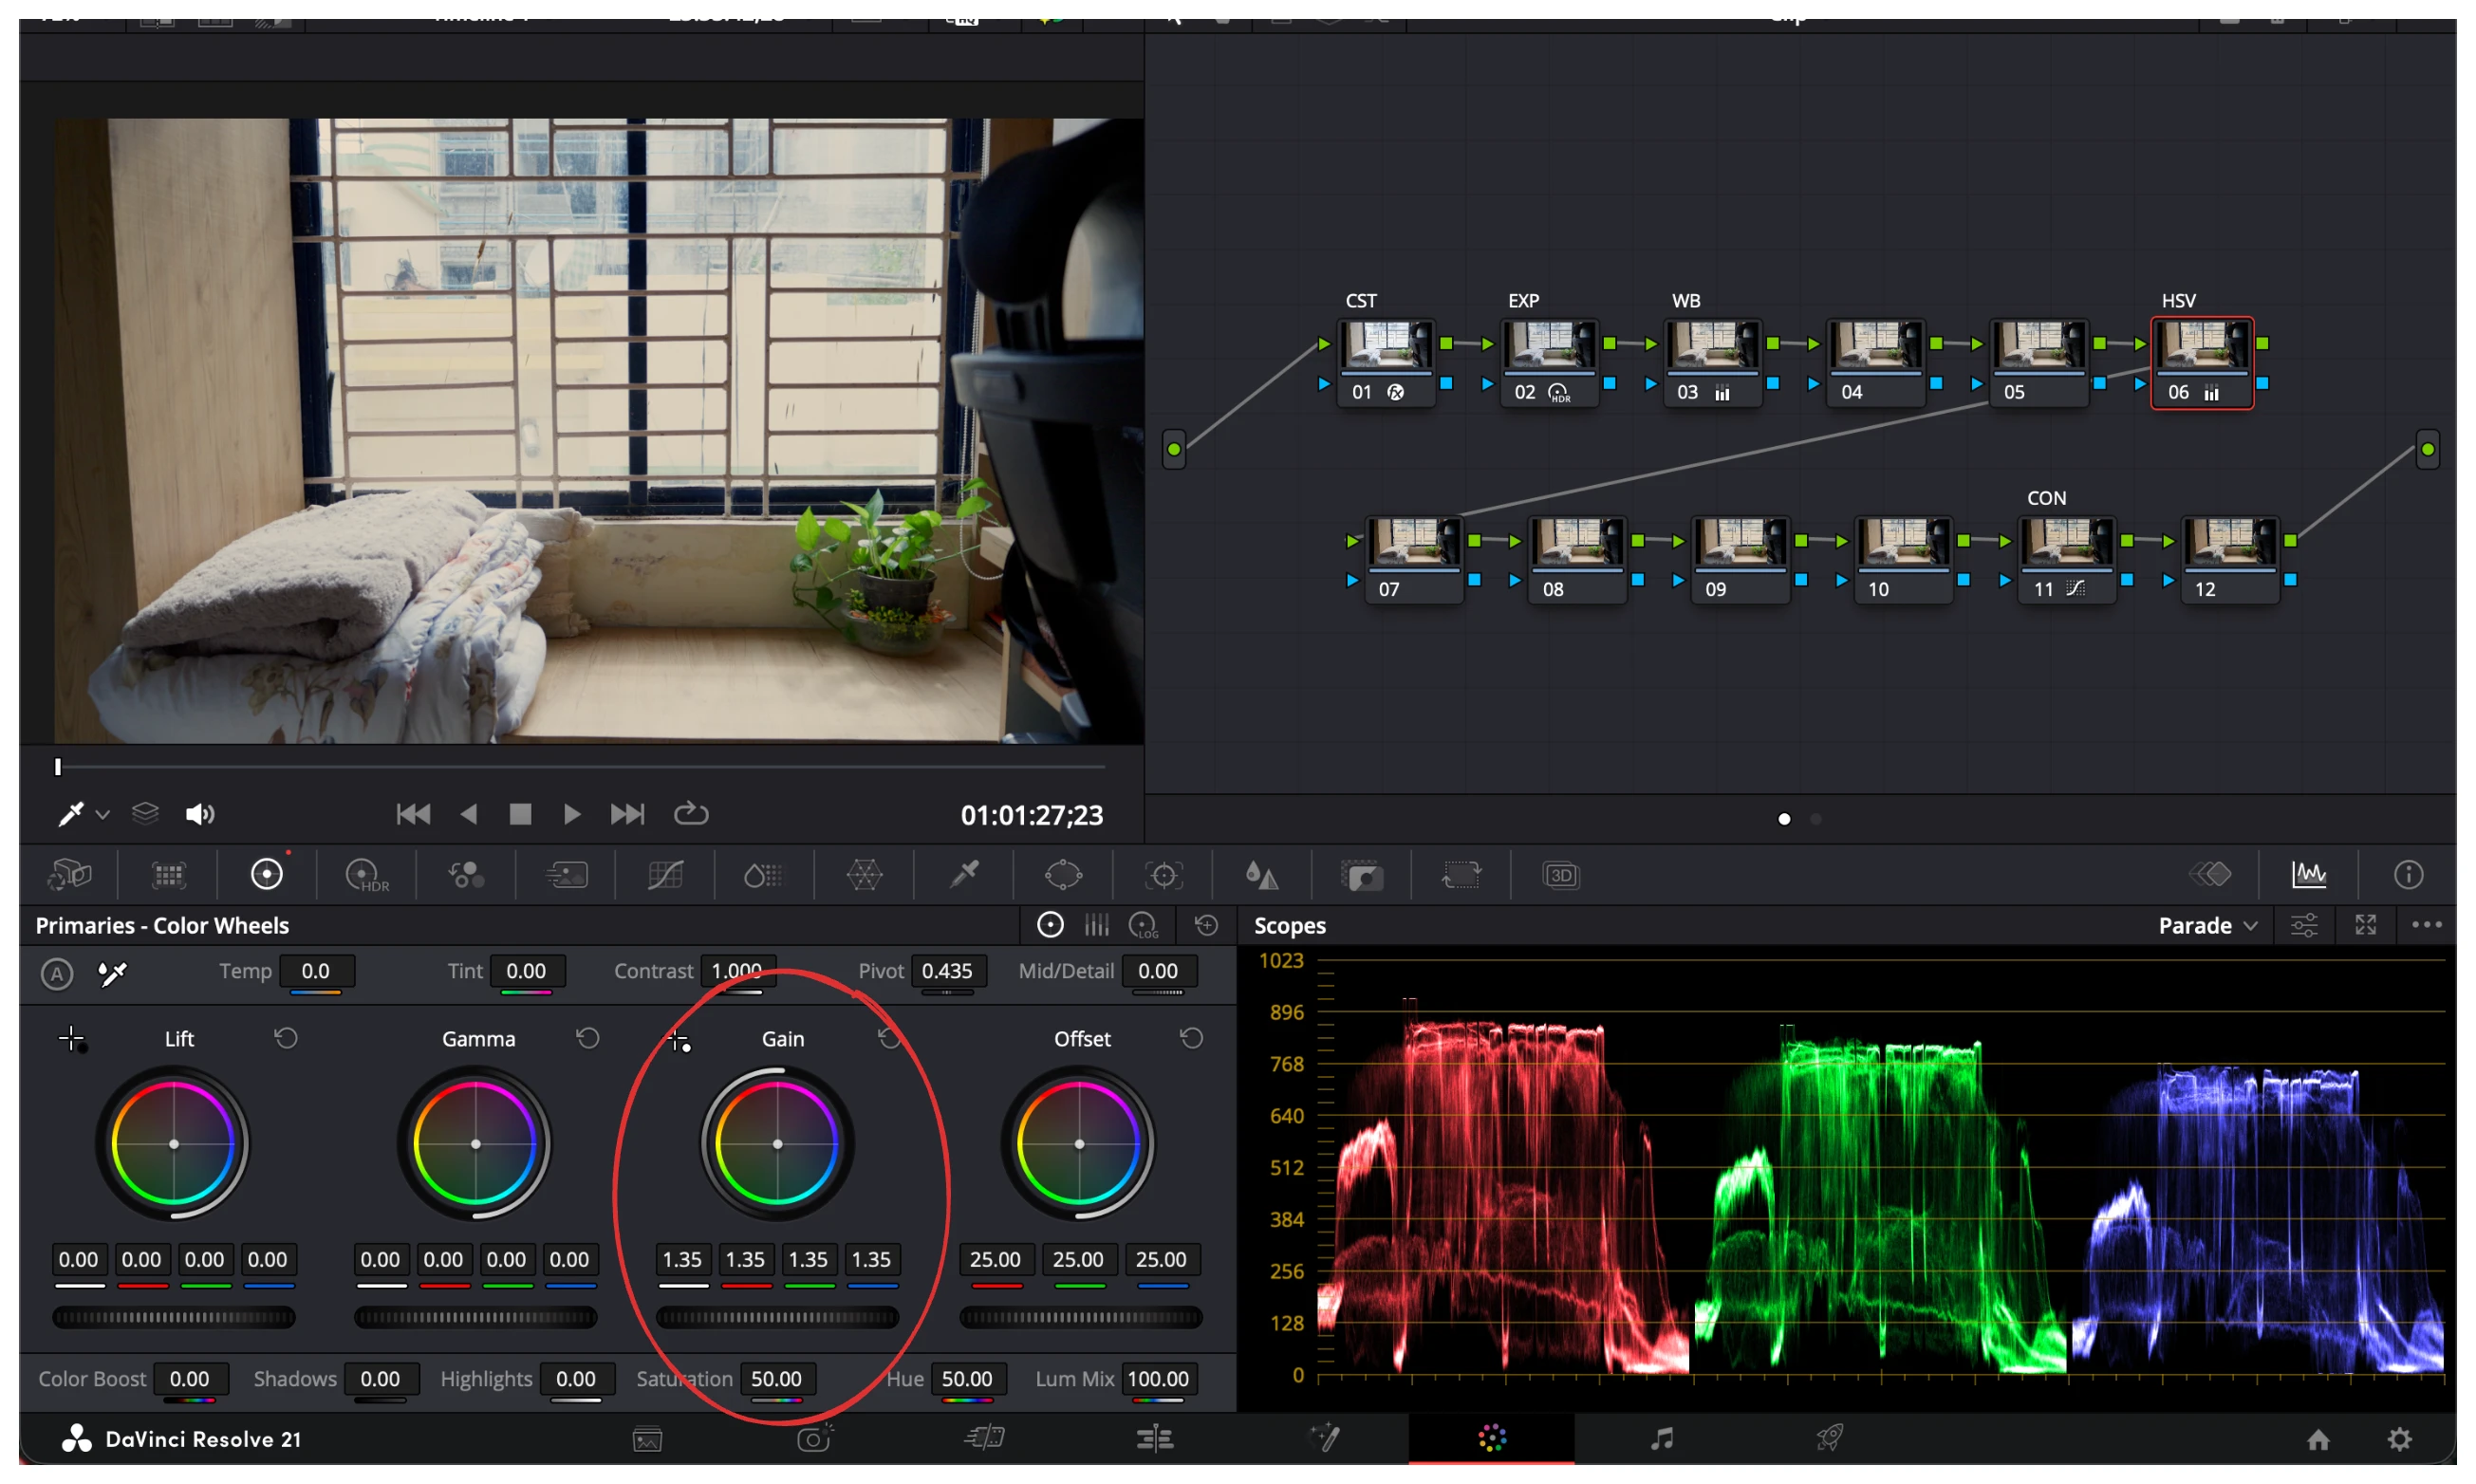
The best method to add beautiful saturation to your video is to follow the above method. HSV stands for Hue, Saturation, Vibrance. By only keeping the saturation active and increasing gamma, you achieve a much better and smoother saturation.
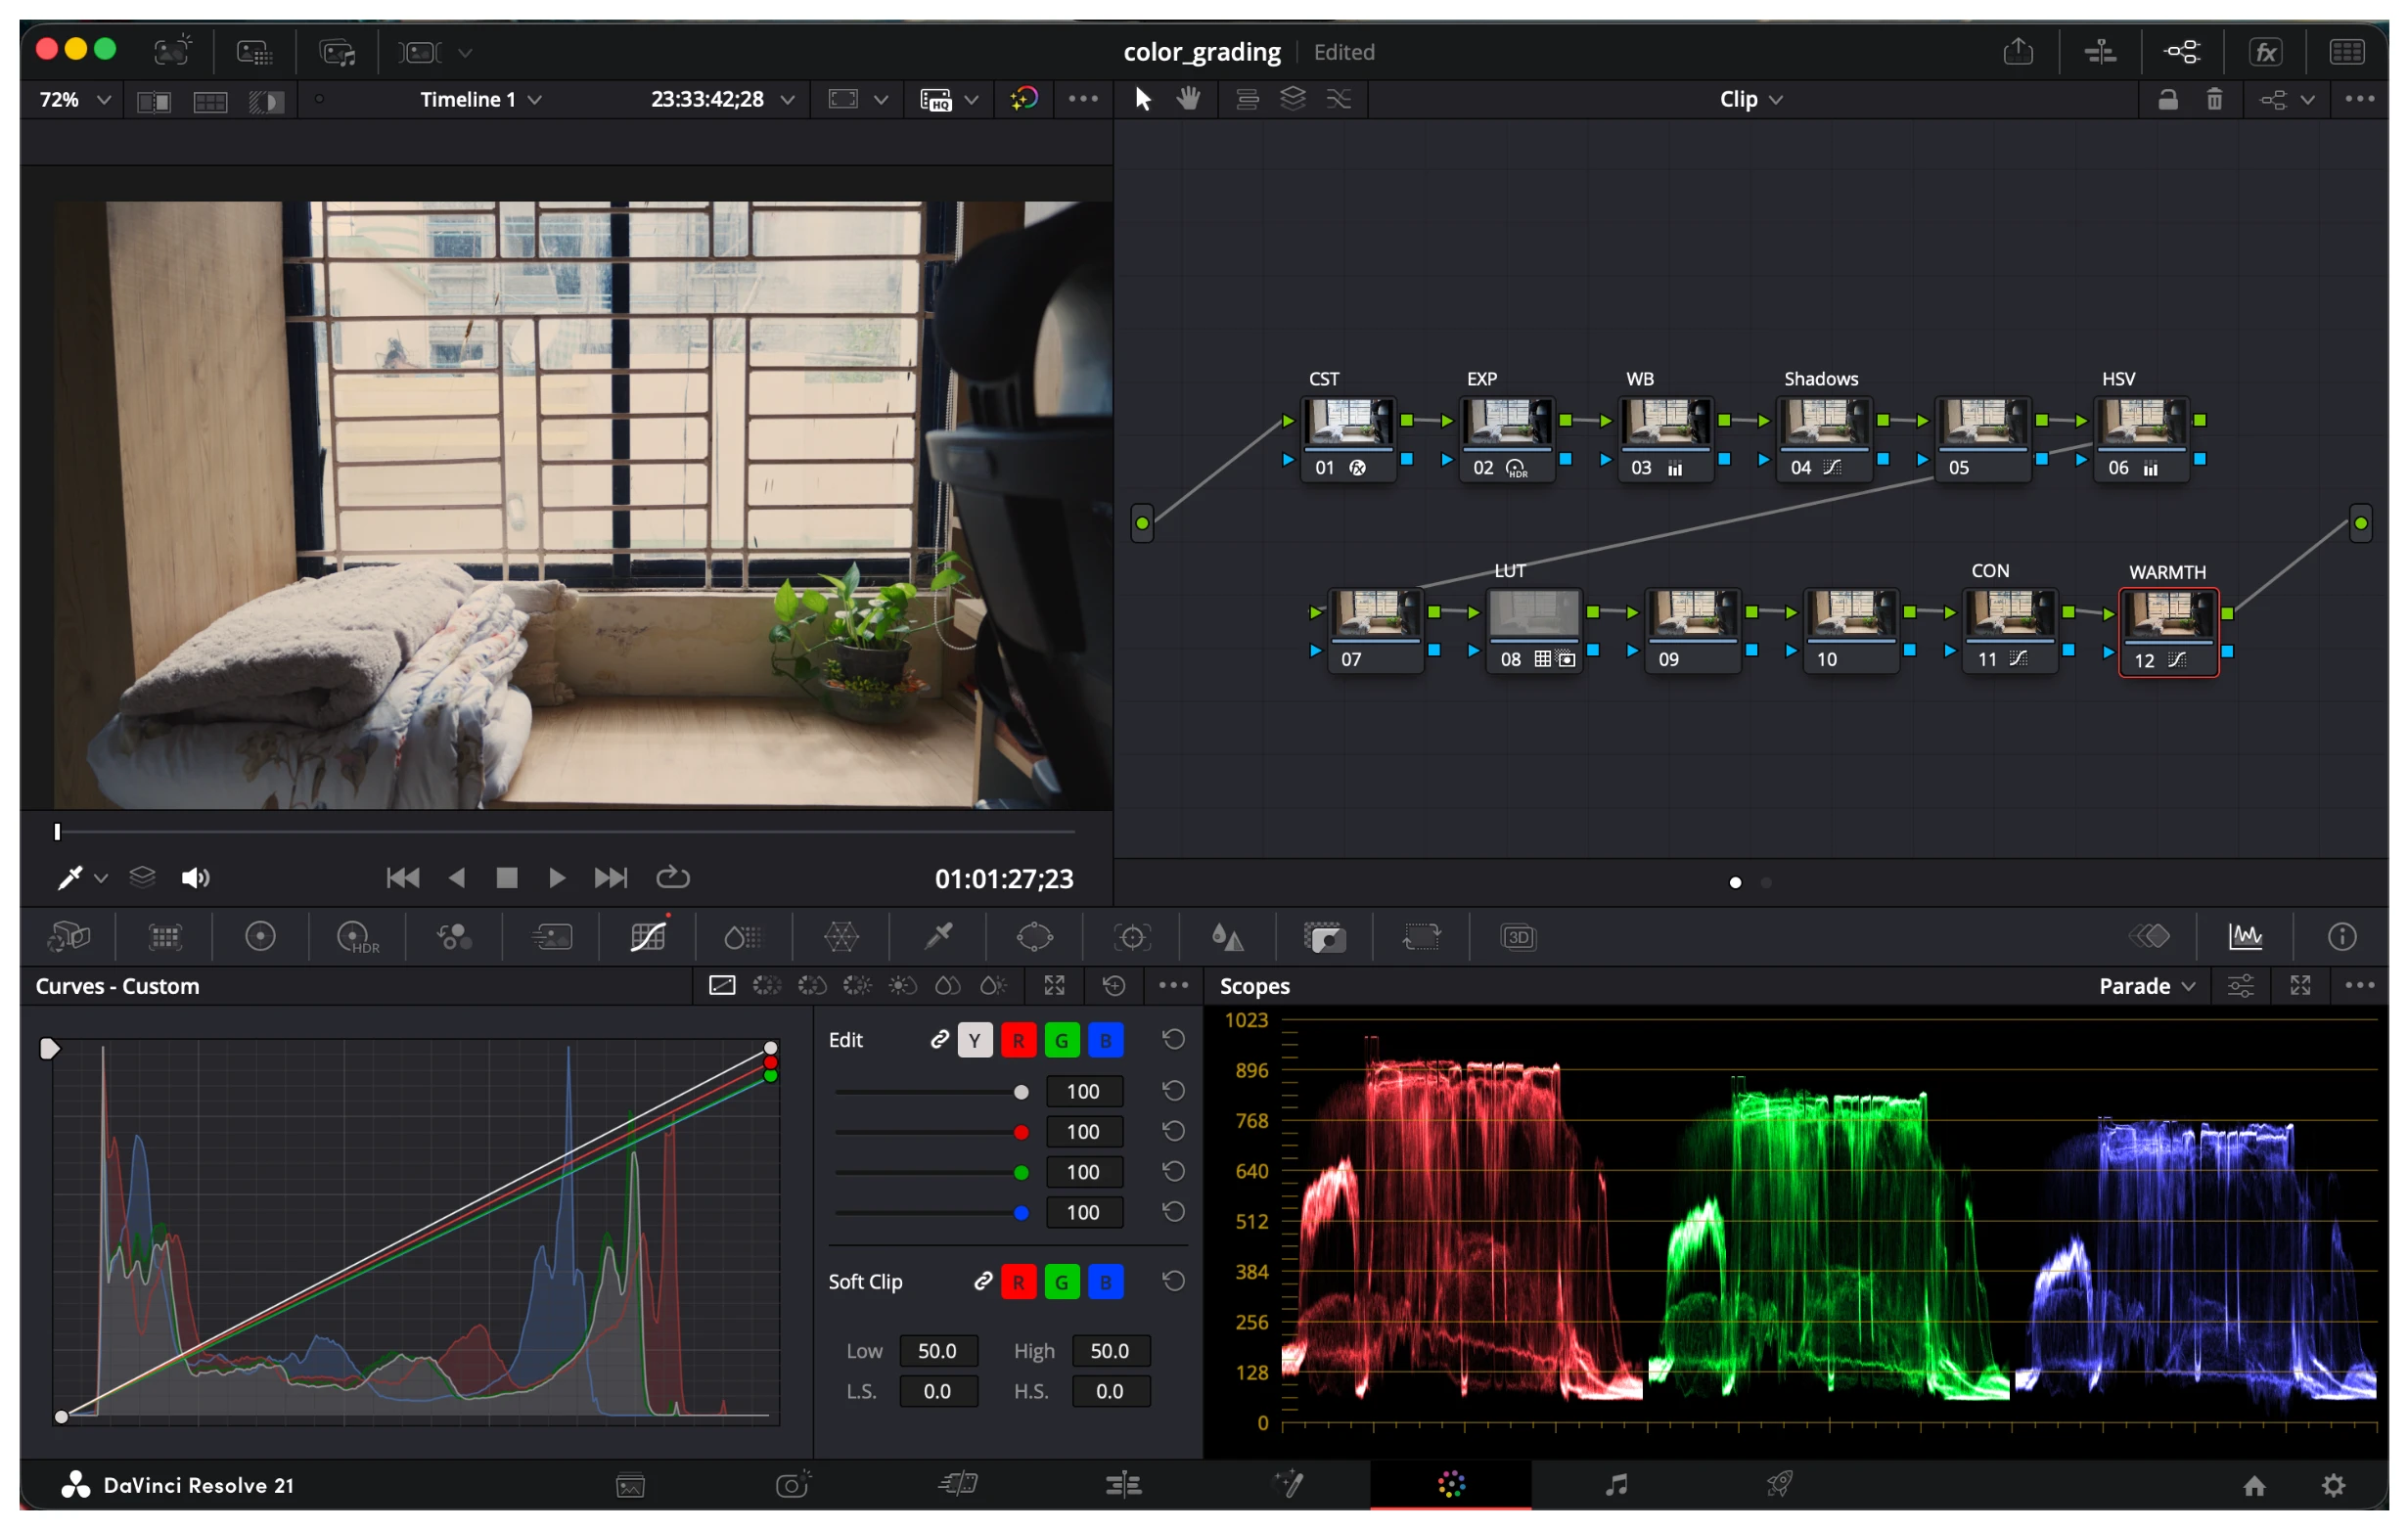
This I feel is a super secret sauce, just follow the above idea and it adds a beautiful warmth to your video!
I personally use a mix of the advanced and intermediate concepts. Whatever you believe was skipped, was mostly covered in intermediate
Professional
Now this is going to be tough, and even I do not use these techniques in most cases. But for brevity’s sake I have included them here.
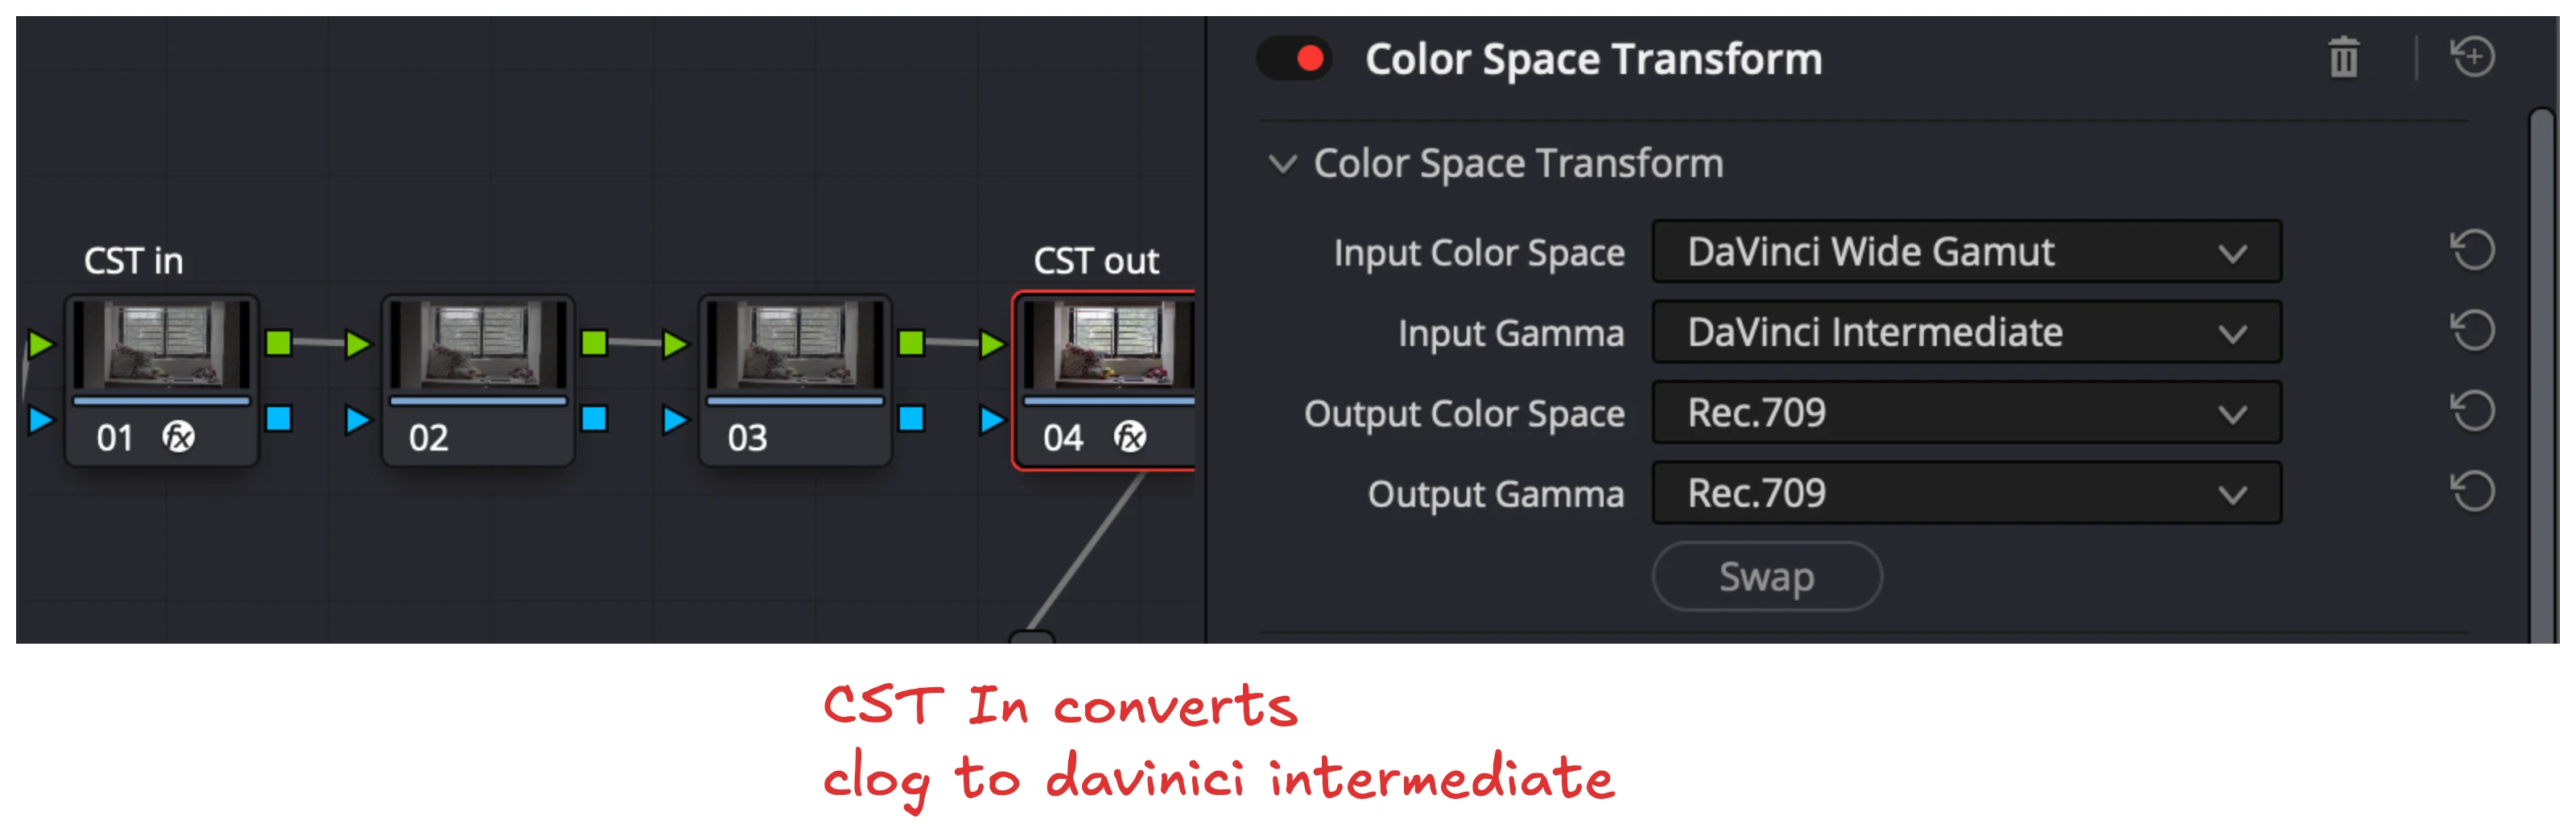
You get much wider editing range if you work in davinci wide gamut. So create a CST in which converts from your log footage to davinci wide gamut and CST out that gives out Rec 709
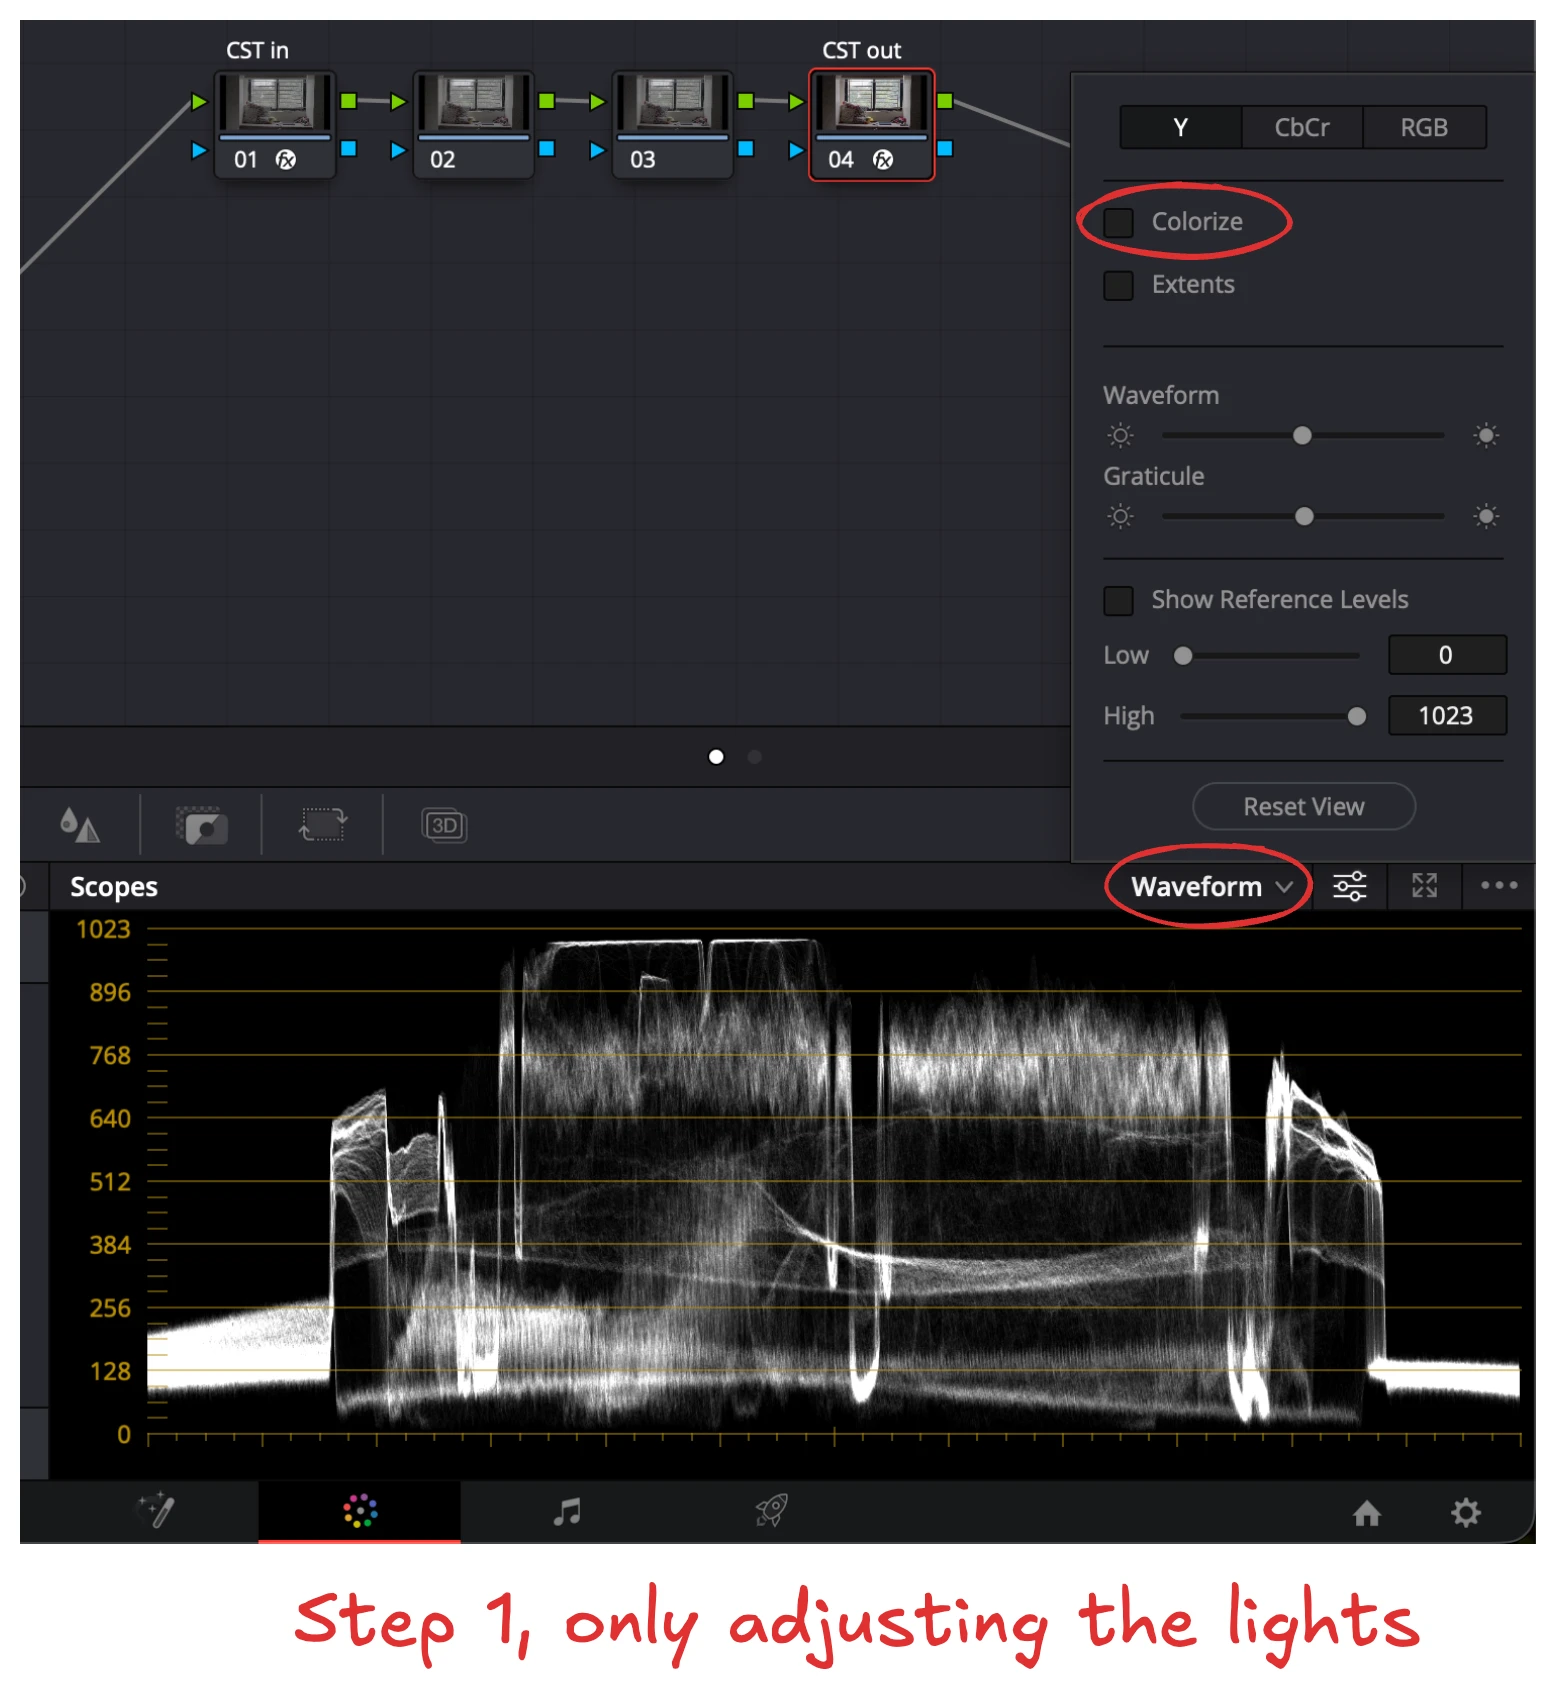
The first step as always is color correction, but even in this. We are going to first improve the lights, increase the contrast, make the video itself pop first!
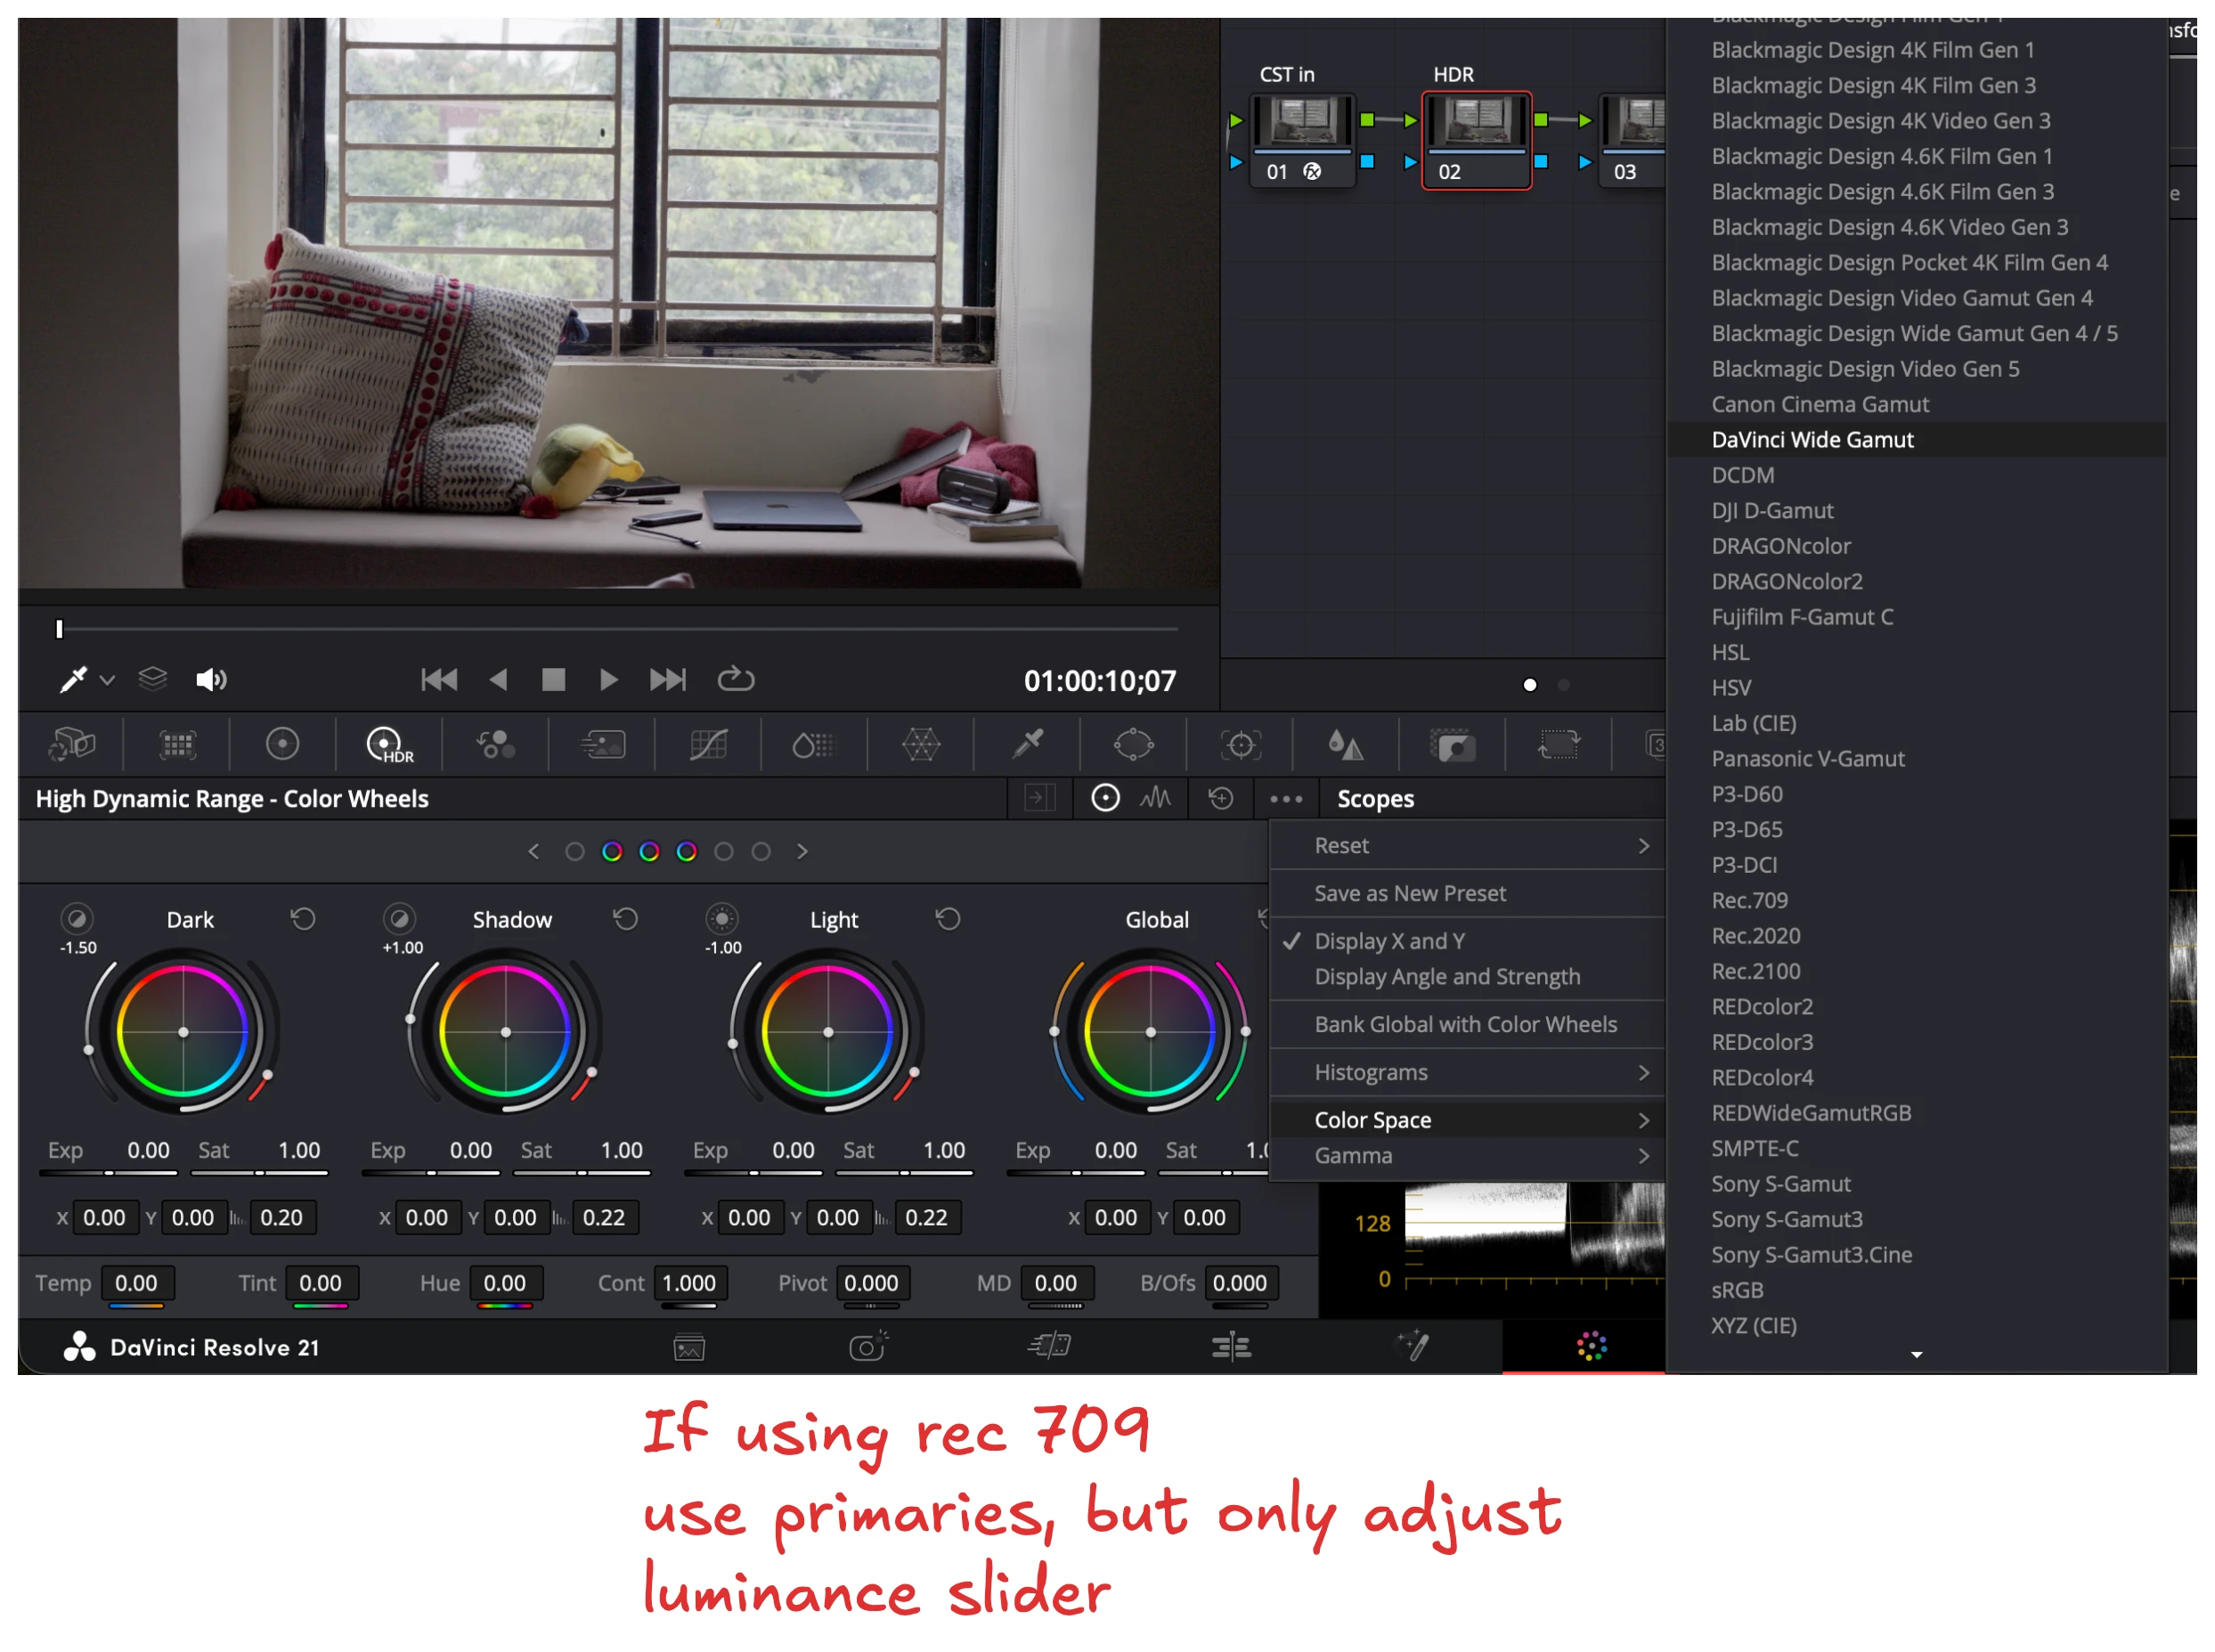
Create an HDR node (exposure), and edit it using the HDR sliders as we did previously.
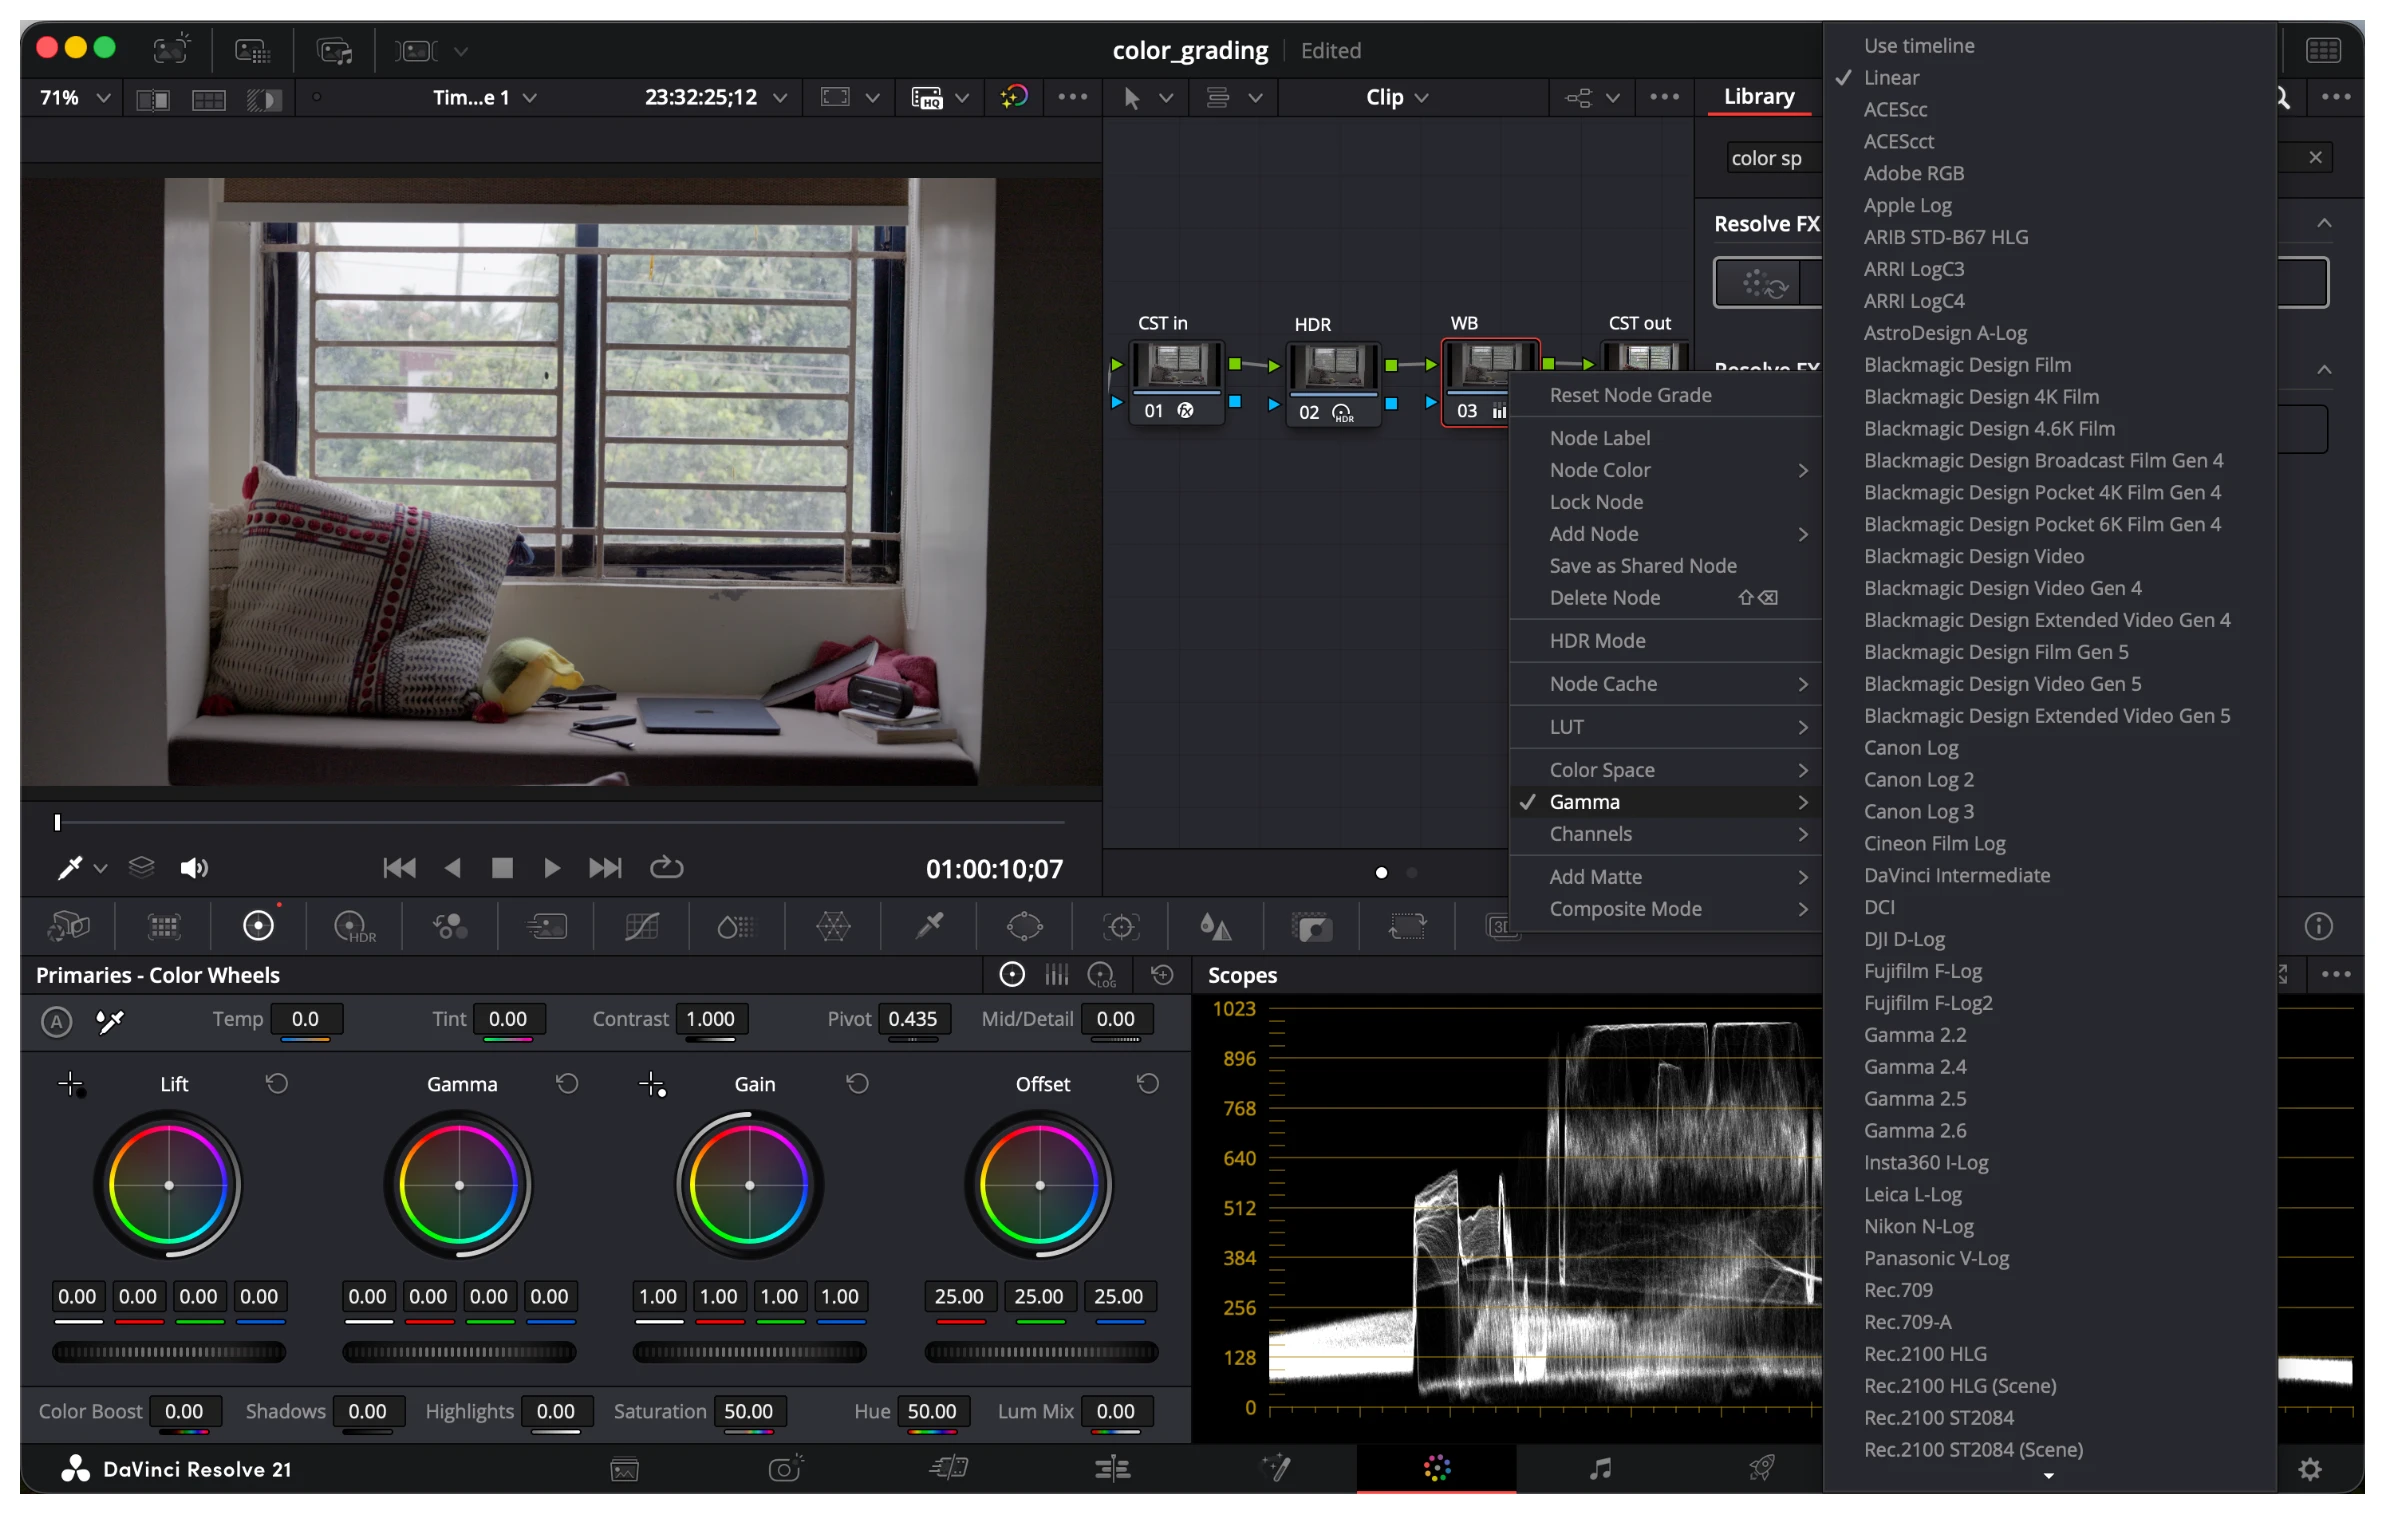
Now to change the WB we will not use the sliders as we had been so far. Create a WB node and make the gamma linear, now to change the temperature, move the primaries of Gain.
This gives a much smoother WB.
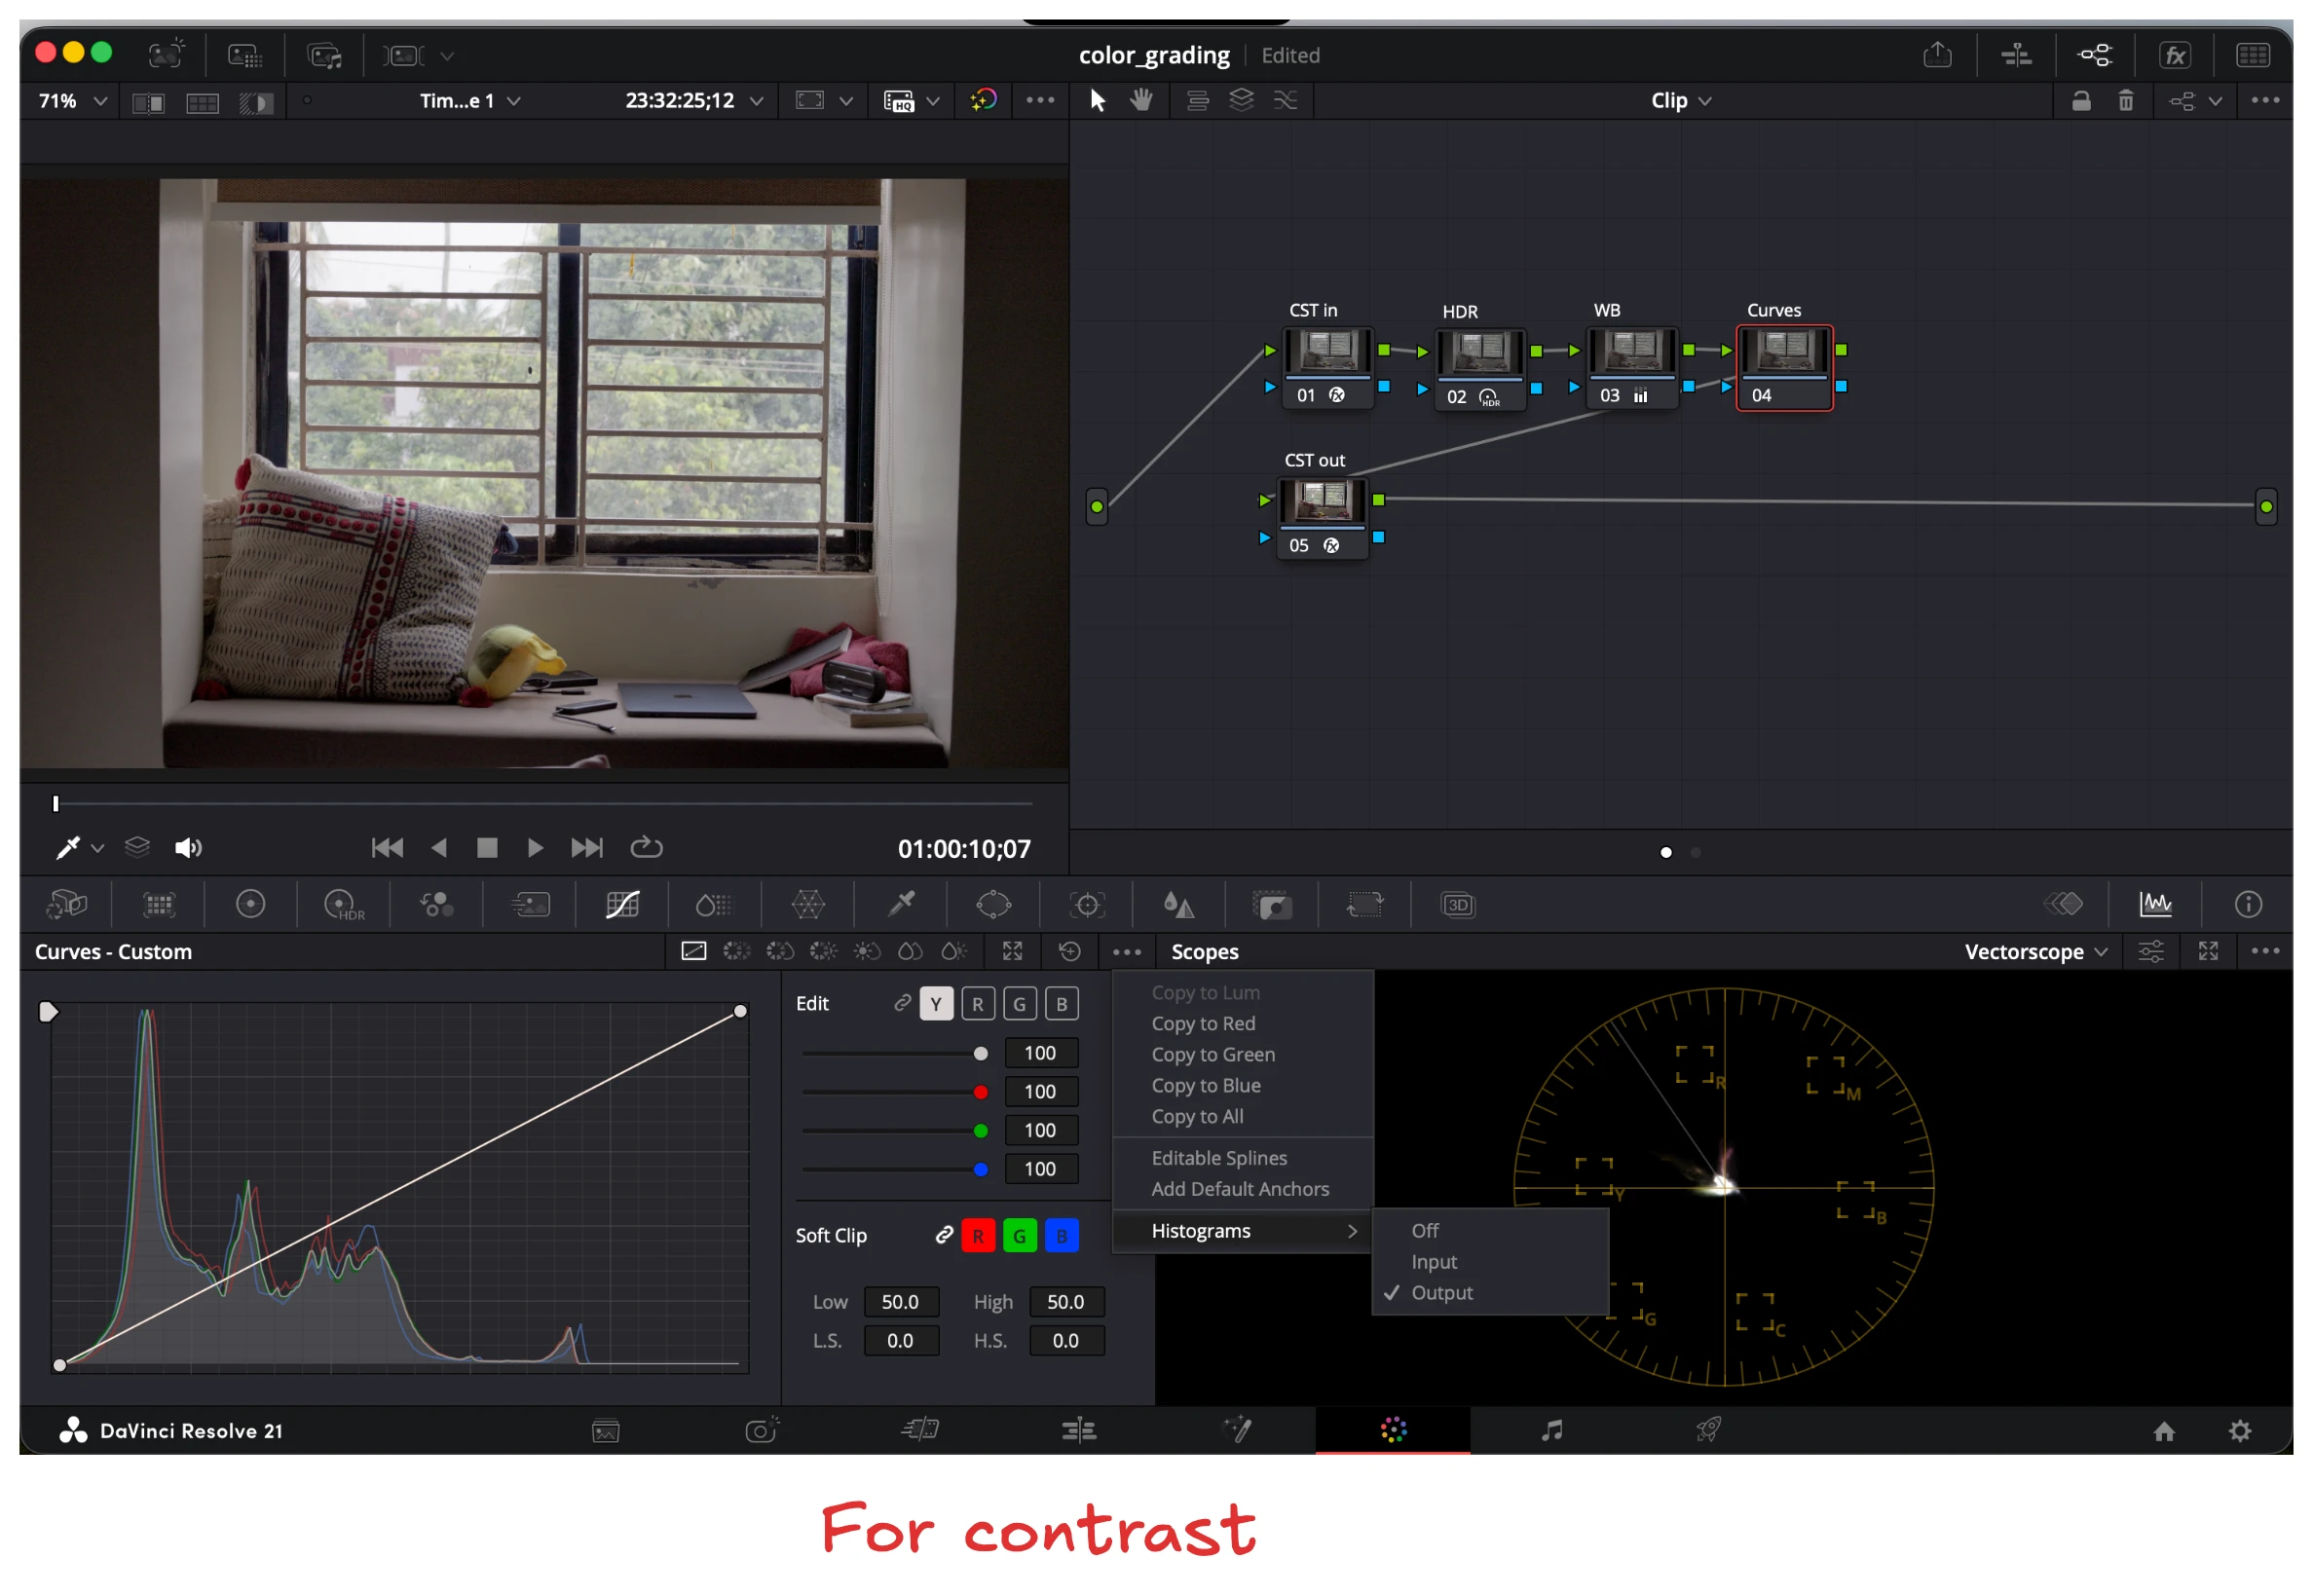
Now let’s add some contrast.
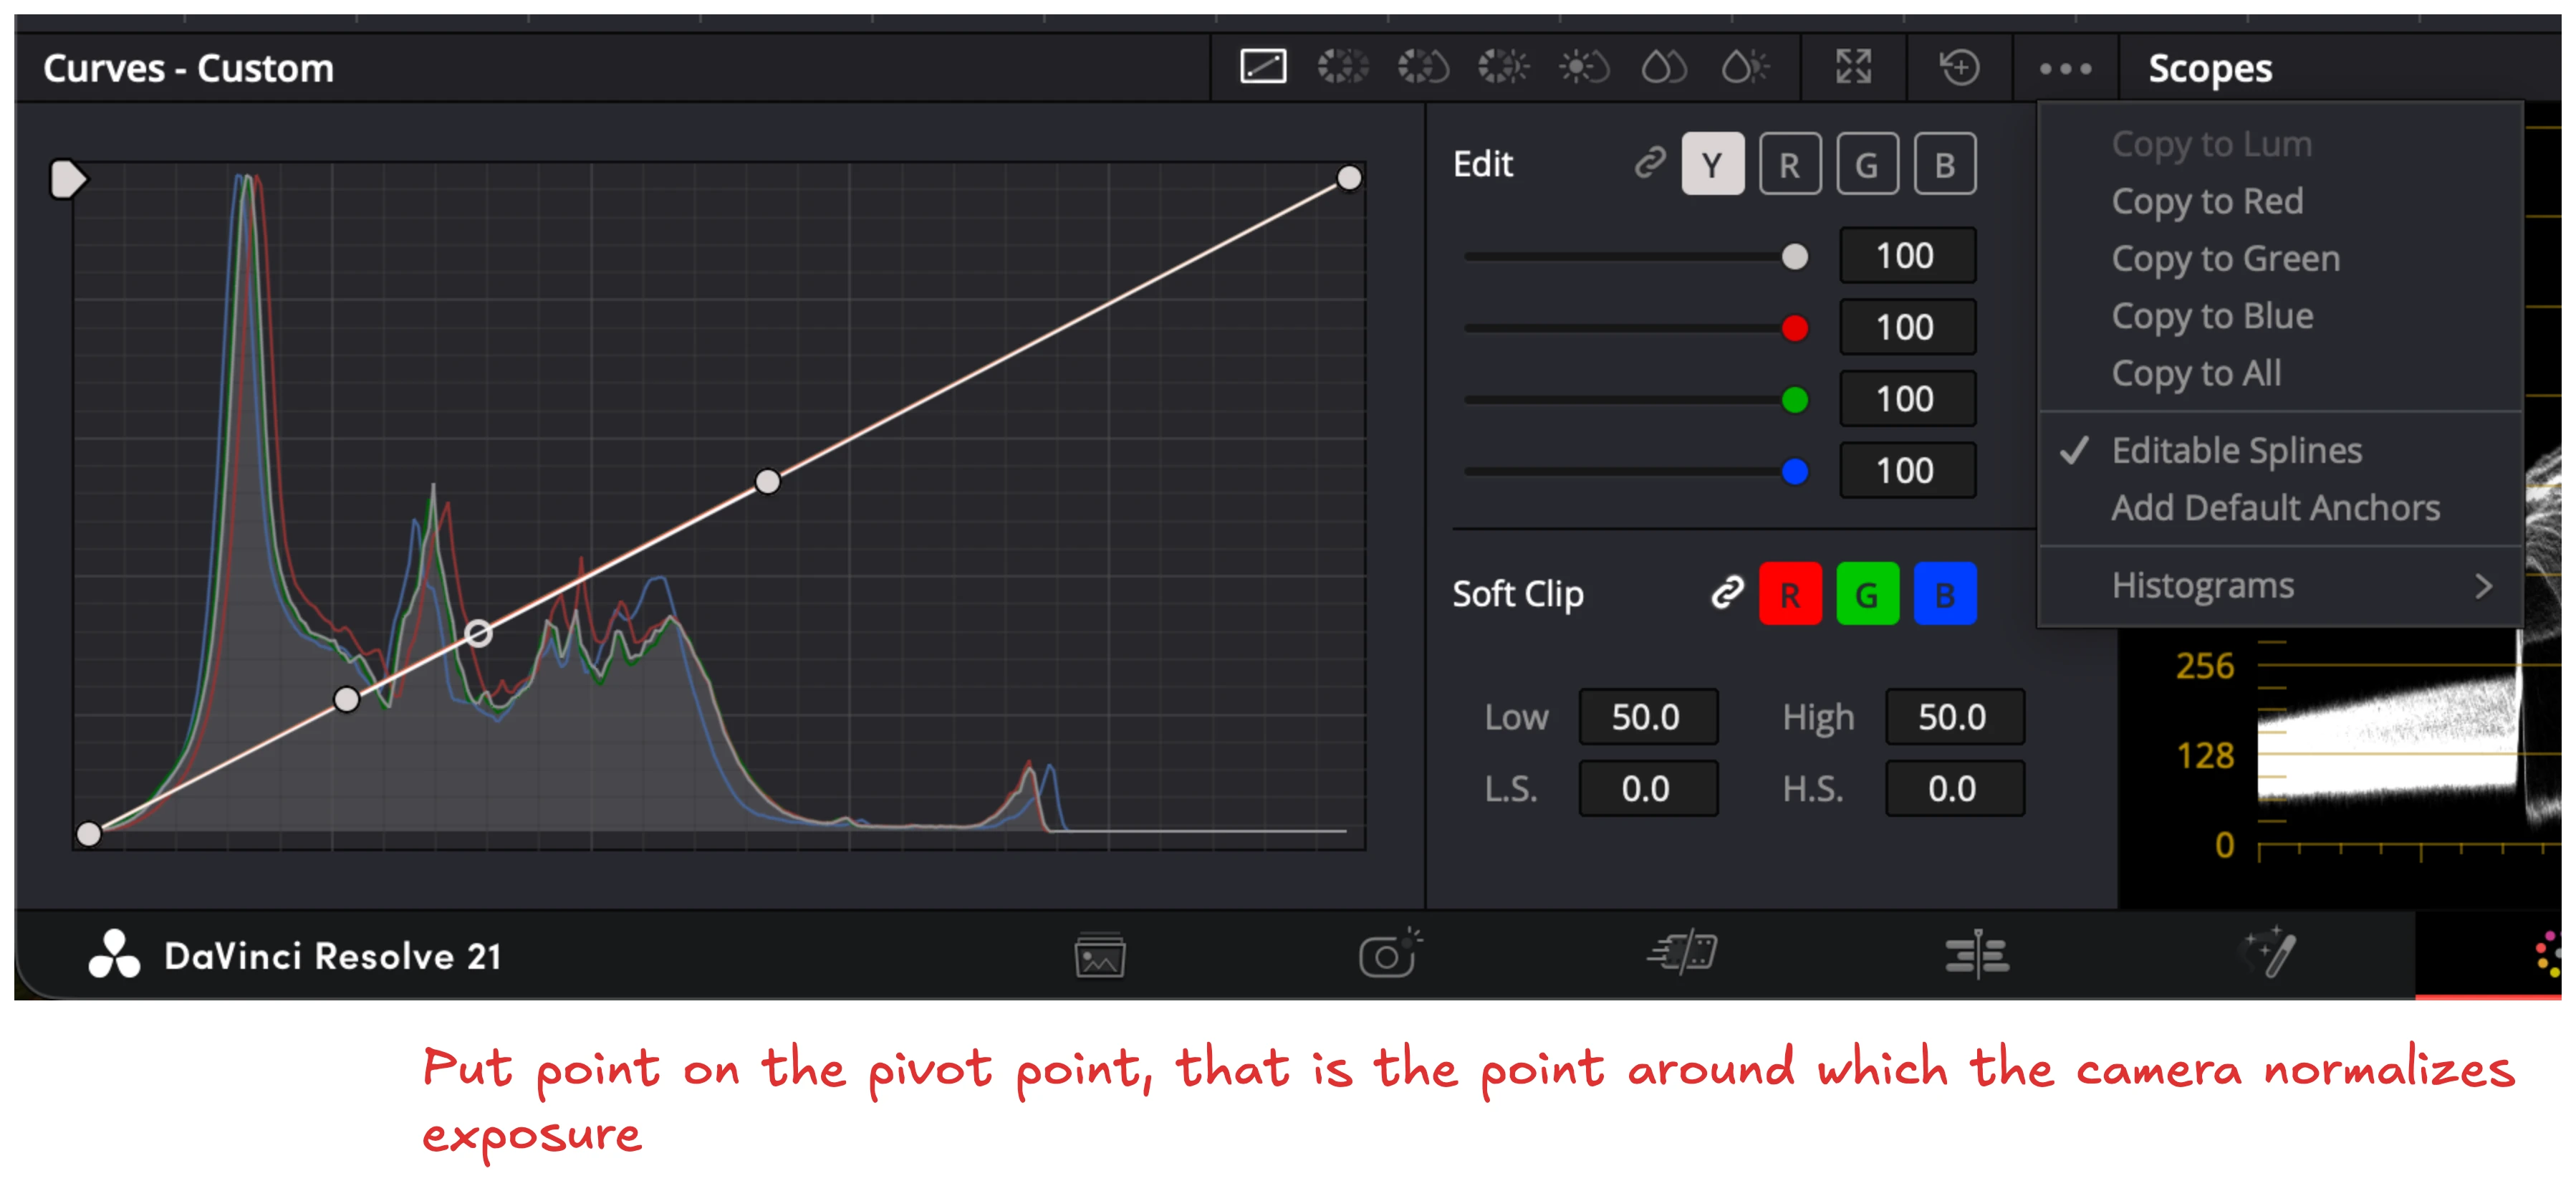
Previously we were eyeballing it, but to be much more concise we should place a point on the pivot point. (You can find the pivot point online! check this out [ADD_LINK])
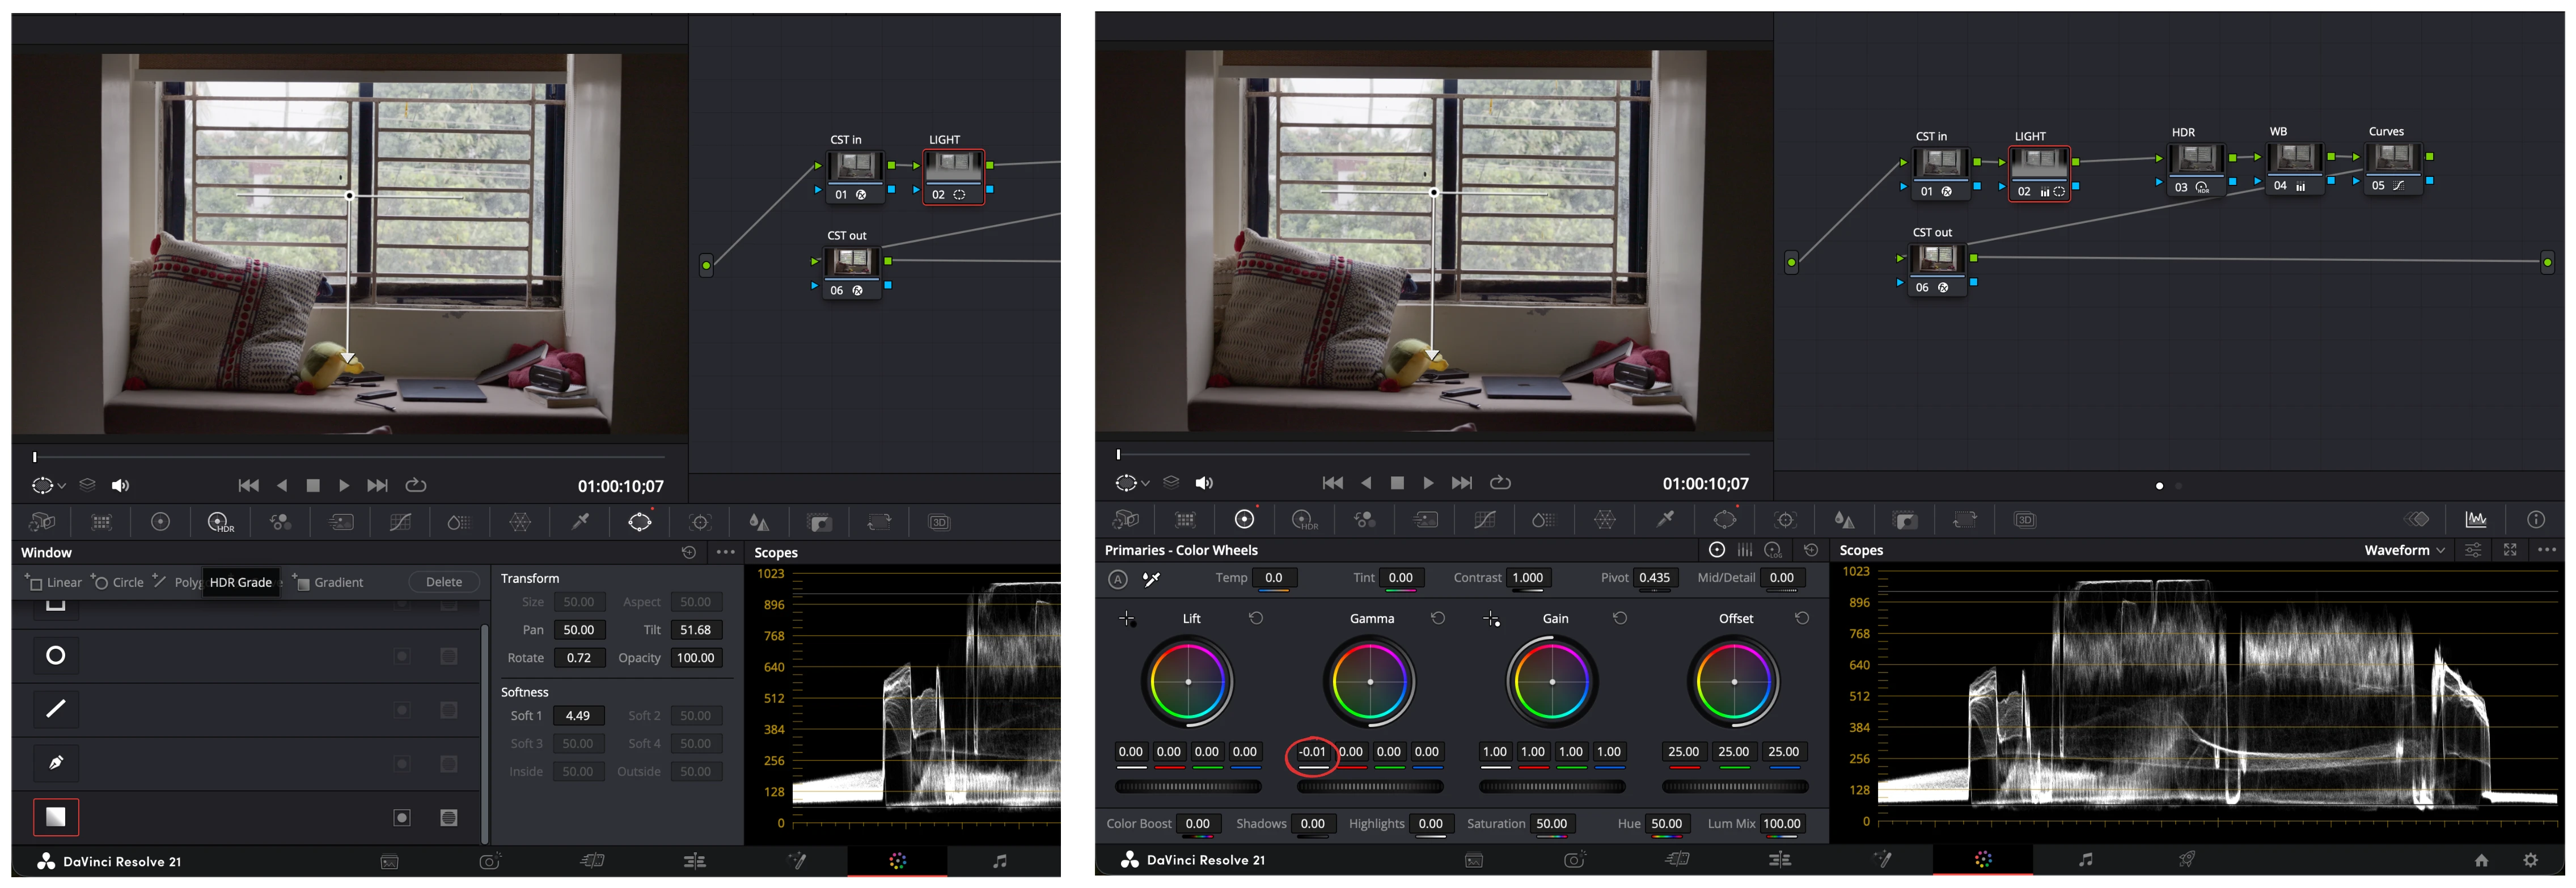
Now to truly add depth to your videos, masking is the secret tool. You want to mask your subject, highlight it, and make everything else dimmer. (It truly is something that comes with time, but masking is the secret to both great photography and videography!)
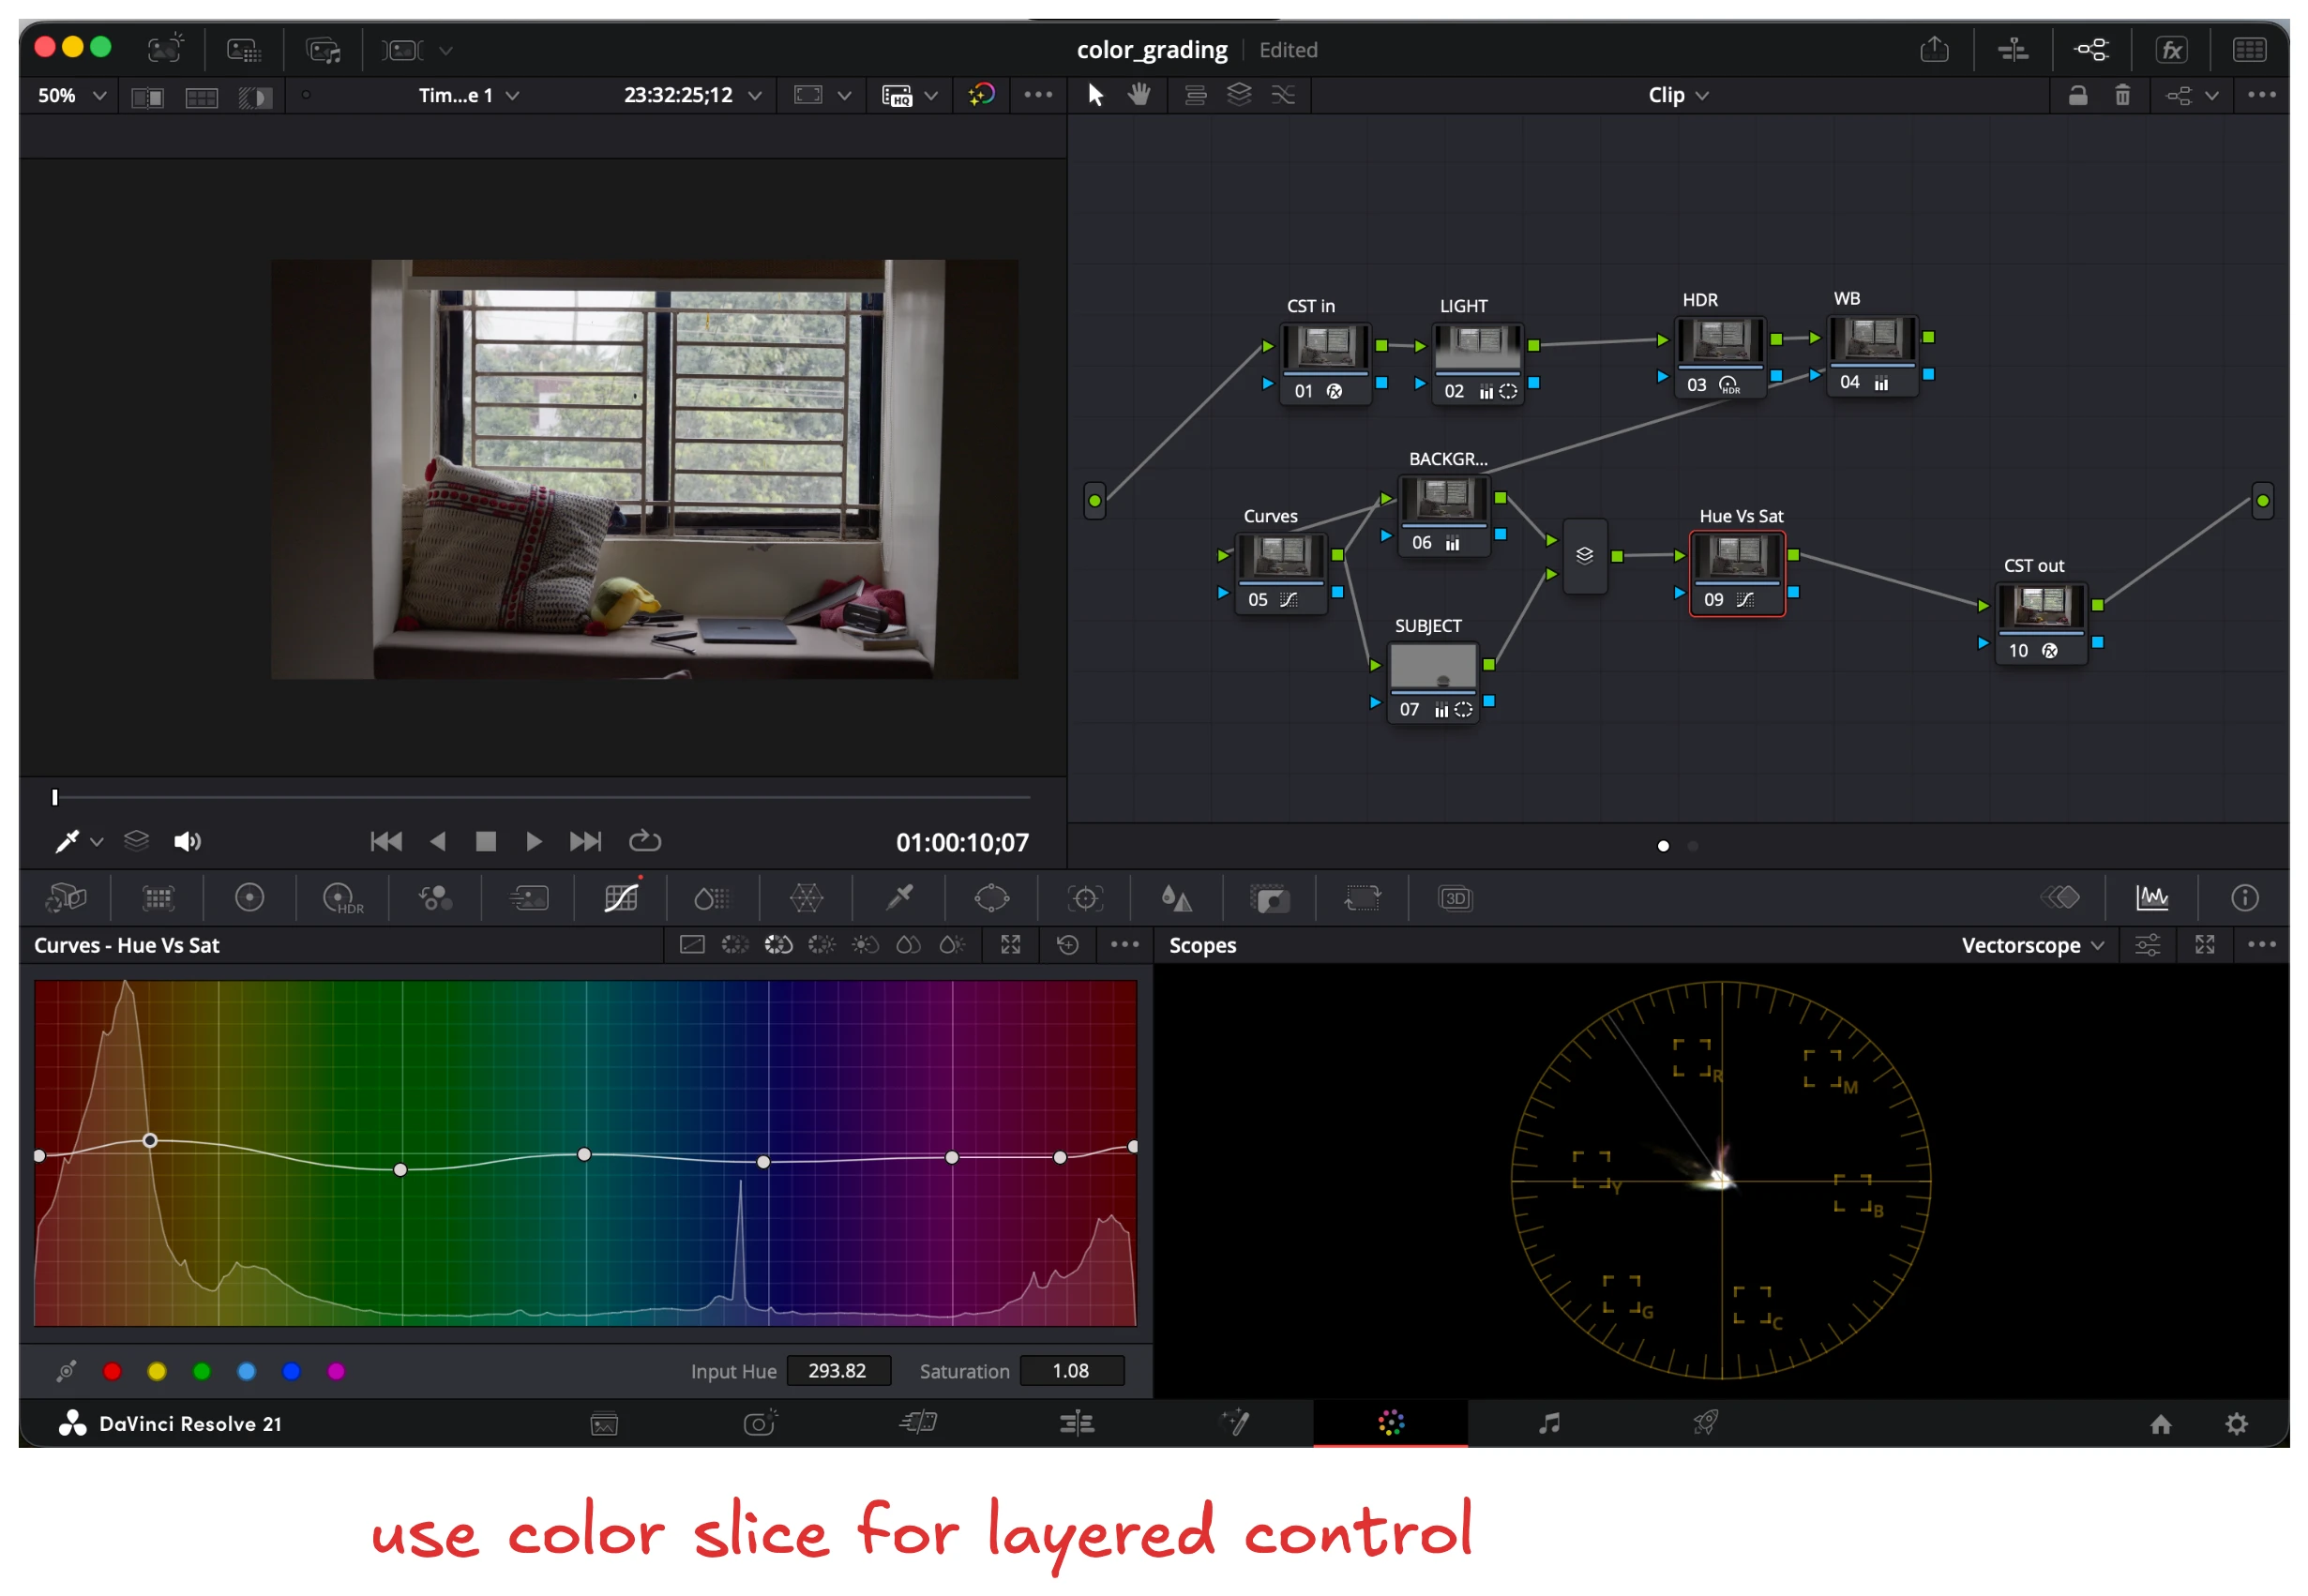
Trust me when I say it does not get harder than this (atleast to the best of my knowledge), Hue is the color of a color (I know sounds like a crazy sentence, but it essentially means, red looks red, but if you push the hue of red to green, everything red will look green, a red apple will turn into a green apple.), Saturation the way I see it is how strong that color is, or bright (Still different from luminance/brightness and Vibrance).
Hence, Hue Vs Saturation curve controls how strong each color looks!
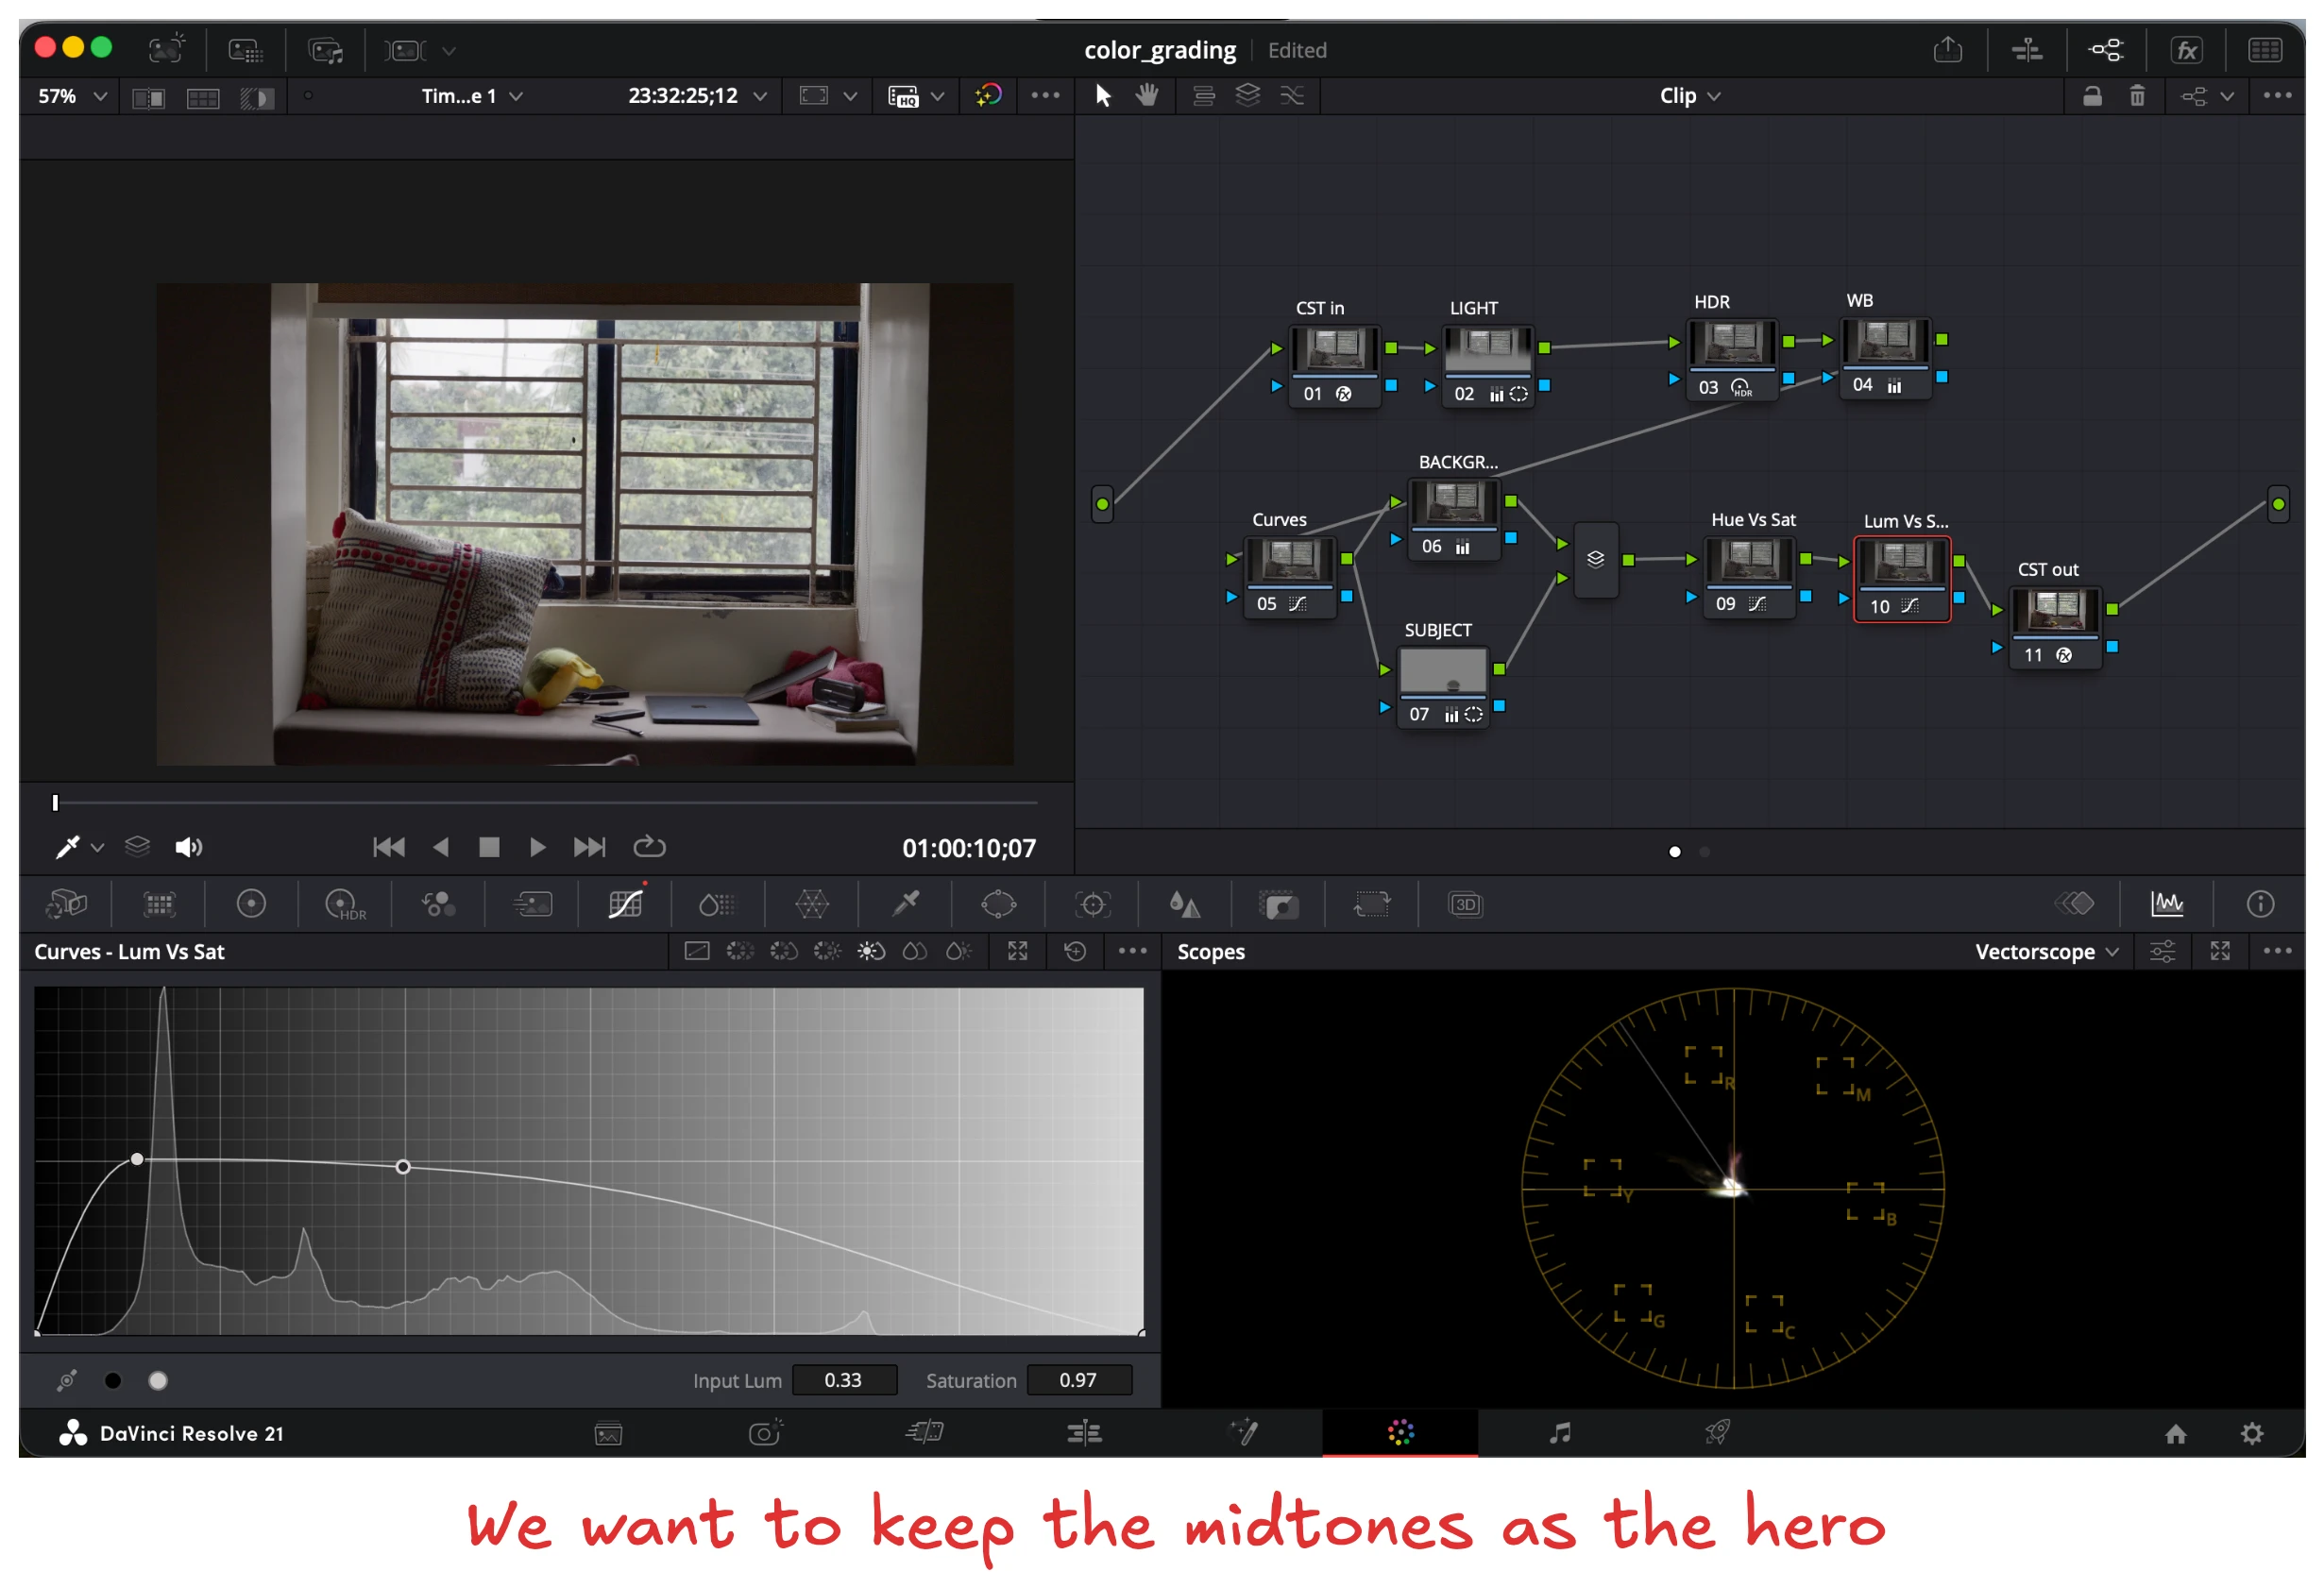
Now what weare trying to do is, roll off the shadows, make the highlights smooth and pop out the midtones. Because in most cases we want the midtones to be the hero!
(Again their are caveats to this, really depends on the look you are going for!)
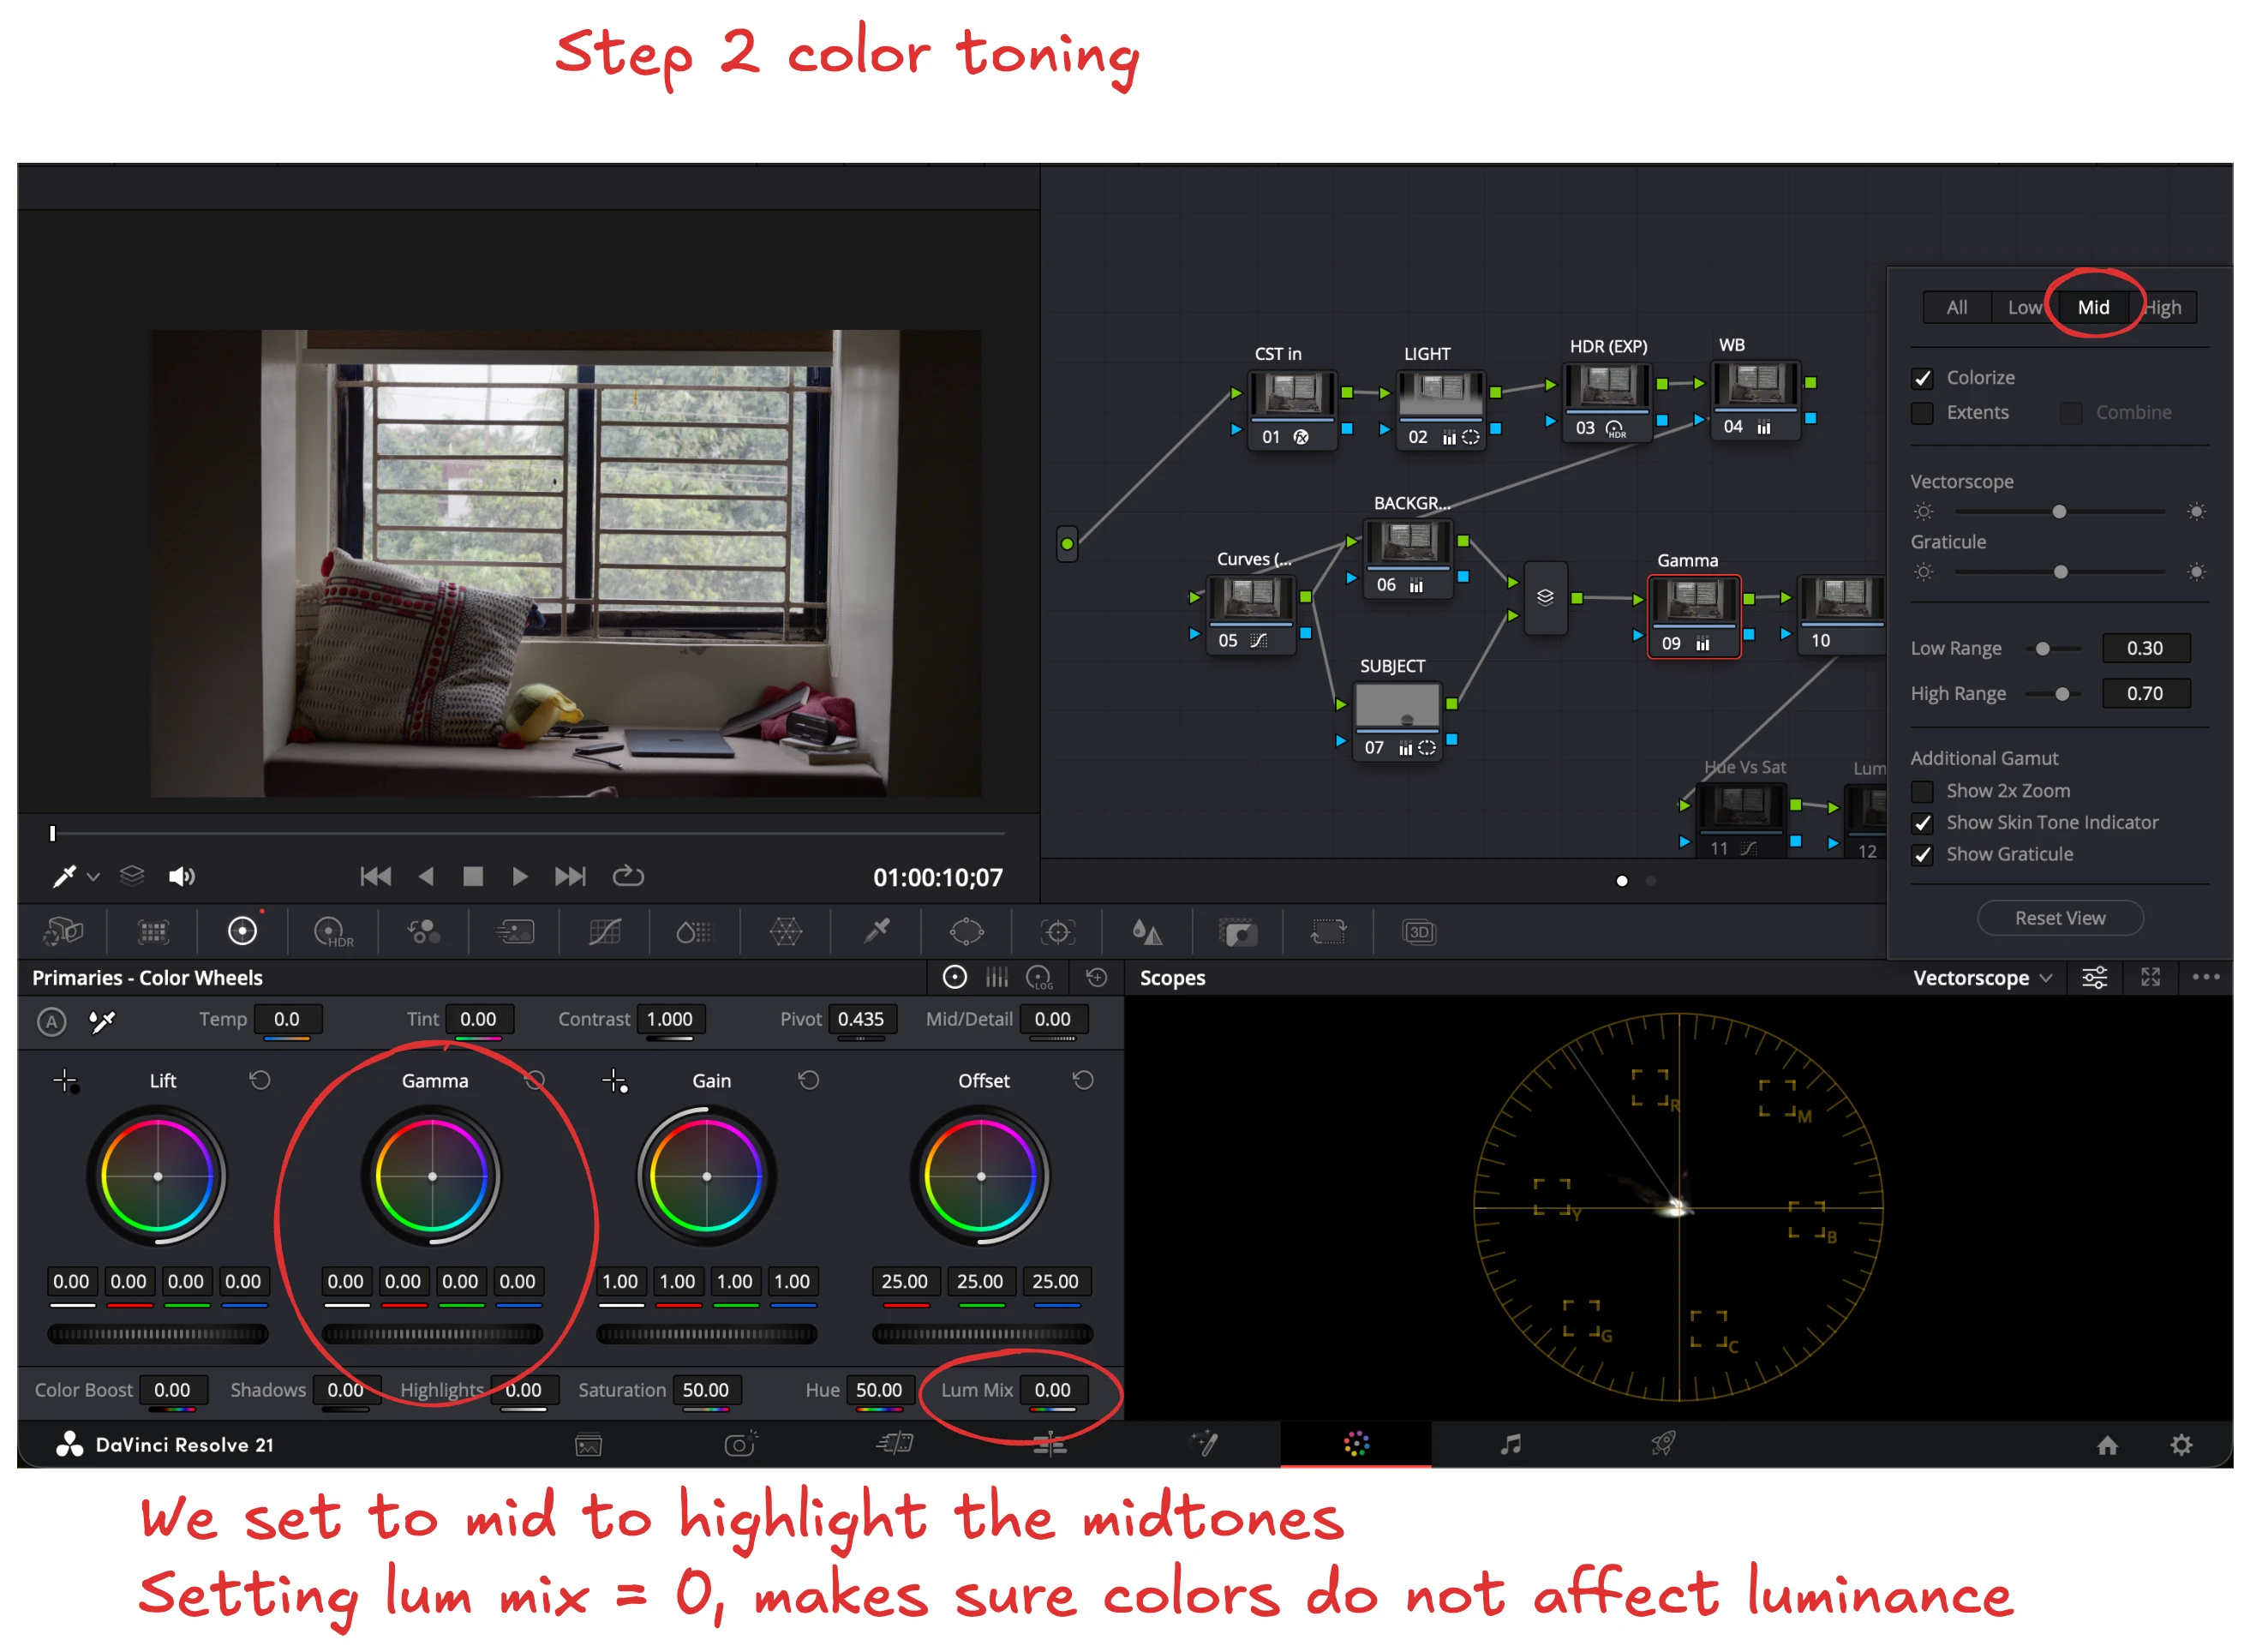
Let’s get into color toning/grading now, the idea is to focus on one part of the color grading process at a time. We first focus on gamma or the midtones, as they occupy the majority of the video.
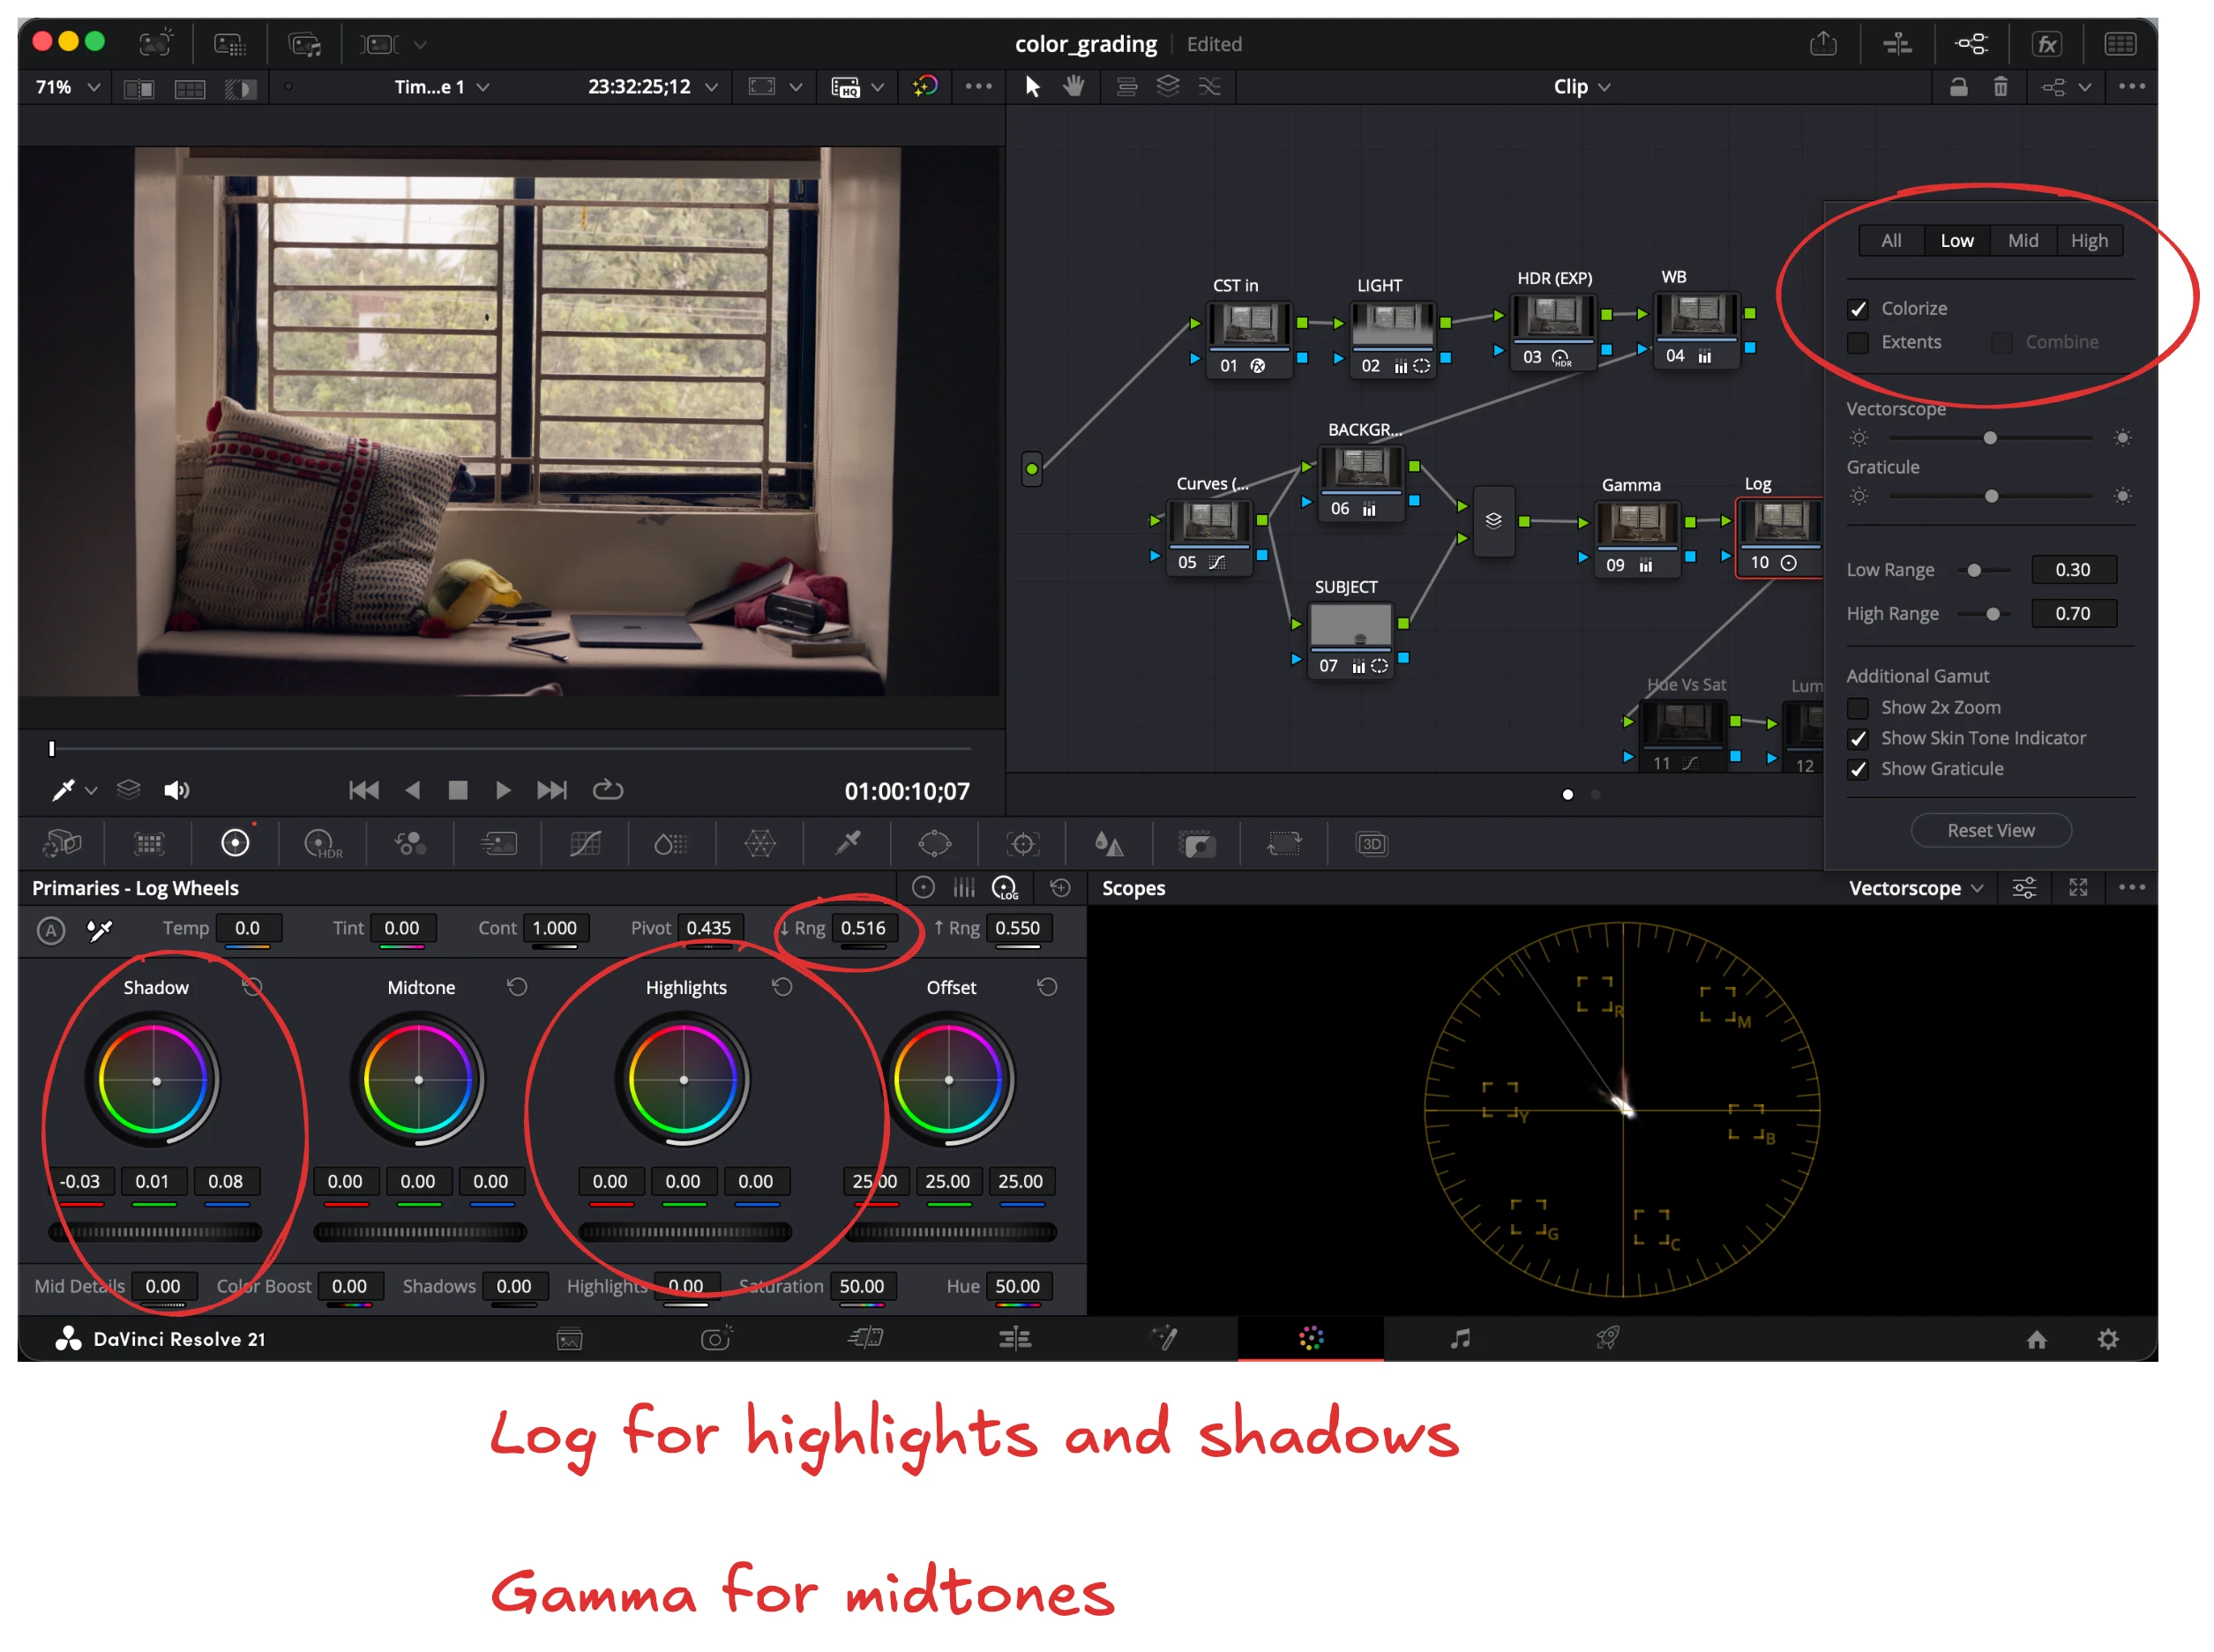
Then we edit the higlights and the shadows.
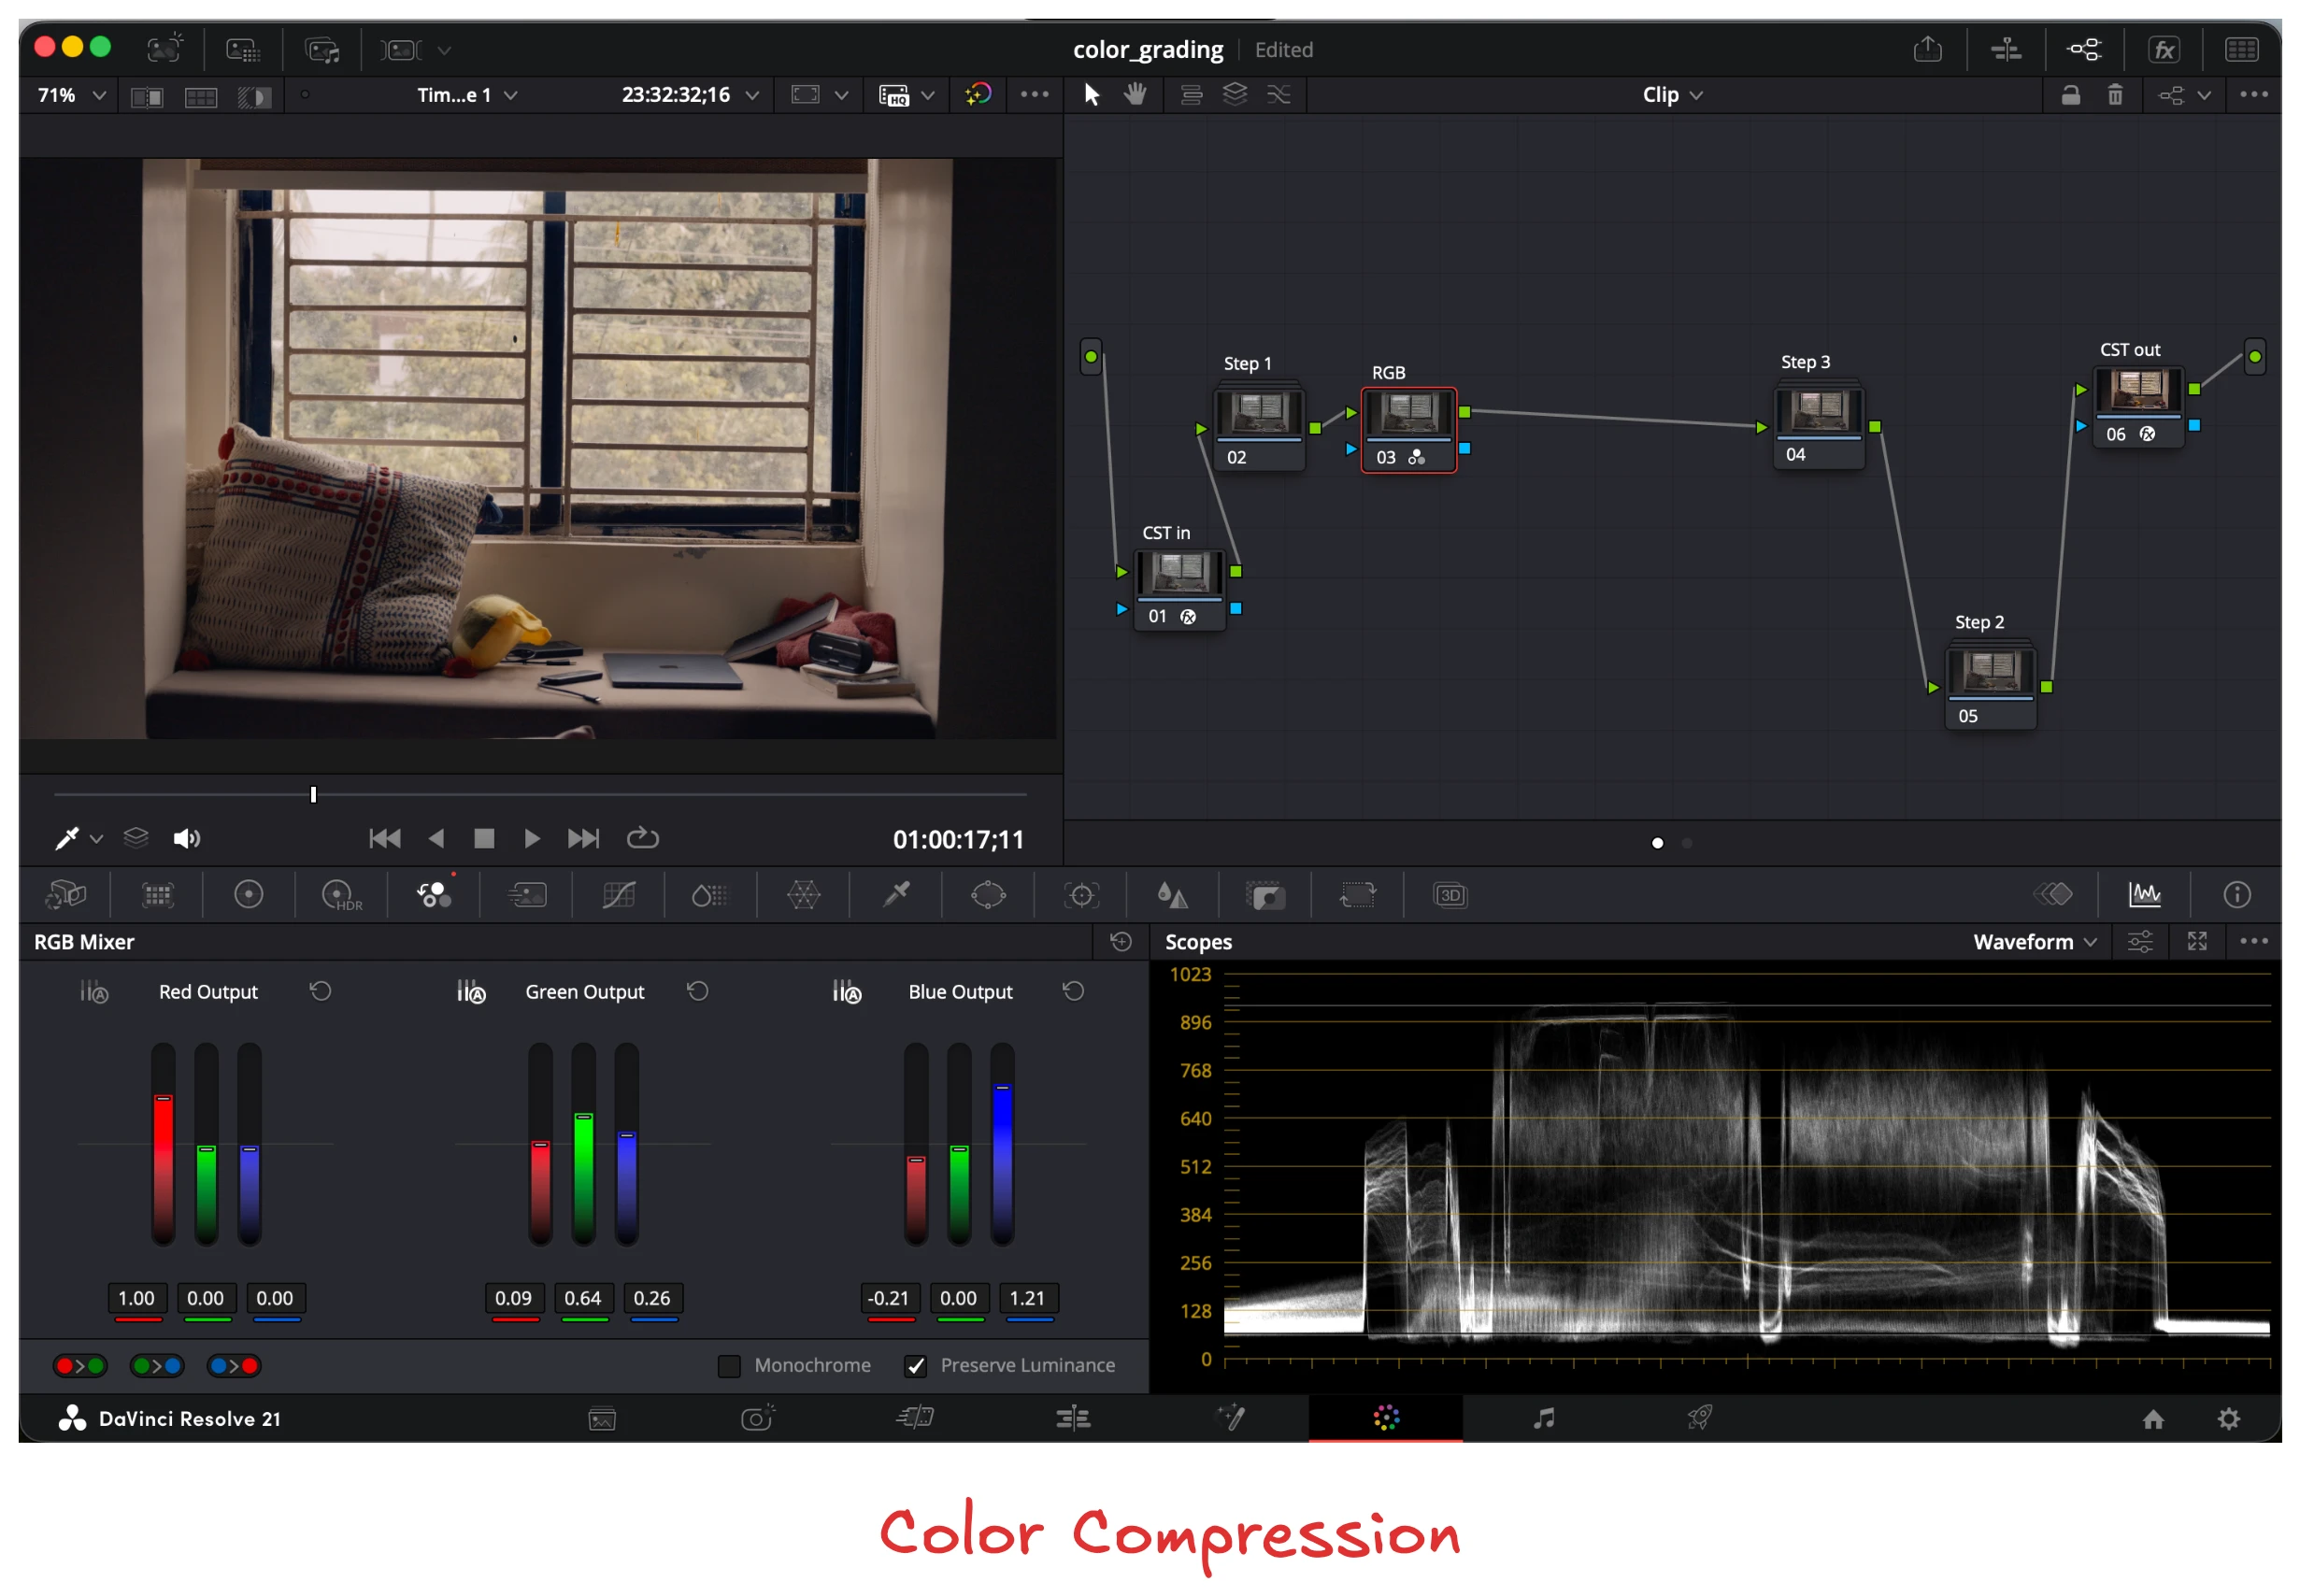
The final step is color compression and mixing, Here you can change the way each individual pixel looks like. I still do not personally completely understand why this is done. But it does add a nice look to the final output.
And there you have it, a complete guide to color grading for each and all levels. This is the extent of my knowledge. Now let us move forward.
CST (Color Space Transform Node)
As a rule of thumb, you want to apply your creative nodes (glow, halation, dust, grain etc) after CST and color grading nodes (WB, EXP, Look) before it.
This is just a good rule of thumb and people break it all the time, including me in this blog!
Sometimes you might see some light moving/twisting weird after CST, this is called artifacts, you can usually fix it by changing the gamut mapping to saturation compression. (It is in the CST settings)
Tips
- Group similar clips in color page, and switch between them in the top
- Use adjustment layer for color grading
- Name your nodes
On Fonts
Font in use https://fontsinuse.com/
https://fonts.google.com/
https://fontshare.com/
On Music
Music sets the mood, no music in my opinion is still much better than wrong music
On SFX
I believe their are only 4 funamental sound effects in content creation
- Score
- Whoosh
Whoosh for zoom in zoom out Riser to build up tension and then payoff clicks for any mechnical object UI pop up when you show something on screen Score for enviorment mood setting
On VFX
This is something I am still actively working on but I believe there are a few popular ones that I love
- Background
- Texture
- Text Animations
- 3d camera
The fundamental knowledge is
- keyframes
- curves
Text Animation
I saw this amazing video
The important key bindings
Ctrl + alt + shift + t -> add text layer S -> Scale P -> Position R -> Rotation A -> Anchor Point T -> Opacity/Transperency U -> show/ Hide all keyframes Ctrl + F -> opens the find dialog box Ctrl + D -> Duplicate Layer Spacebar -> Play/Preview the composition Ctrl + Z -> Undo f9 -> ease ease
On 3D
On Storytelling
All the above are a means to an end, just clogs in a machine. The machine; is the story. So you have to understnad how each part works, to make the story correct and beautiful. So it is very important to understand “THE COG COMPLEMENTS THE STORY” Do not let any part of the means take over the story, the story is the hero. Now for most beginners (including me!) storytelling just doesnt come naturally. But I believe as an engineer that everything is a science and it can be broken down into individual simple components.
Let me provide you the different steps to tell a good story
Storyboarding
Types of story
Three Act Structure
Freytag’s Pyramid
The Hero’s Journey
Structures of a story
Now the above methods work great for a long form of video, they specifically go into the content section of this part. But we can still divide it essentially into 3 parts.
hook
This is one of the most important part of the video. It comprises about 5% but makes up for 50%. So pay attention.
The hook as the name says hooks the user to the content, their are multiple differnt
Video Hook
This is the most common kind of hook, here are some examples of it…
{}
Audio Hook
Rare, but still amazing. Done best with music, some examples
{}
Thumbnail
YouTube will benefit the most from this knowledge, I can do a big deep dive on how to make the best thumbnail out there which may perform well. (it is always a probablitsitc model)
But I will not, instead feel free to watch this video which does a much better job…
Content
Now finding content, this is one of THE QUESTION of social media. I’ll say it is mostly irrelevant for a beginner. Because initially noone cares about what you put out because you are essentially a nobody.
So here is some advice to find your content
-
Make or post what you wish existed in the world. For instance,I love to read articles and blogs. And I really wished someone would post interesting things they were reading, so that is what I started doing on X. surprise surprise, a lot of people wished for that too!
-
Do what you would have done anyhoo, it’s much easier to do something you like than to do something you think others will like.
-
Be you, that is your biggest moat. There is no competing with the real you, because you are like noone, and noone is like you!
CTA
CTA stands for the call to action. They can be multiple things
- Links to your courses/products/affiliates
- Engagement
- Other social media
I used to think having a CTA was like selling snake oil, but a fabulous friend of mine changed my opinion on it. The example was something along the lines “If steve jobs started a design academy and charged 100 dollars for it, will you not pay for it” (Obviously steve jobs wouldnt need movie and he most likely will not do it for that much too, the idea was that if person X who is the one of the best in Y, it is completely reasonable for him to charge for the years of work he has put in his field. You pay for the years of time & experience, not the course itself.)
Also another thought that I liked was that in courses, it’s rarely the material that you are charged for. But the structure, because we live in a day and age where you have access to all kinds of information. The hard thing is to know the right kind of information for you!
The reasoning can be extended to everything, but what I am trying to say is… be a good person, use this knowledge to make the world a better place.
Tips
We can rave about these for days, but there are so many ways to mess one’s story and so few ways to get it correct
- Filter (Human personality) (Speak through a mental filter)
- Voice (personal touch)
- But, therefore not and, then (South park creators)
On Secrets
- Do what you like to do, delegate the rest when you can
- HIRE AN EDITOR
- Use shortcuts
- Have structure
- LUTs
- Cut on the beat
- Understand curves, like seriously.
Comments